

5 Ways to Add a Vertex in 3DS Max
3D modeling software packages come with a dizzying number of tools to help create just about any type of geometry. These tools can create spheres, particle systems, procedural objects, and even animate objects! No matter how powerful these types of tools are, almost every project requires the manual editing of 3D models. Knowing how to add a vertex in 3DS Max can help avoid starting from scratch and even make adding complexity much easier. Below are five different methods to add vertexes—each of which has pros and cons.
Method 1: Insert Vertex Tool
Click to Enlarge
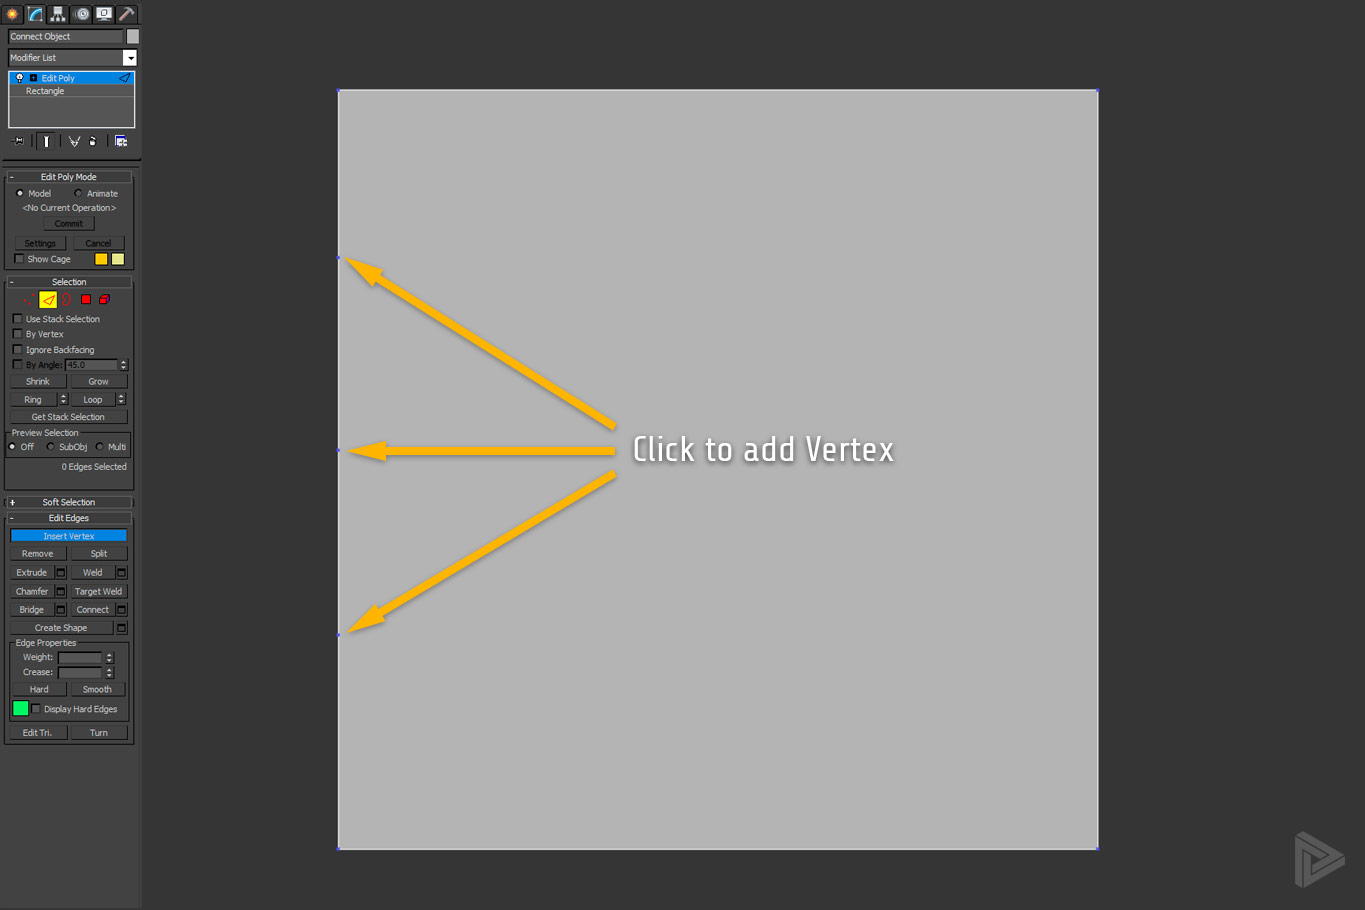
This method to add a vertex is, arguably, the simplest method. Firstly, ensure that your model has an Editable Poly modifier added, or is already an Editable Poly object. Next, click the edge mode icon or press 2 on your keyboard to enable that mode. This will activate the Edit Edges tool panel exposing the Insert Vertex button—press it.
Next, simply click anywhere on an edge that you wish to add a vertex. That’s it.
Pros: Easy, doesn’t add polygons to object, free-form creation.
Cons: Can break edge loops, create rat’s nests, and requires manual positioning for each vertex.
Method 2: Connect Tool

Click to Enlarge
This method to add an extra vertex in 3DS Max is, arguably, the most efficient in terms of preserving the editability of your 3D model. The first step is to ensure you have an Edit Poly modifier applied to your model. This allows access to the Connect tool which is used by this method.
Next, with the edge mode option clicked, select the edge you want to add a vertex to, or multiple vertices, and select an edge opposite that edge (step 1 in the above image.) This second part is crucial. The connect tool doesn’t work with only a single edge selected. If you don’t select a second edge you can’t use this method.
Next, click the connect button under the Edit Vertices section of the Edit Poly tools menu (step 2 in the above image.) This will cause a popup dialog box to appear, in which you can specify the number of segments you want to create between the two selected edges (step 3 in the above image.)
This process results in the creation of new edge segments connecting the two edges that you selected in step 1.
Pros: Easy + preserves edge looping in most cases
Cons: Creates additional polygons
Method 3: Quick Slice

Click to enlarge
This method of adding a vertex is the first step into “probably not the best approach” territory. 3D Studio Max’s quickslice tool allows for an easy “cut” across Editable Poly objects. This is very similar to the end result of the connect tool but requires a bit more manual work. Firstly, ensure your object’s topmost modifier is an Editable Poly the either click the edge mode icon or press 2 on your keyboard to enable that mode.
Next, click anywhere on the screen (doesn’t have to be an edge, and no edges have to be selected) to create the first point of your slice line.
Next, by moving your cursor, adjust the path that the quick slice tool will add a new edge segment across your model’s surface. This will create a new edge on your object that will forcibly cross any other edges it encounters, creating an additional vertex at their intersection. This tool works in 3D space and will slice your model to pieces if you’re not careful.
Pros: Quick and easy, free-form
Cons: Can create multiple unwanted vertexes, will slice across multiple faces of 3D objects
Method 4: Slice Plane
Click to Enlarge
This method to add a vertex is very similar to the quick slice method but offers more control by using the Slice Place toll available to Editable Poly objects. First, ensure your object’s topmost modifier is an Editable Poly, then click the edge mode icon or press 2 on your keyboard.
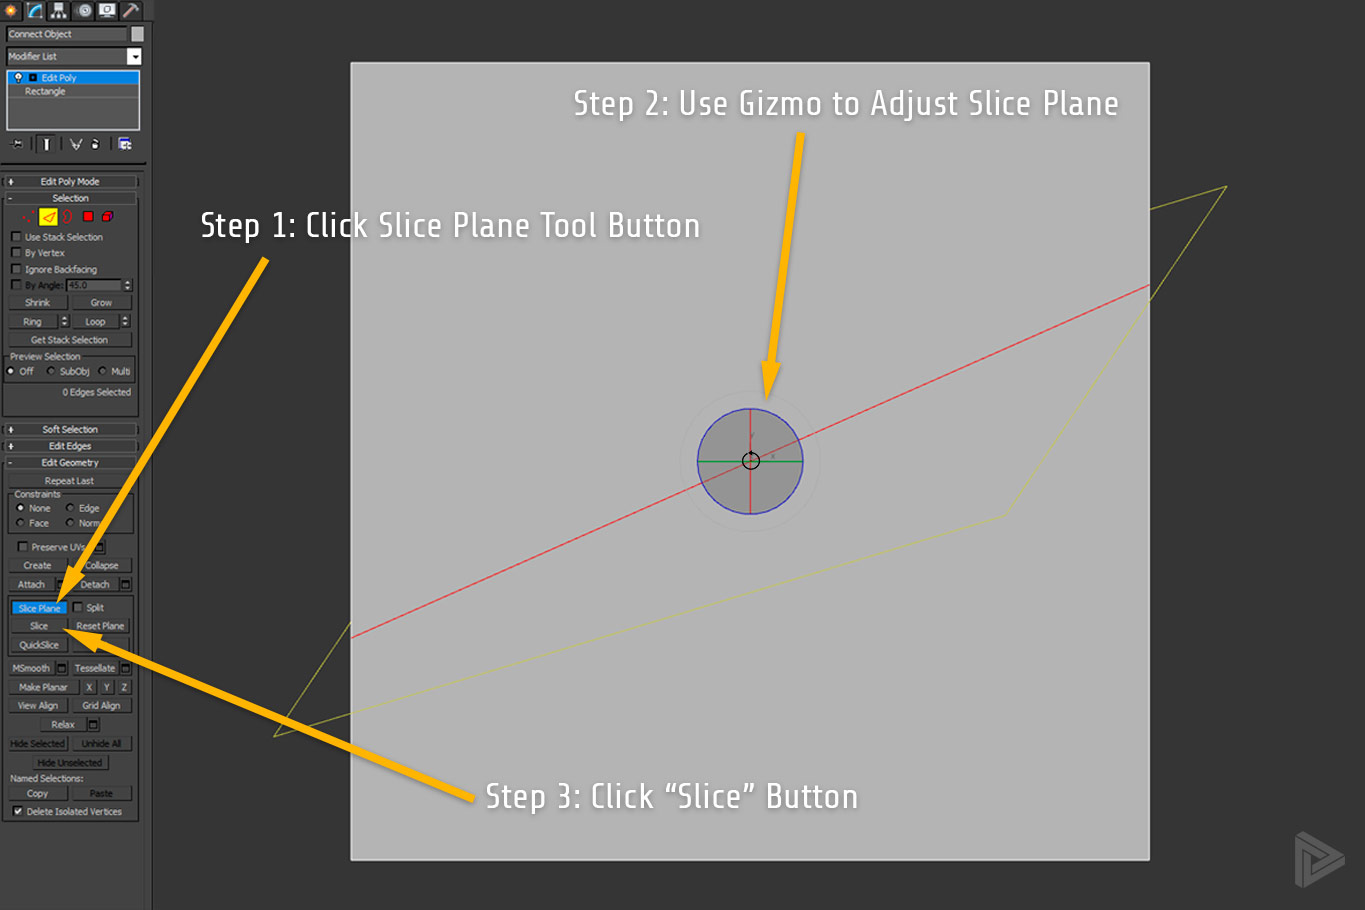
Next, click the Slice Plane button under the Edit Geometry tool section. This will activate the tool and you will see a yellow bounding box and gizmo icon appear on your screen, centered about your model.
Next, using 3DS Max’s standard transform tools (Move, Rotate, Scale) adjust the gizmo to position the slicing plane wherever you want vertices to appear. There will be a red line drawn across your model (a selected edge indicator) that will show you where the new edge will be created.
Next, press the Slice button in the Edit Geometry tool panel (right below the Slice Plane button) to actually create the new edge. A vertex will be added to your model at every location that your newly-created edge intersects an existing edge.
Pros: Can create multiple vertices at one, can preserve edge loops, more control than quickslice method.
Cons: Always creates multiple vertices, always slices all 3 dimensions.
Method 5: Tesselate Tool
Click to enlarge
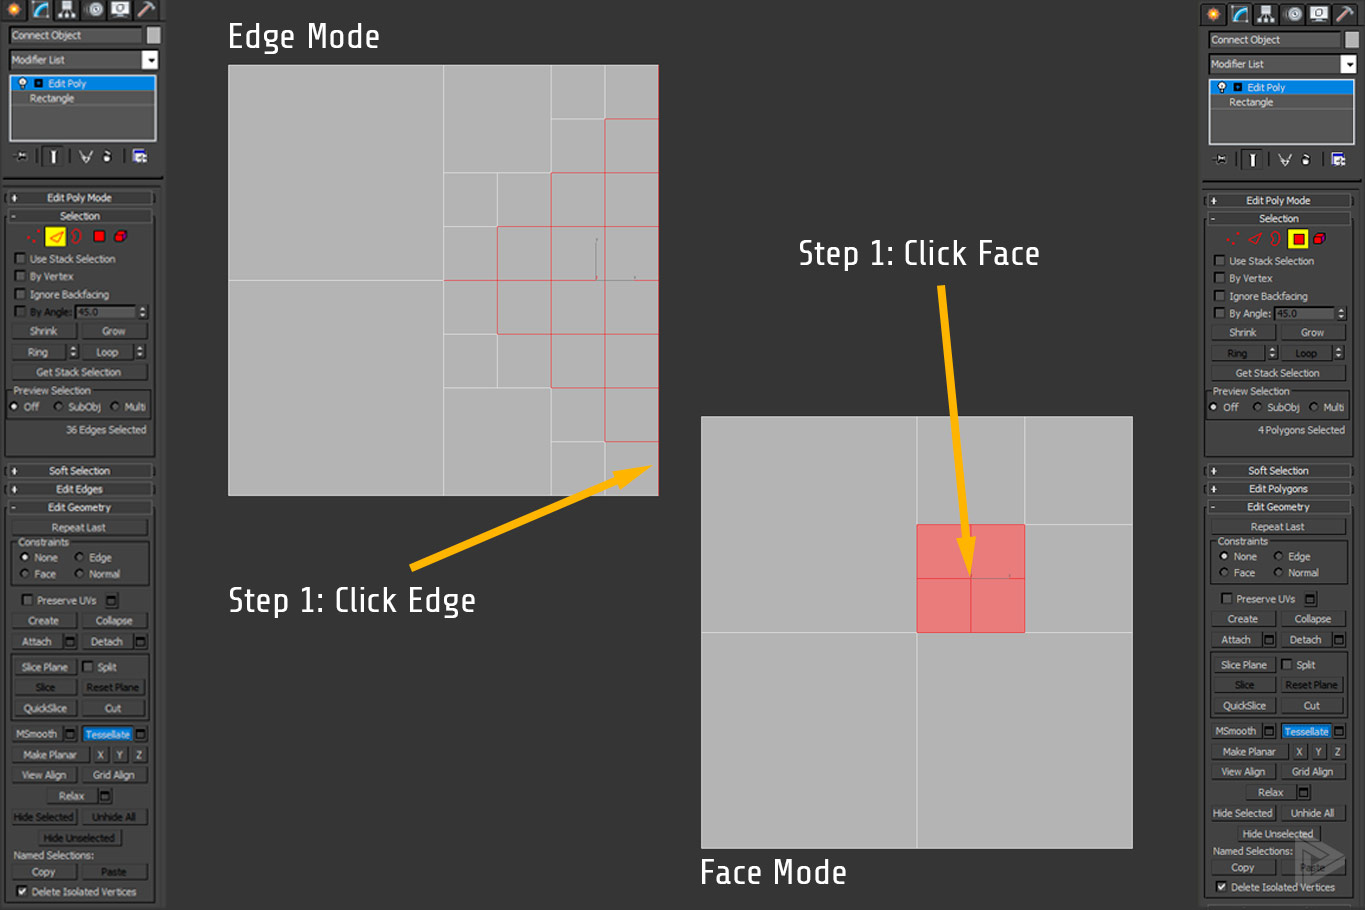
This method is another in the “probably not the best approach” category that uses the Editable Poly modifier’s Tesselate tool. This tool can be used in edge mode or face mode and has several adjustable parameters, such as edge tension, that can produce different types of outcomes. Firstly, ensure you’re working on an Editable Poly object, then enter either edge mode or face sub-object modes.
Next, regardless of which sub-object mode you’re in, you want to make a selection for the tesselate tool to target. If you’re in edge mode, you can select 1 or more edges. If you’re in face mode, you can select 1 or more faces.
Next, with your selection made, click the tesselate button under the Edit Geometry toolbar. This will apply one iteration of the tesselate’s effect on your object. Successive clicks will continue to apply the effect but might not produce desirable effects.
This method would be quicker than applying two connect edge methods to create a grid across a face but, in most other cases, isn’t a very efficient approach to adding vertexes in 3DS Max.
Pros: Can save a few steps sometimes
Cons: Produced isolated results, create a varying mesh density
Final Thoughts & Tips
Knowing how to add a vertex in 3D Studio Max can help create models more accurately and efficiently. This skill is great for cases where additional model detail is needed, isolated parts of 3D models need to be revised, or more complex geometries are required. There are plenty of ways to create vertices in 3DS Max, though many of them are simply results from other actions. One example would be using the Turbosmooth modifier. It will essentially double the number of vertices on your model—but creating vertices isn’t really it’s intended purpose.
Leveraging other functions of 3DS max in combination with these methods is also a tremendous help. For example, having midpoint snaps enabled while using the Add Vertex tool can help quickly add isolated vertices that are aligned with one another. Altering between Edge Mode and Polygon Mode in the options of the Tesselate tool also adds another useful dynamic. Each of the methods here can get the job done but some approaches, like quick slice and slice plane, may be more trouble than they’re worth!


