

How To Model a Seat Cushion in 3D Studio Max
One of the trickiest types of 3D models to create is one which features elements made of fabric. The texturing can be difficult, but creating realistic geometry for these elements can be tricky as well. For advanced fabrics such as curtains, clothing, or bedding there are dedicated solutions such as Marvelous Designer.For simpler cases such as basic chair seat cushions, it’s often easier to keep everything inside of 3D Studio Max rather than juggling multiple models back and forth.
Getting Started on the Seat Cushion
This tutorial will demonstrate how to quickly and effectively model a seat cushion in 3D Studio Max by using the Cloth modifier and subdivision modeling techniques. The only modifiers used in this process are the Edit Poly, Symmetry, Cloth, and Turbosmooth modifiers—all building on top of an initial Rectangle shape object. While preserving the modifier stack allows for easy regression into modifier history, it should be noted that the Cloth modifier will not accurately reflect changes made beneath it in the modifier stack. Changes to the model done by the Cloth modifier become baked in and the Cloth modifier must be removed to remove those effects.
Step 1: Create an Outline Shape Using Splines
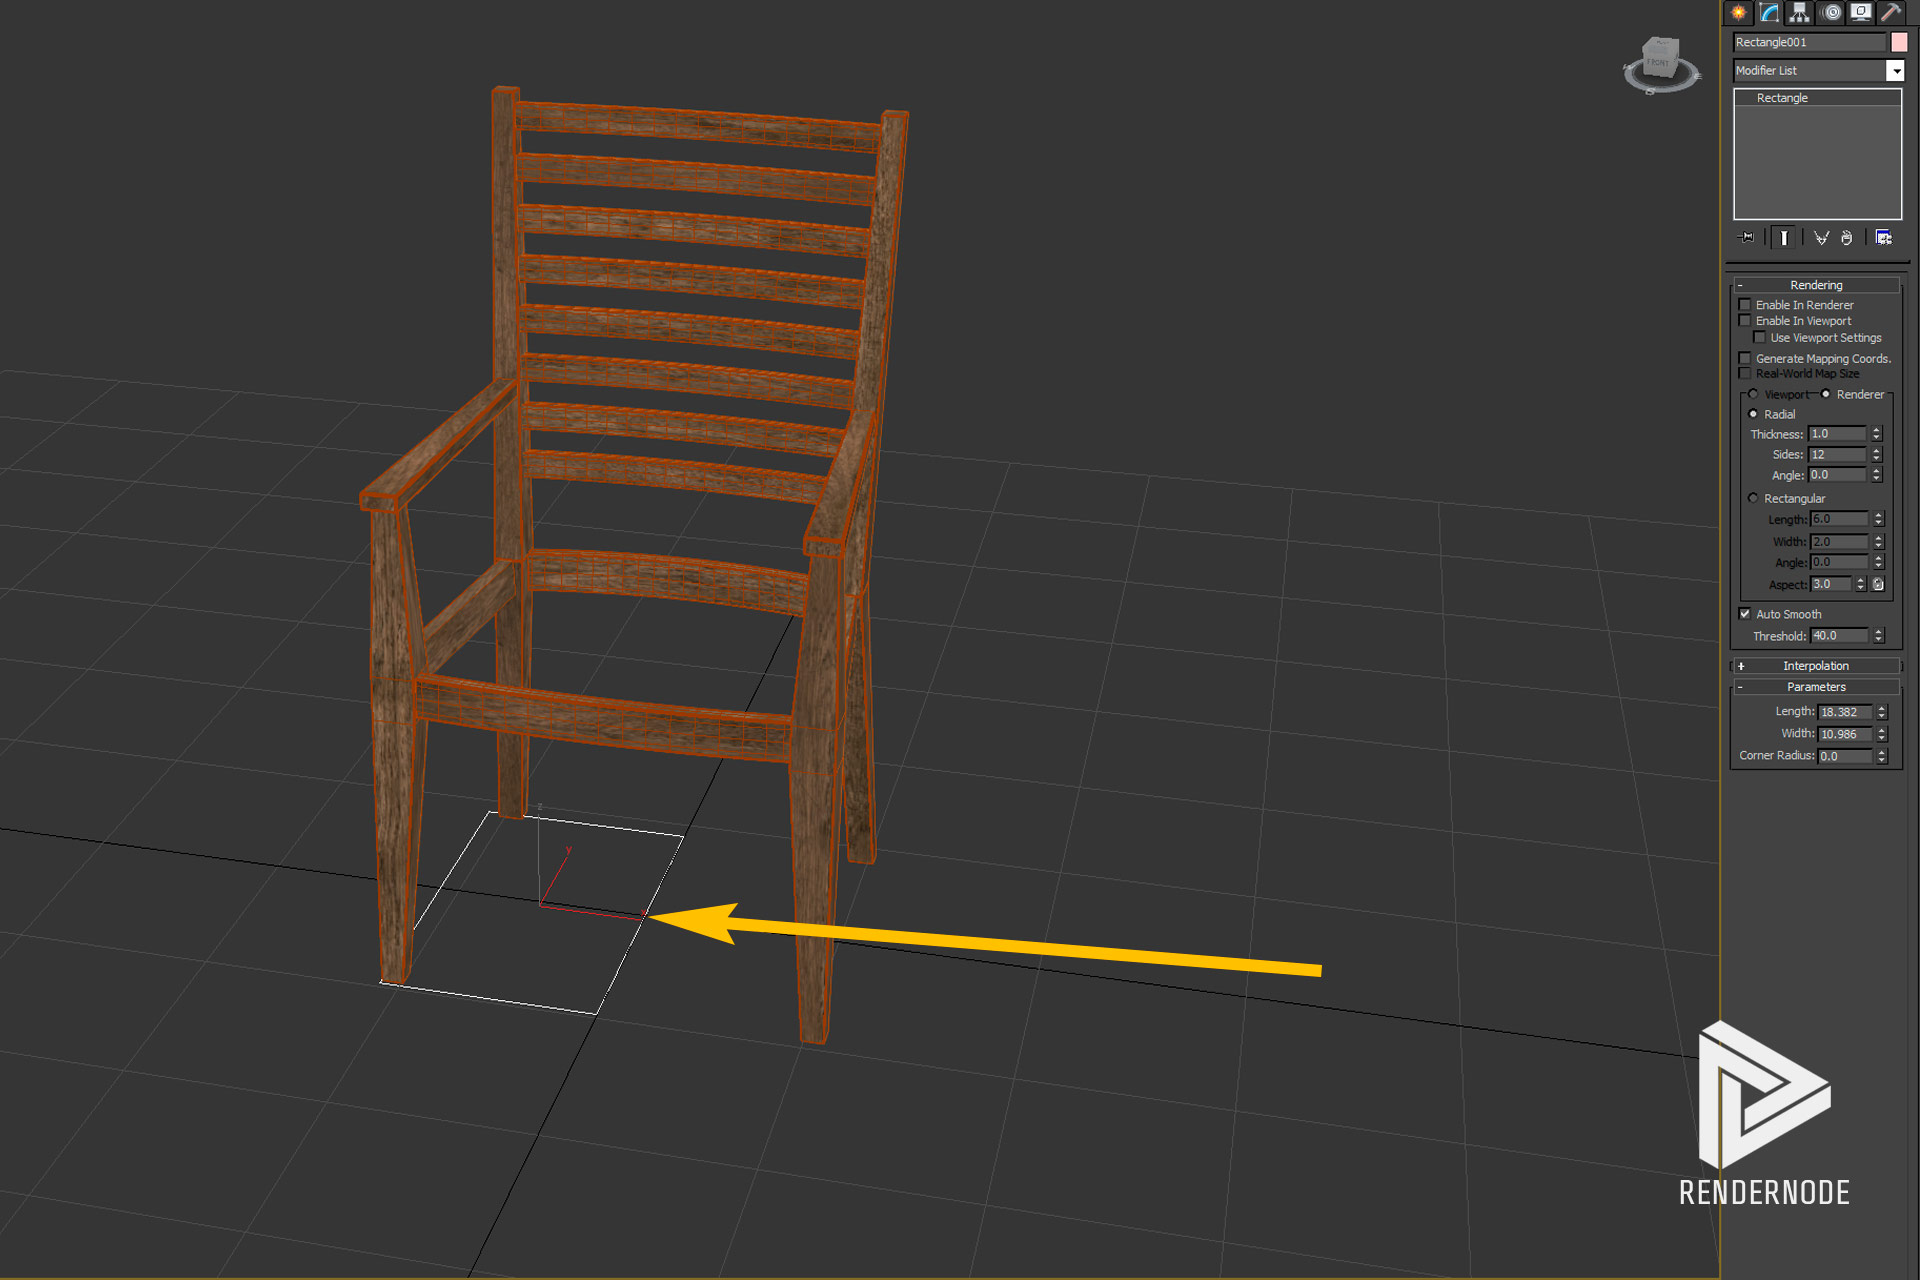
Create the initial seat cushion shape outline using the Line Tools.
The first step in creating a seat cushion or, arguably, any 3D model is to create a general outline of the shapes to be created. In this case, using the Shapes -> Splines -> Line tool create a general outline of the seat shape. In these initial steps, the shape is going to be cut in half in such a way that we can use the Symmetry modifier later. This can be done here during the initial creation of the shape or in Step 2.
Step 2: Create a Solid Planar Object of Shape
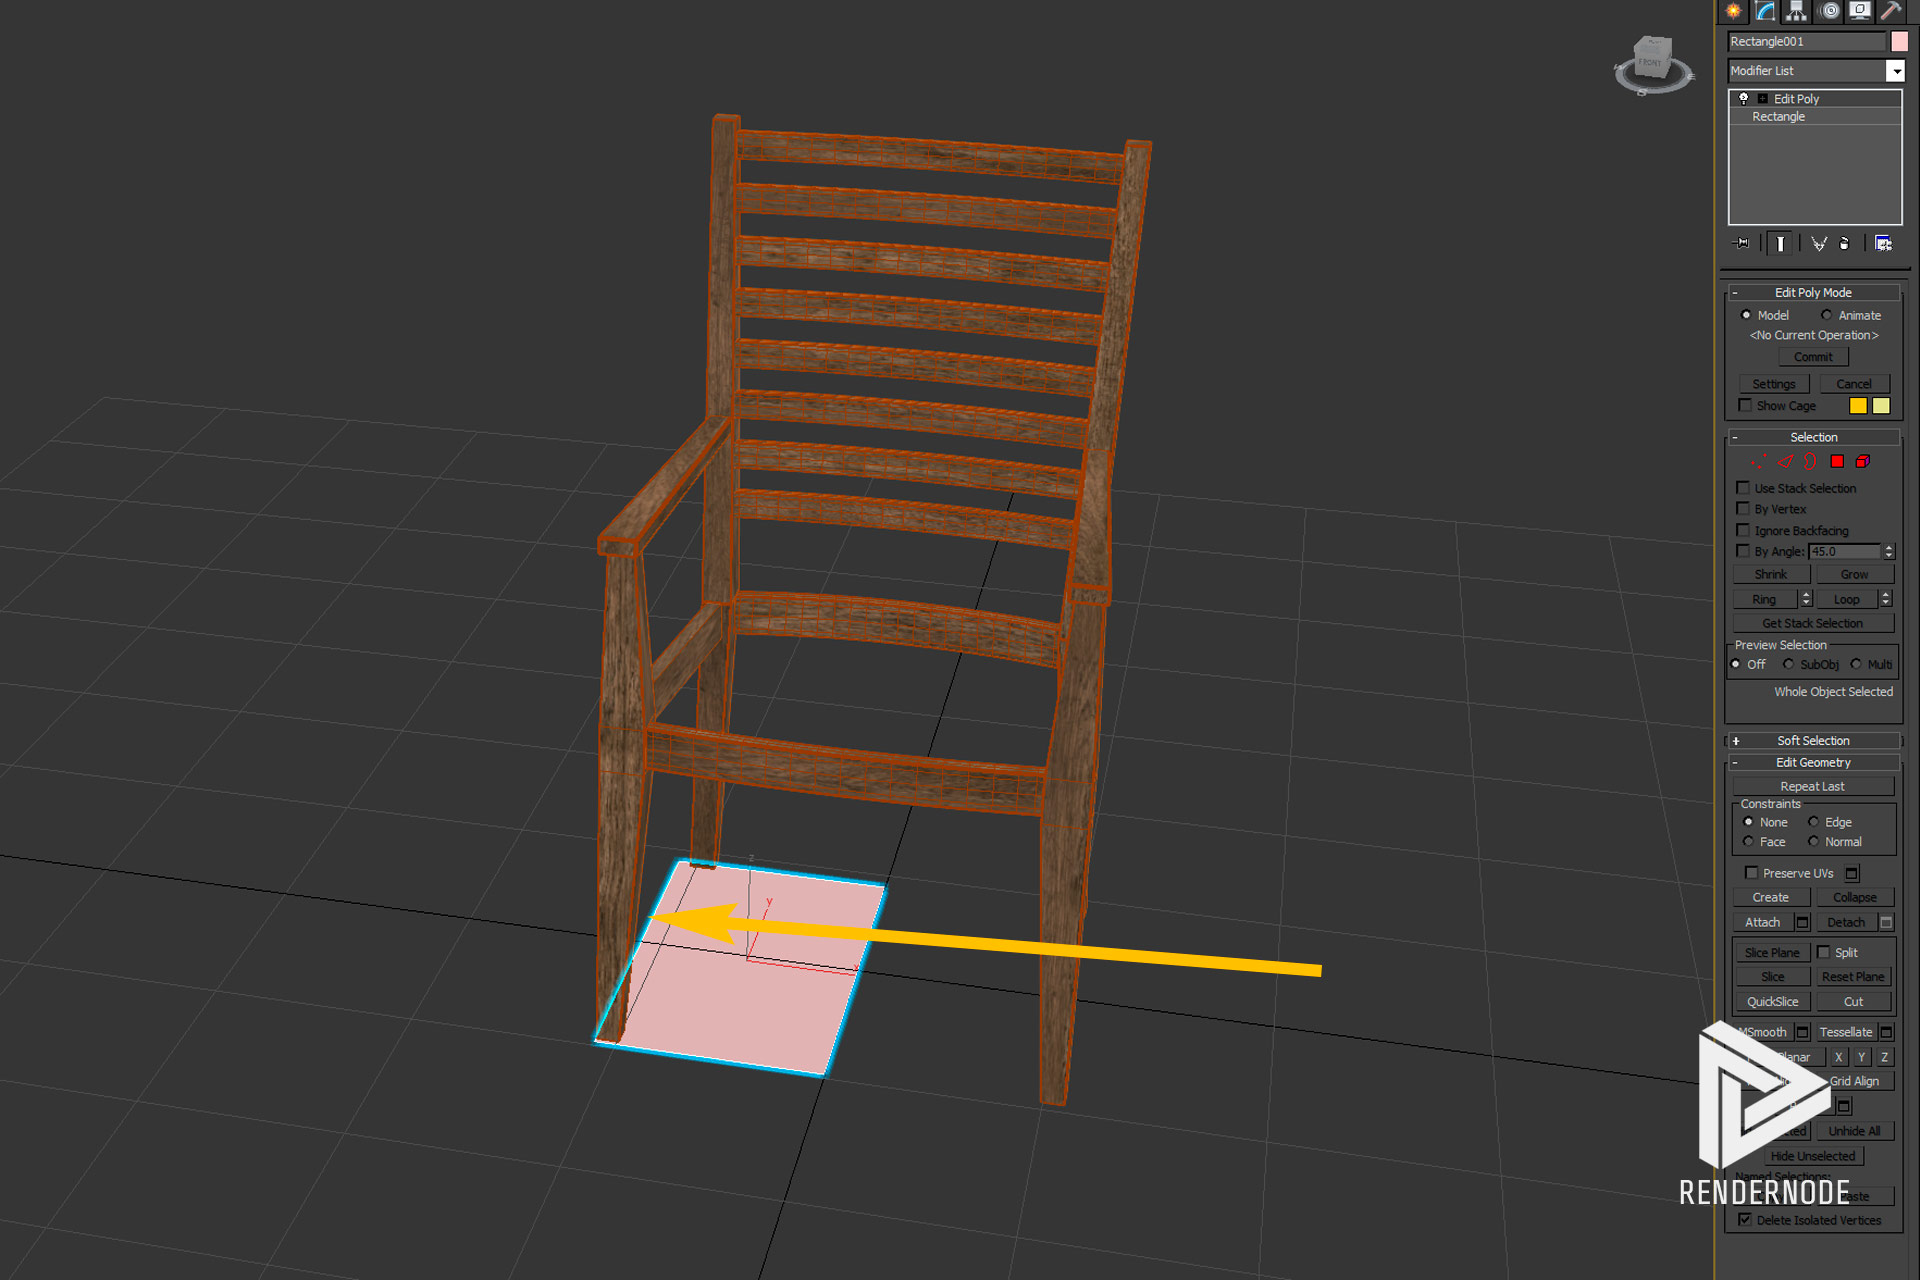
Add the Edit Poly modifier to create a solid planar surface representing the seat cushion shape.
Add an edit poly modifier to the spline and, using any method you’d prefer, delete one half of the object. This will be reconciled later by using the Symmetry modifier. Taking this approach allows for a faster workflow and only requires making half as many seat adjustments. Once the half seat object is created, locate the object to a position that will represent your seat cushion bottom moving forward (most likely the top of the chair frame’s side, front, and back rails.)
Step 3: Make Accommodations for Chair Legs, Other Limiting Objects
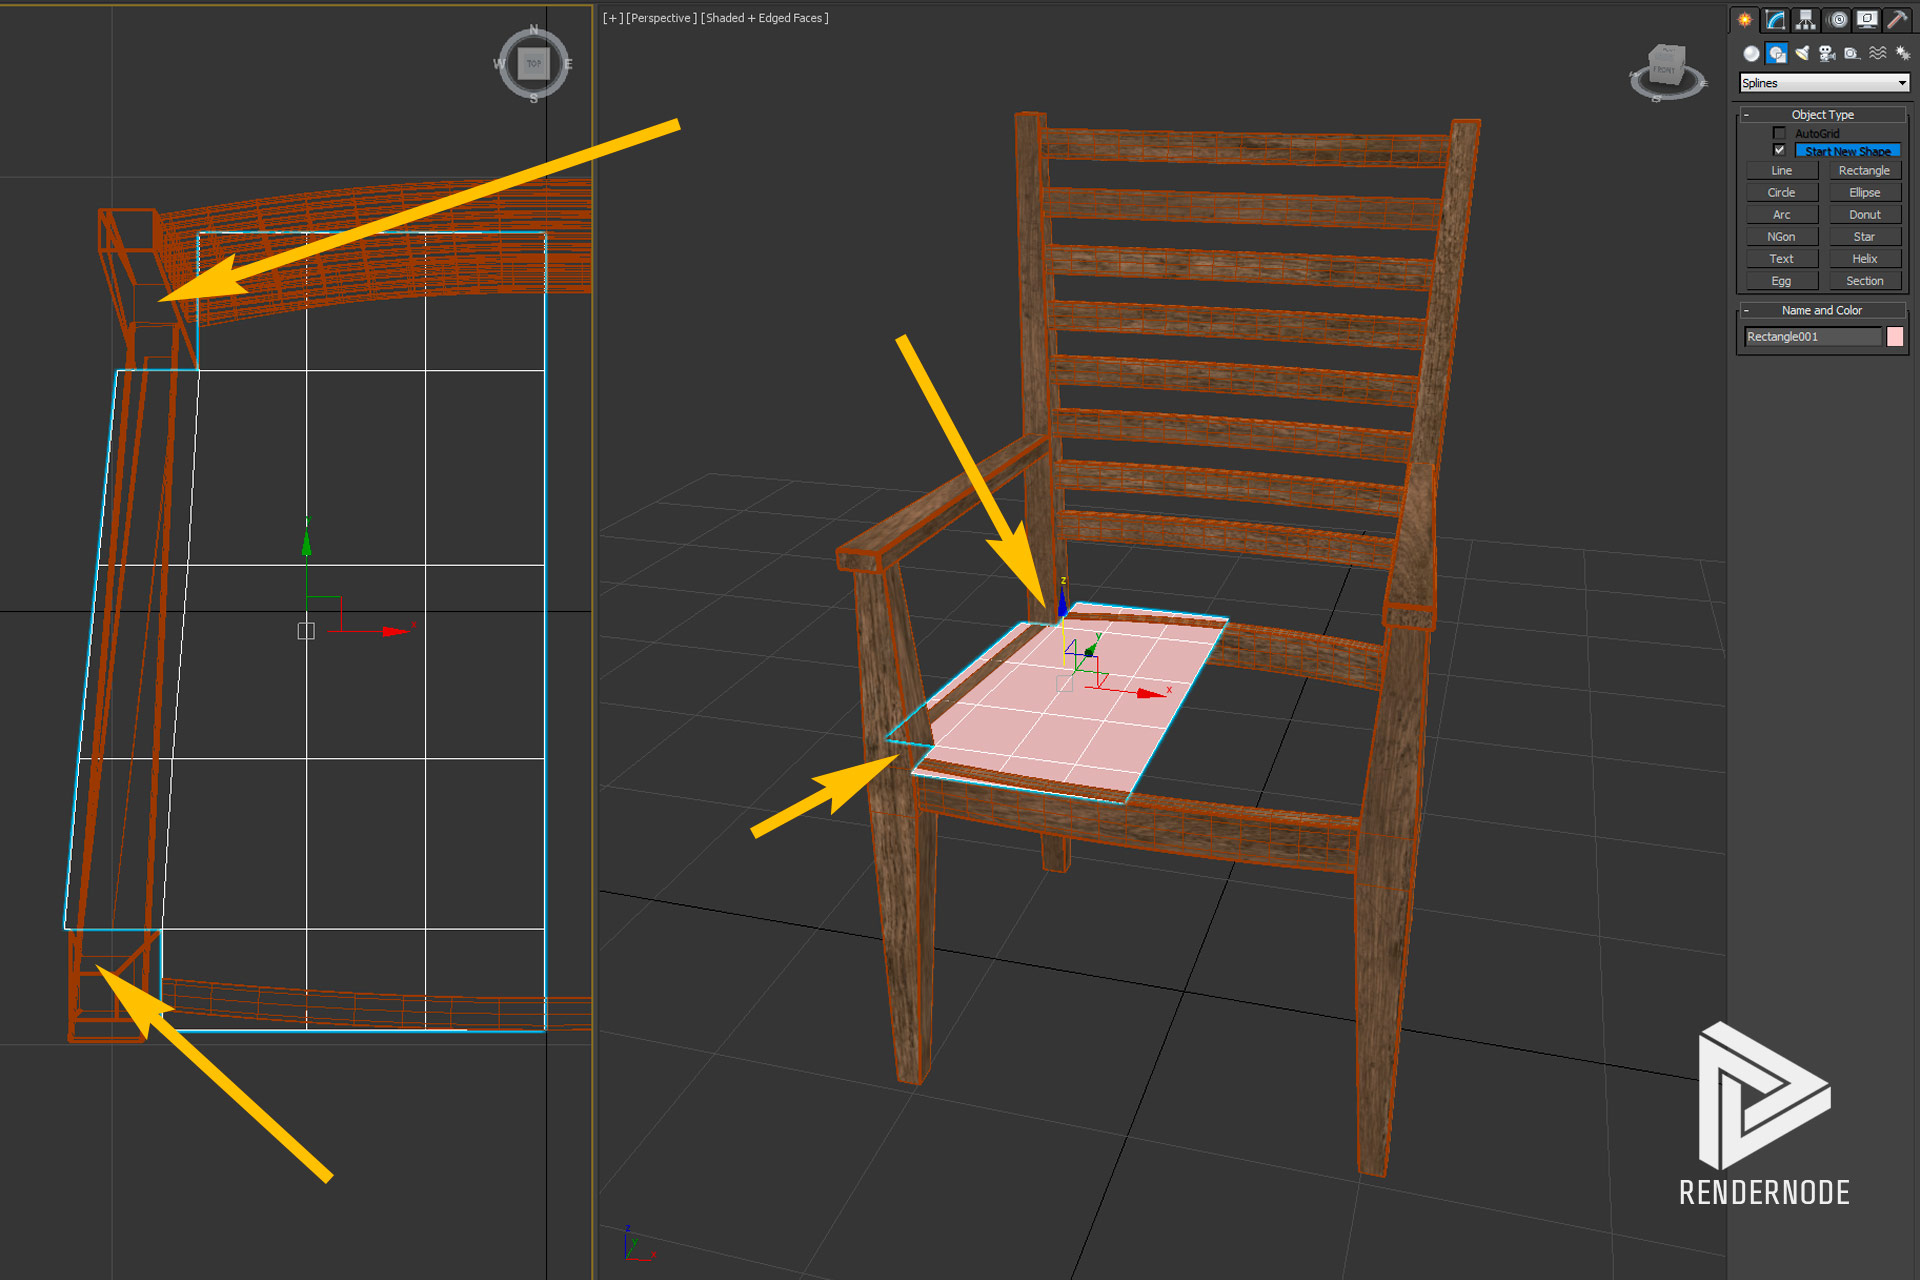
Cutouts are created by moving points and edges to align with the legs of the chair, then deleting the faces therein.
By selecting various polygon edges via the Edit Poly -> Edges sub-object selector tool, create new subdivision edge loops, when needed, to produce cutaway sections to make room for chair arms, legs, or any other obstructive forms. This step will depend on the shape of your chair and may not be required at all.
Step 4: Use Symmetry Modifier to Create Full Shape
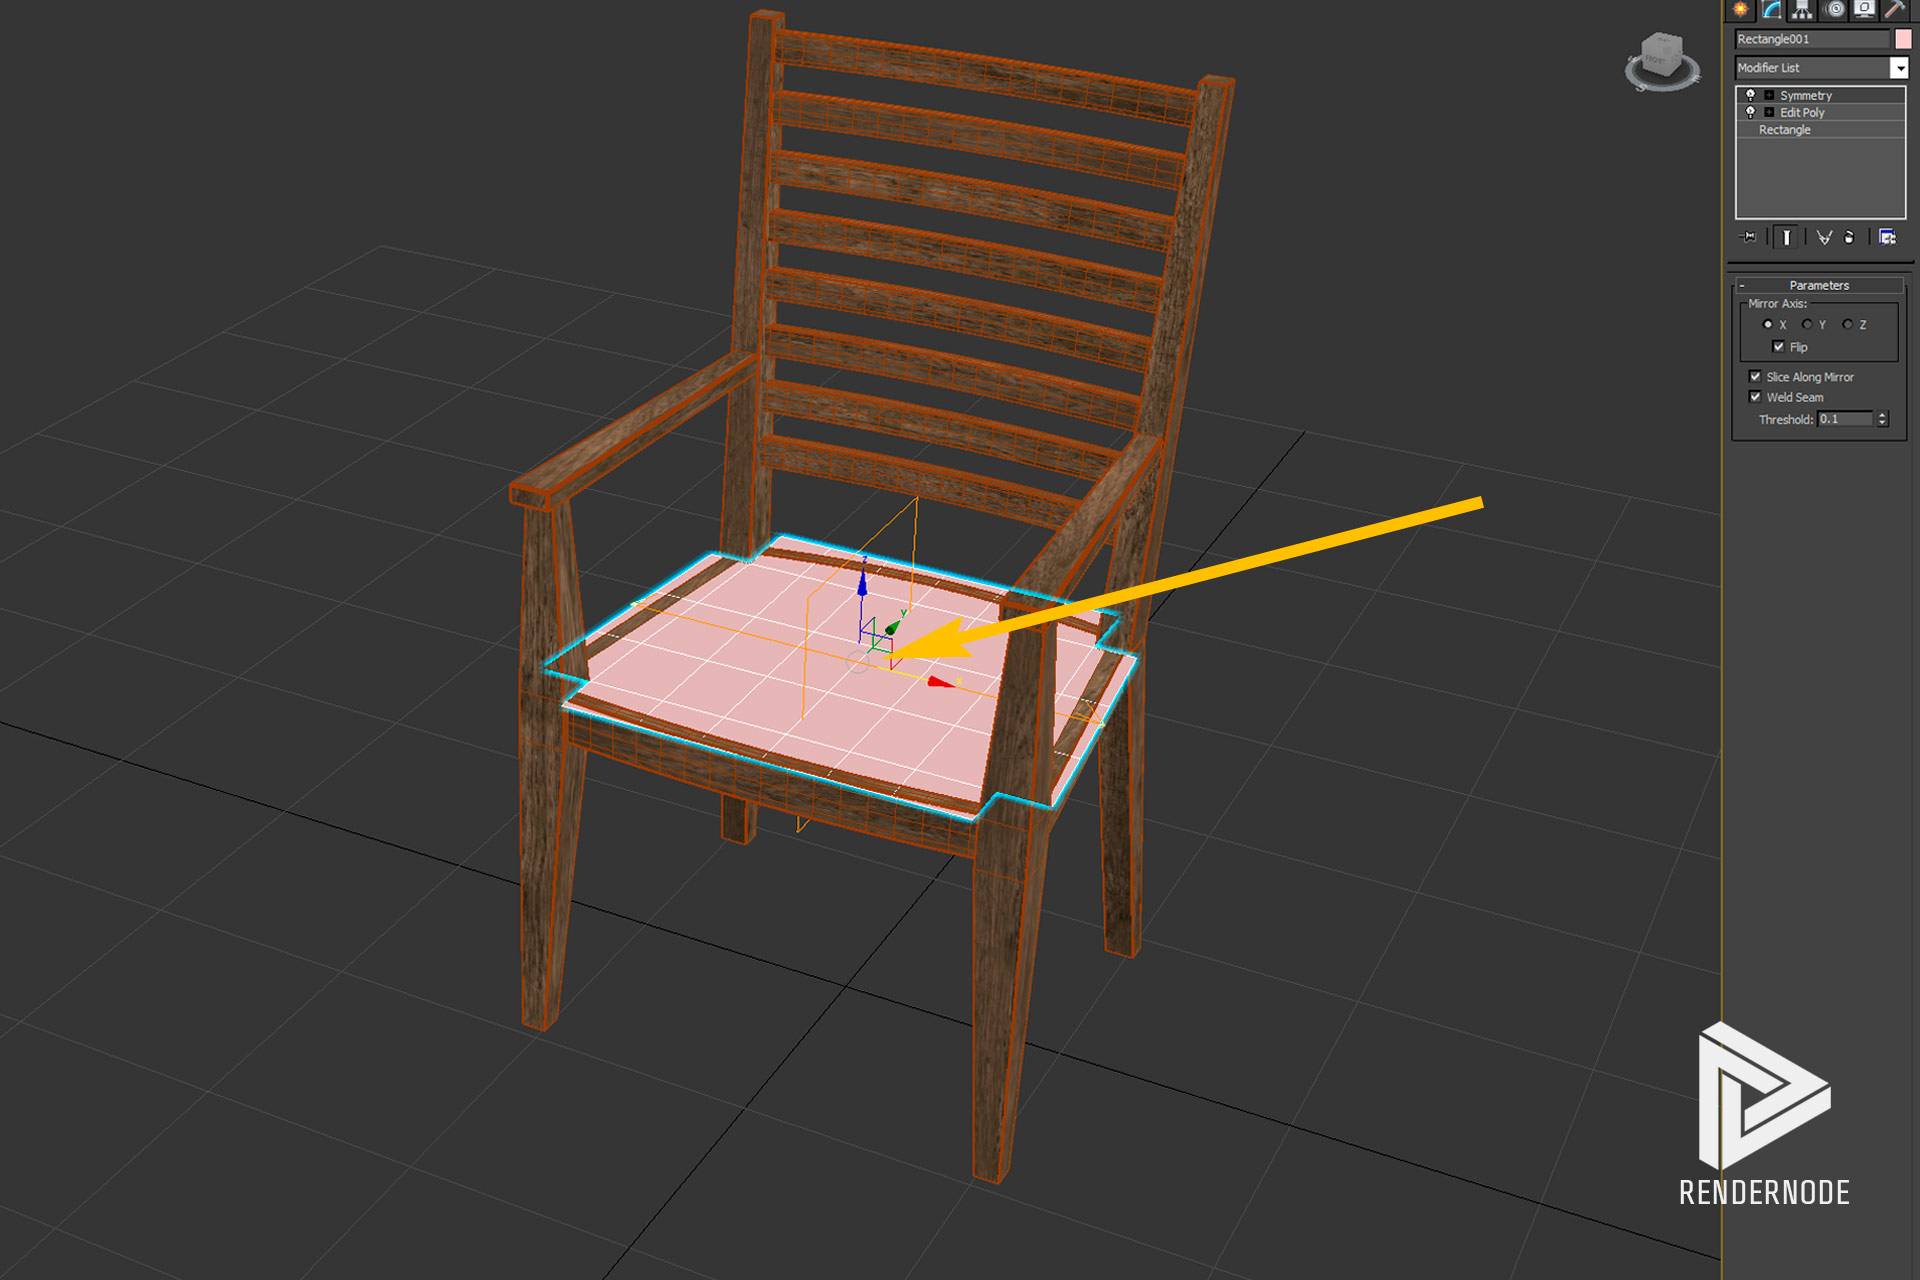
Locate the seat to final position and use the symmetry modifier to complete the shape creation process.
Using the Symmetry modifier, reflect the existing seat shape across the depthwise intersecting plane (likely the y-z plane) and toggle the “flip” parameter on/off depending on what you’re seeing in the viewport. At this point, you should see a flat planar object that is representative of your seat cushion bottom. Make sure you’ve set the control point to be aligned with the center of the object to ensure proper reflection while using the Symmetry modifier. One helpful approach is to select the centermost edge vertices of the seat cushion and align them, using axis constraints and snaps, to the center of the chair object. Note: the control point can be adjusted on a modifier-level within the Symmetry modifier which can avoid adjusting the entire object’s control point location.
Step 5: Use Shell Modifier to Create Seat Thickness
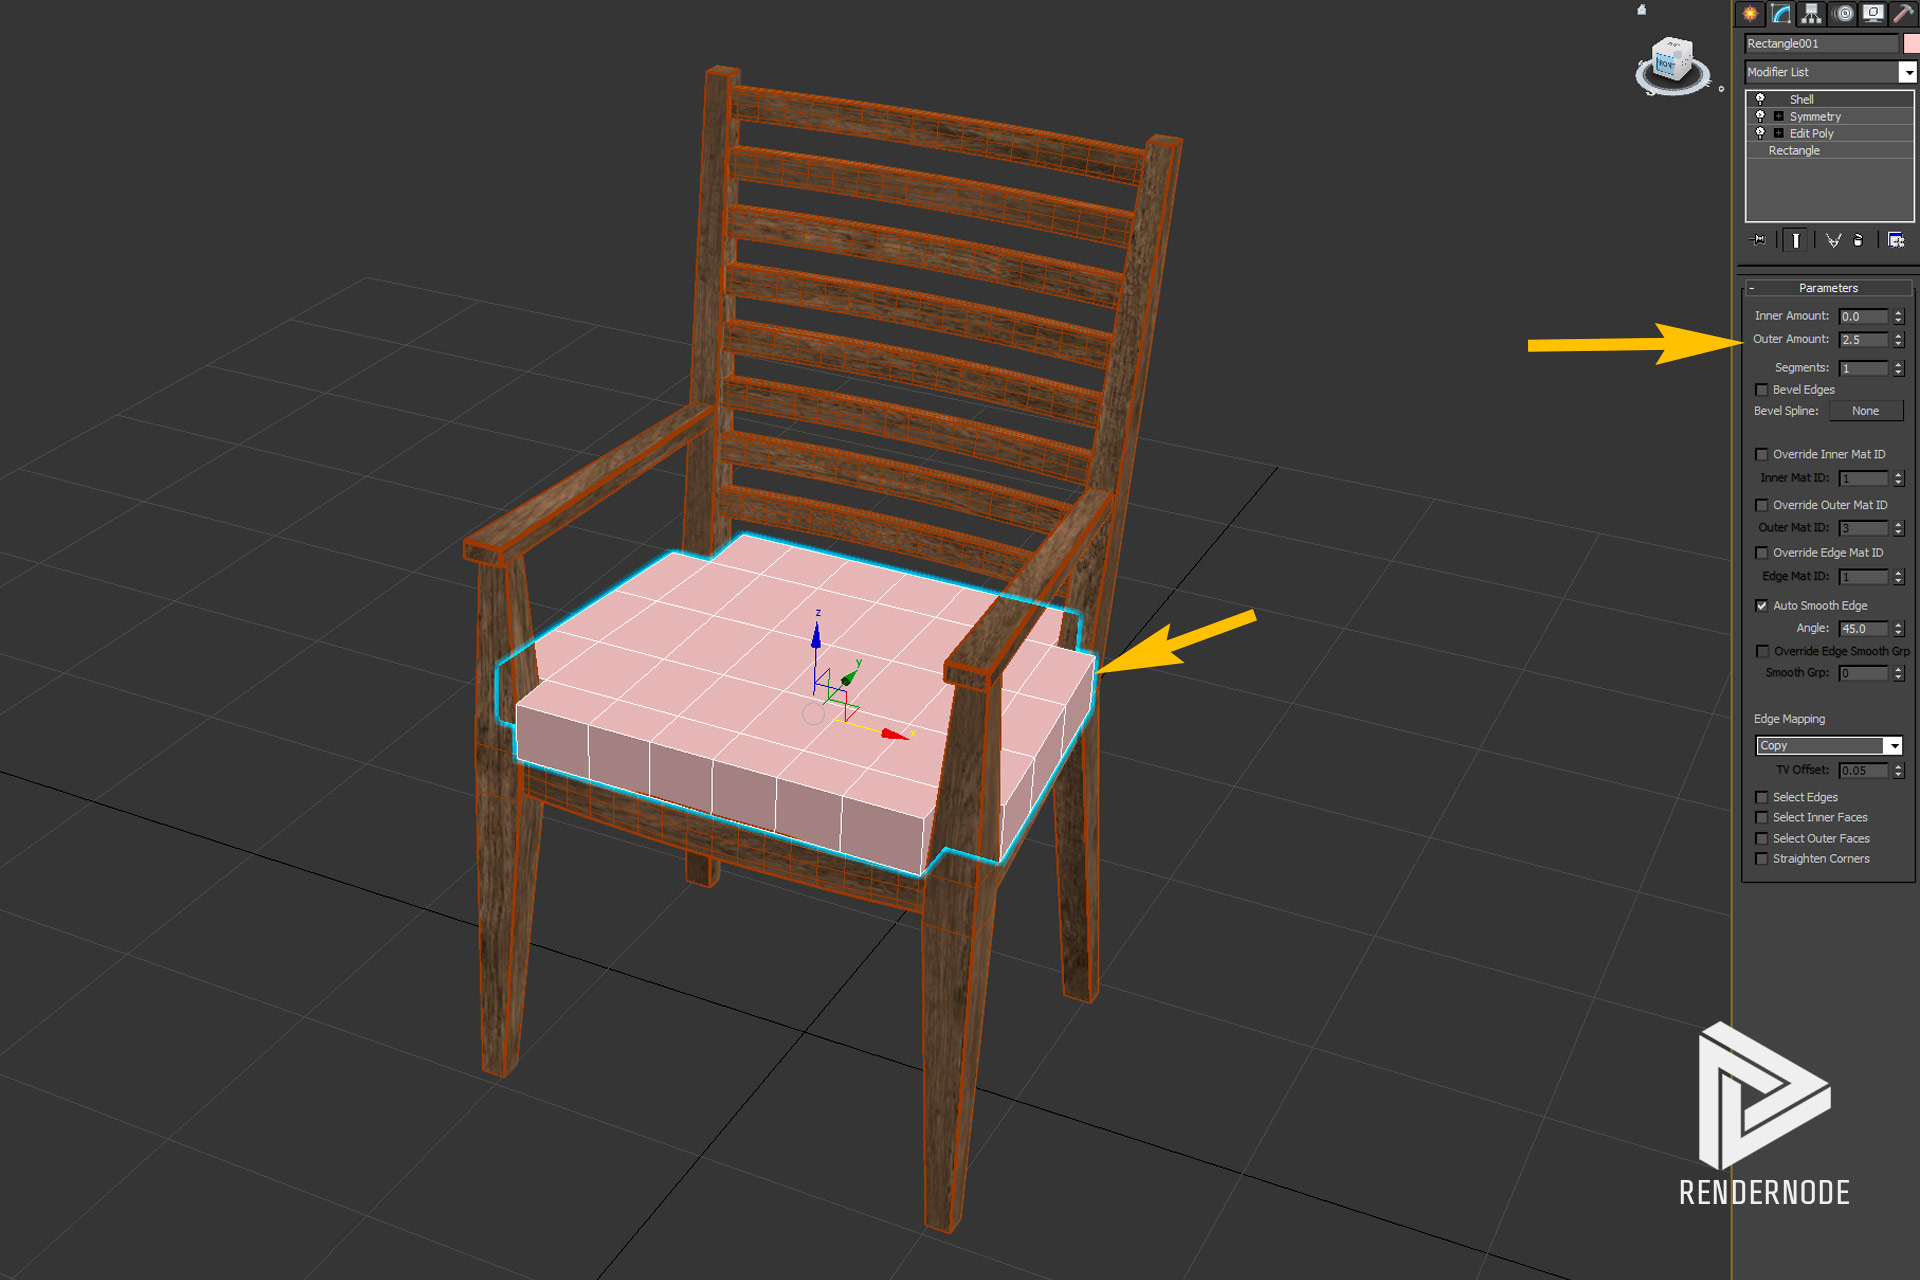
The Shell modifier is used to give the seat cushion thickness.
Using the Shell modifier, add thickness to the seat cushion shape. The value used in the Outer/Inner amounts will depend on how you want your cushion to look. For regular seat cushions, one would expect to find on dining room chairs or barstools, a thickness of 2.5 inches (63.5 mm) is recommended. In most cases, this value should be added to the Outer Amount parameter of the Shell modifier. When successful, you should see a very boxlike representation of a seat cushion that would look appropriate in low-poly environments.
Step 6: Create Edge Loop + Add Turbosmooth Modifier
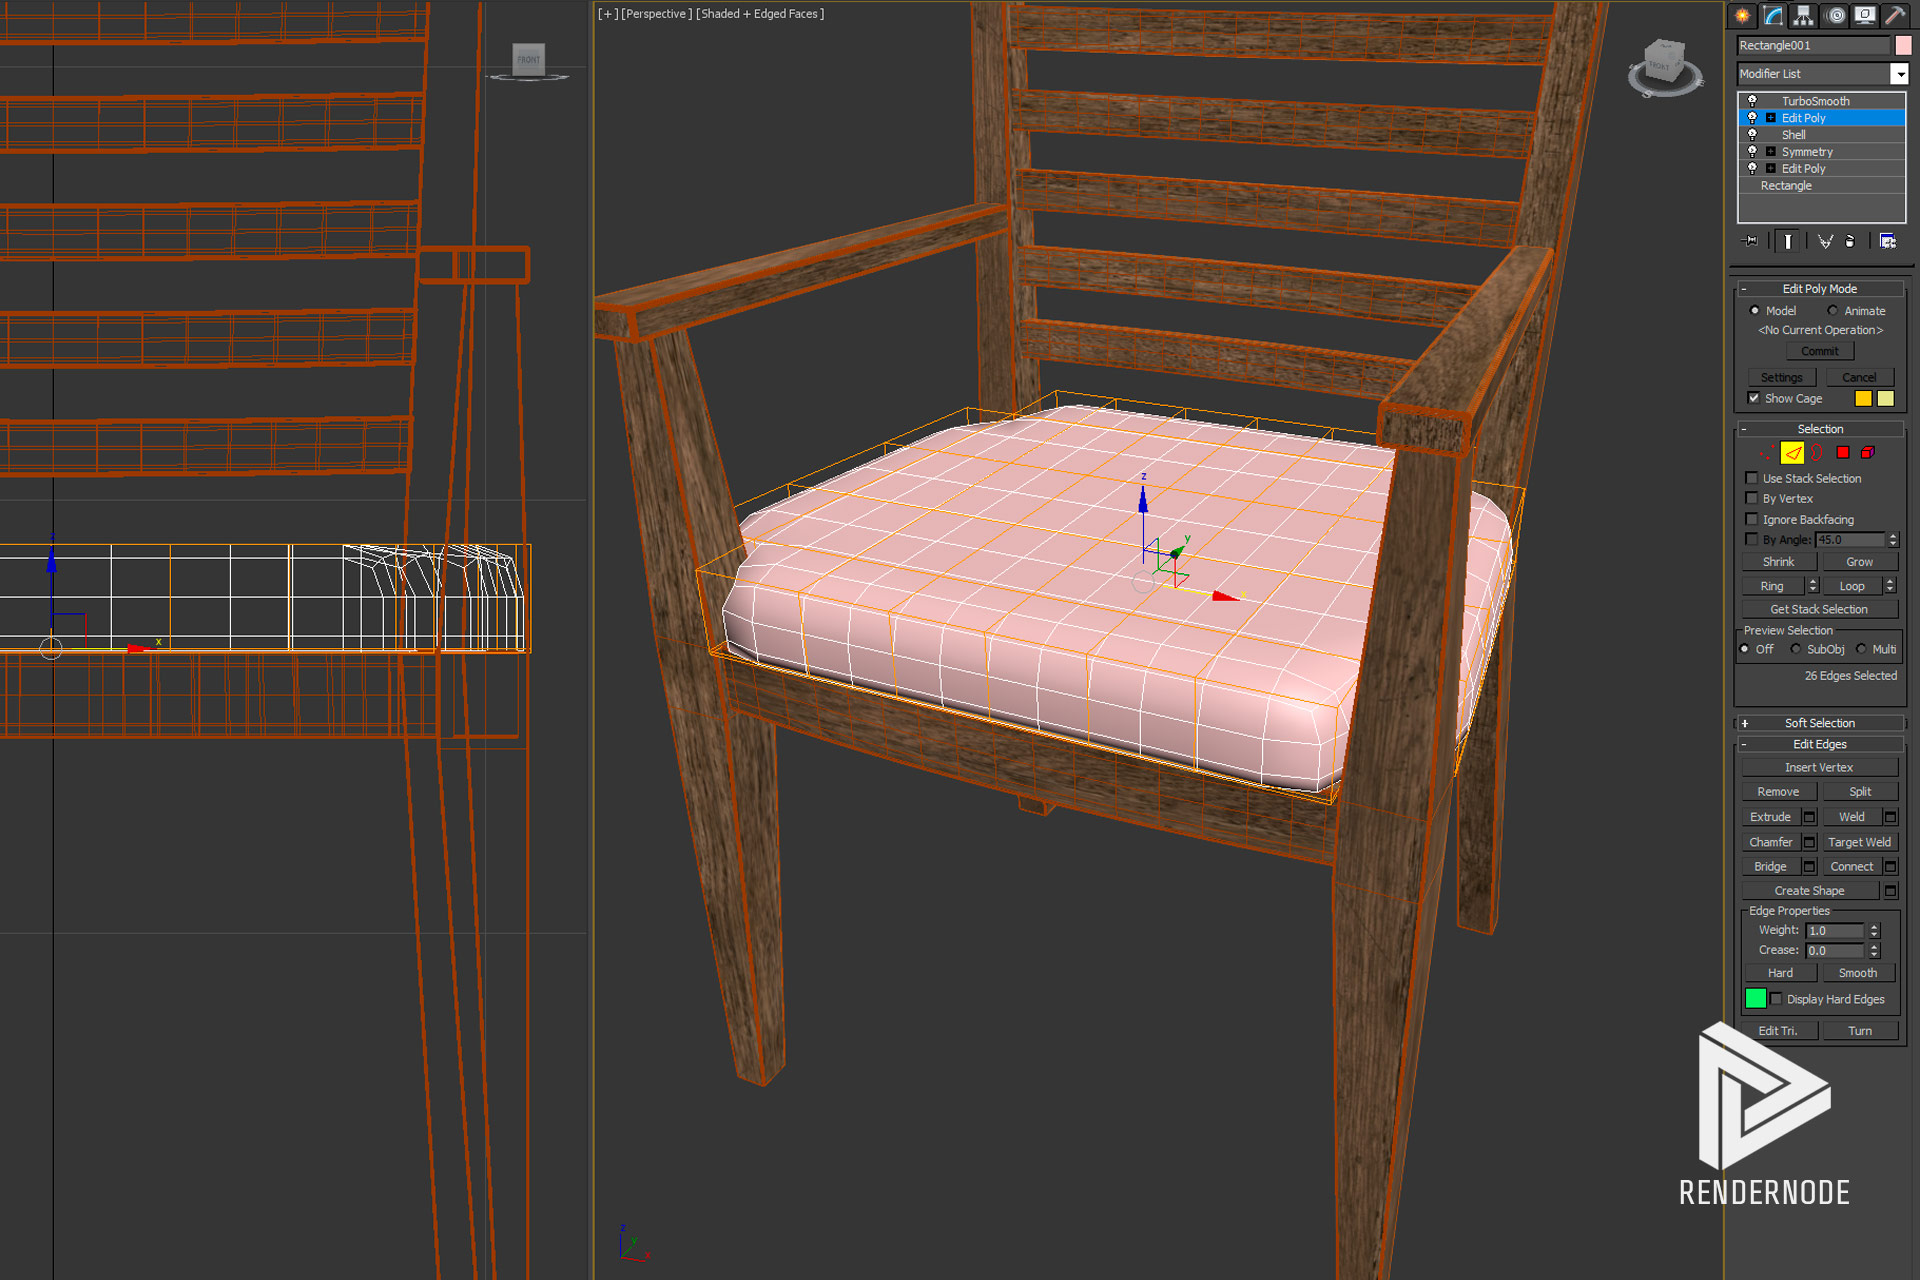
Use the Edit Poly + Turbosmooth Modifiers to create an additional edge loop near the bottom and smooth the top corners.
The next step will produce a more realistic smoothing effect on the seat cushion and round off many of the sharp edges. The only issue here is that, if applying a Turbosmooth modifier immediately, the bottom edges of the seat cushion will be given an unrealistic amount of curvature.
Step 7: Create Selection of Seat Bottom Vertices
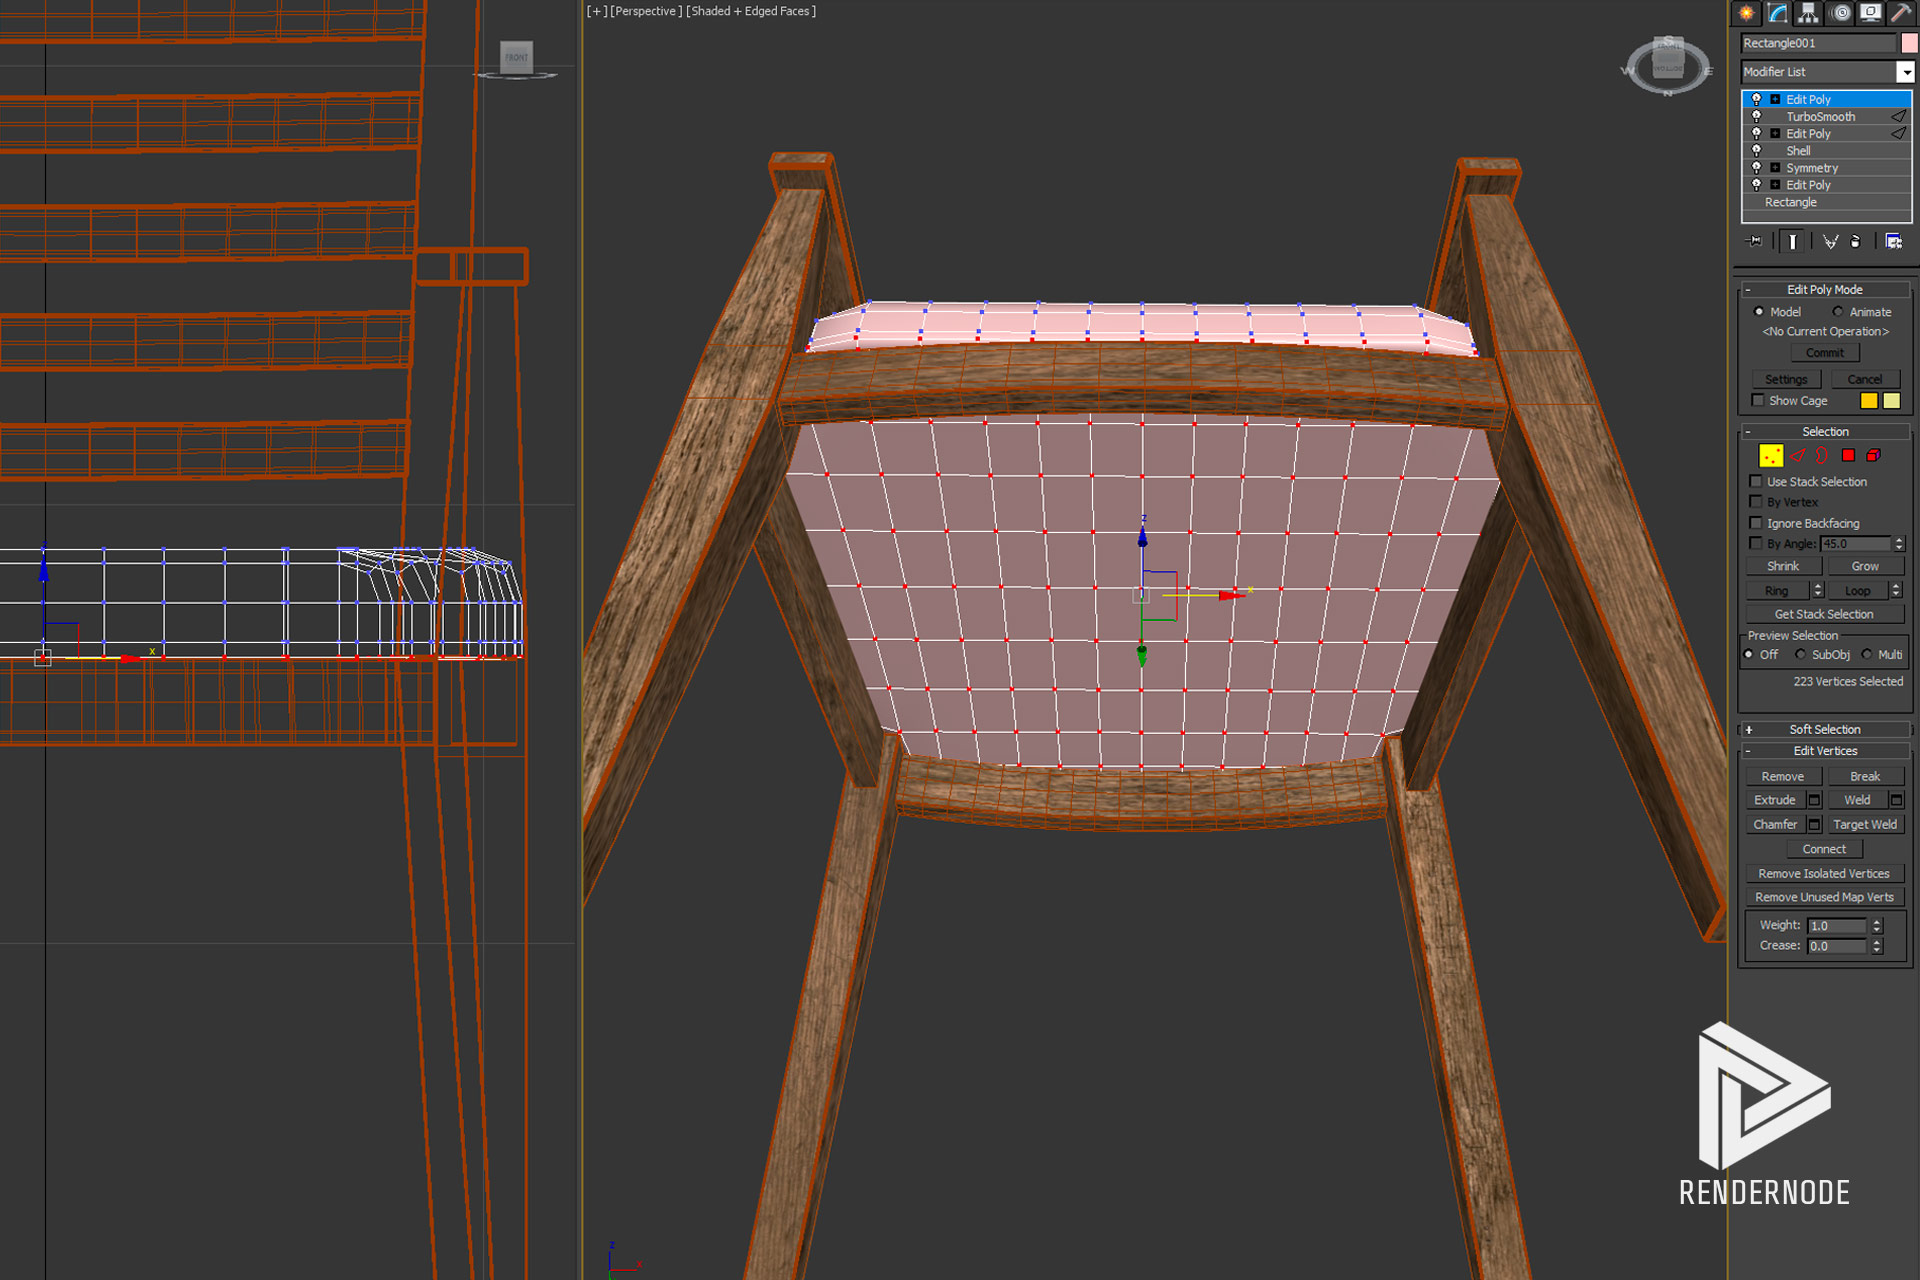
Create a selection of the seat cushions bottom-most vertices.
We’re going to use the Cloth modifier to really give our cushion a realistic shape but first, we need to ensure that the bottom of the seat cushion retains a flat appearance. After all, we don’t want the seat cushion to appear as if it is sagging. This can be done via the Cloth modifier’s options but we need to pass a selection of the bottom vertices of the seat into that modifier first. To do this, add a new Edit Poly modifier and use the Vertex sub-object selection mode to create a selection of only the vertices on the bottom of the seat cushion.
Step 8: Use Cloth Modifier to Create Real-World Shaping
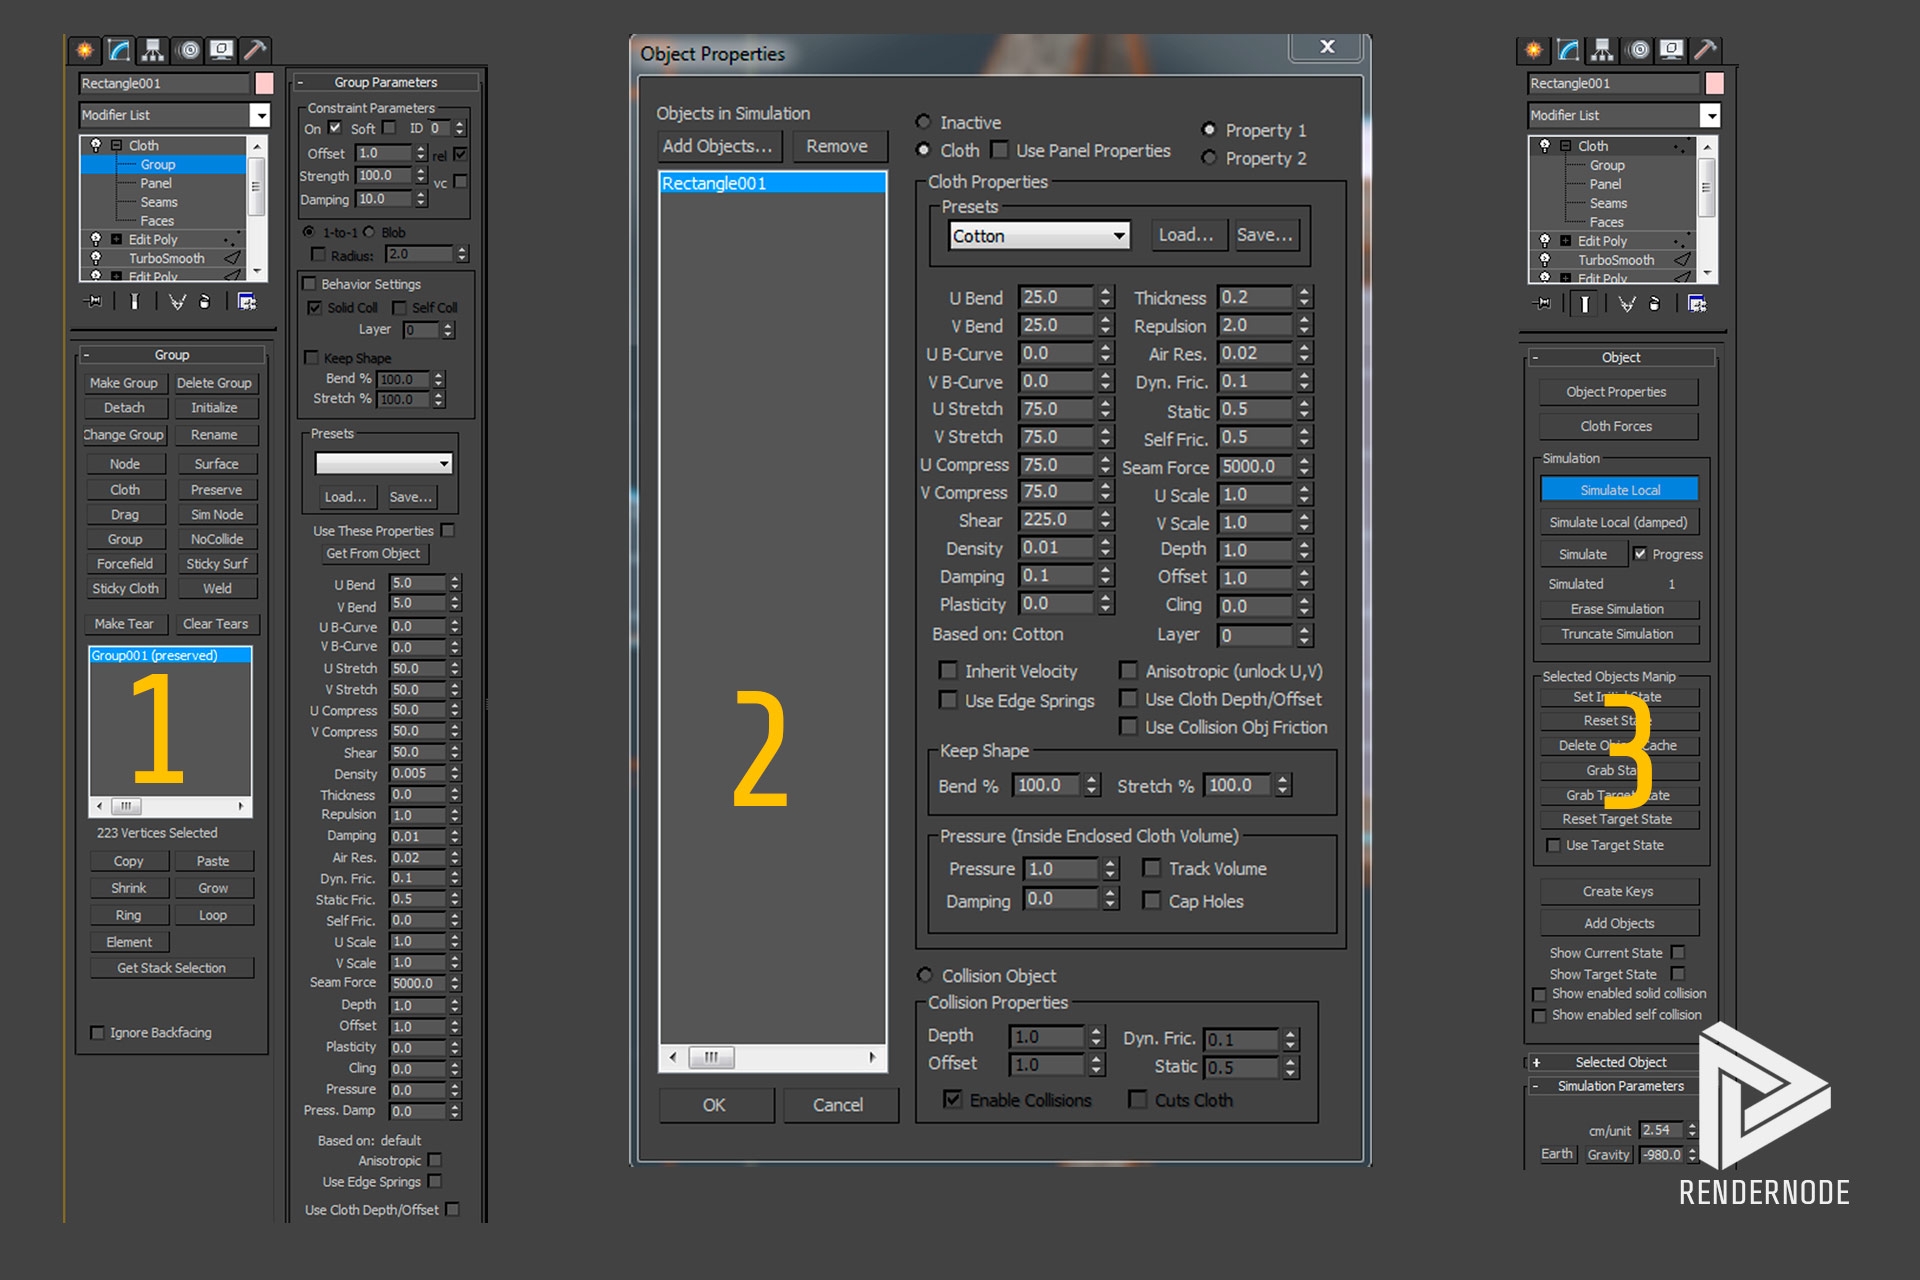
The Cloth modifier can simulate a very realistic look with basic parameter values.
Add a Cloth modifier to the seat cushion and complete the following actions:
Under the Sub Objects -> Group parameters:
- Click “Get Stack Selection”
- Click “Make Group” button (top leftmost option in the Group panel). Click OK to confirm.
- Click “Preserve” button in the Group panel options.
- Click the “Cloth” modifier name to return to the main options panel.
Under the Object Properties Menu (topmost under Object):
- Select your seat cushion object from the list on the left side (should be a single object)
- Select the “Cloth” radio button option (topmost right side)
- Select “Cotton” from the presets drop-down menu (under “Cloth Properties”)
- Add a non-zero value (1 works fine) for the “Pressure” parameter (towards the bottom of the right panel)
- Click OK
With the above two steps completed the seat cushion is ready to simulate the internal pressures and fabric physics. At this point, you can proceed in multiple ways. If you are running a complex cloth simulation the “Simulate” button will create keyframe animation throughout the simulation process to allow easy state selection. For simpler simulations, such as basic seat cushions, the “Simulate Local” button is often quicker. Clicking this button will apply the physics and forces specified in the Cloth options menu all while excluding the bottom-most vertices (our earlier selection group) from moving. If your seat cushion drops in the scene, ensure that the “Gravity” button is deselected under the Cloth -> Simulation Properties rollout menu. To undo the simulation simply click the “Reset State” button in the Object rollout menu.
Step 9: Create Piping by Selecting Bottom Edge
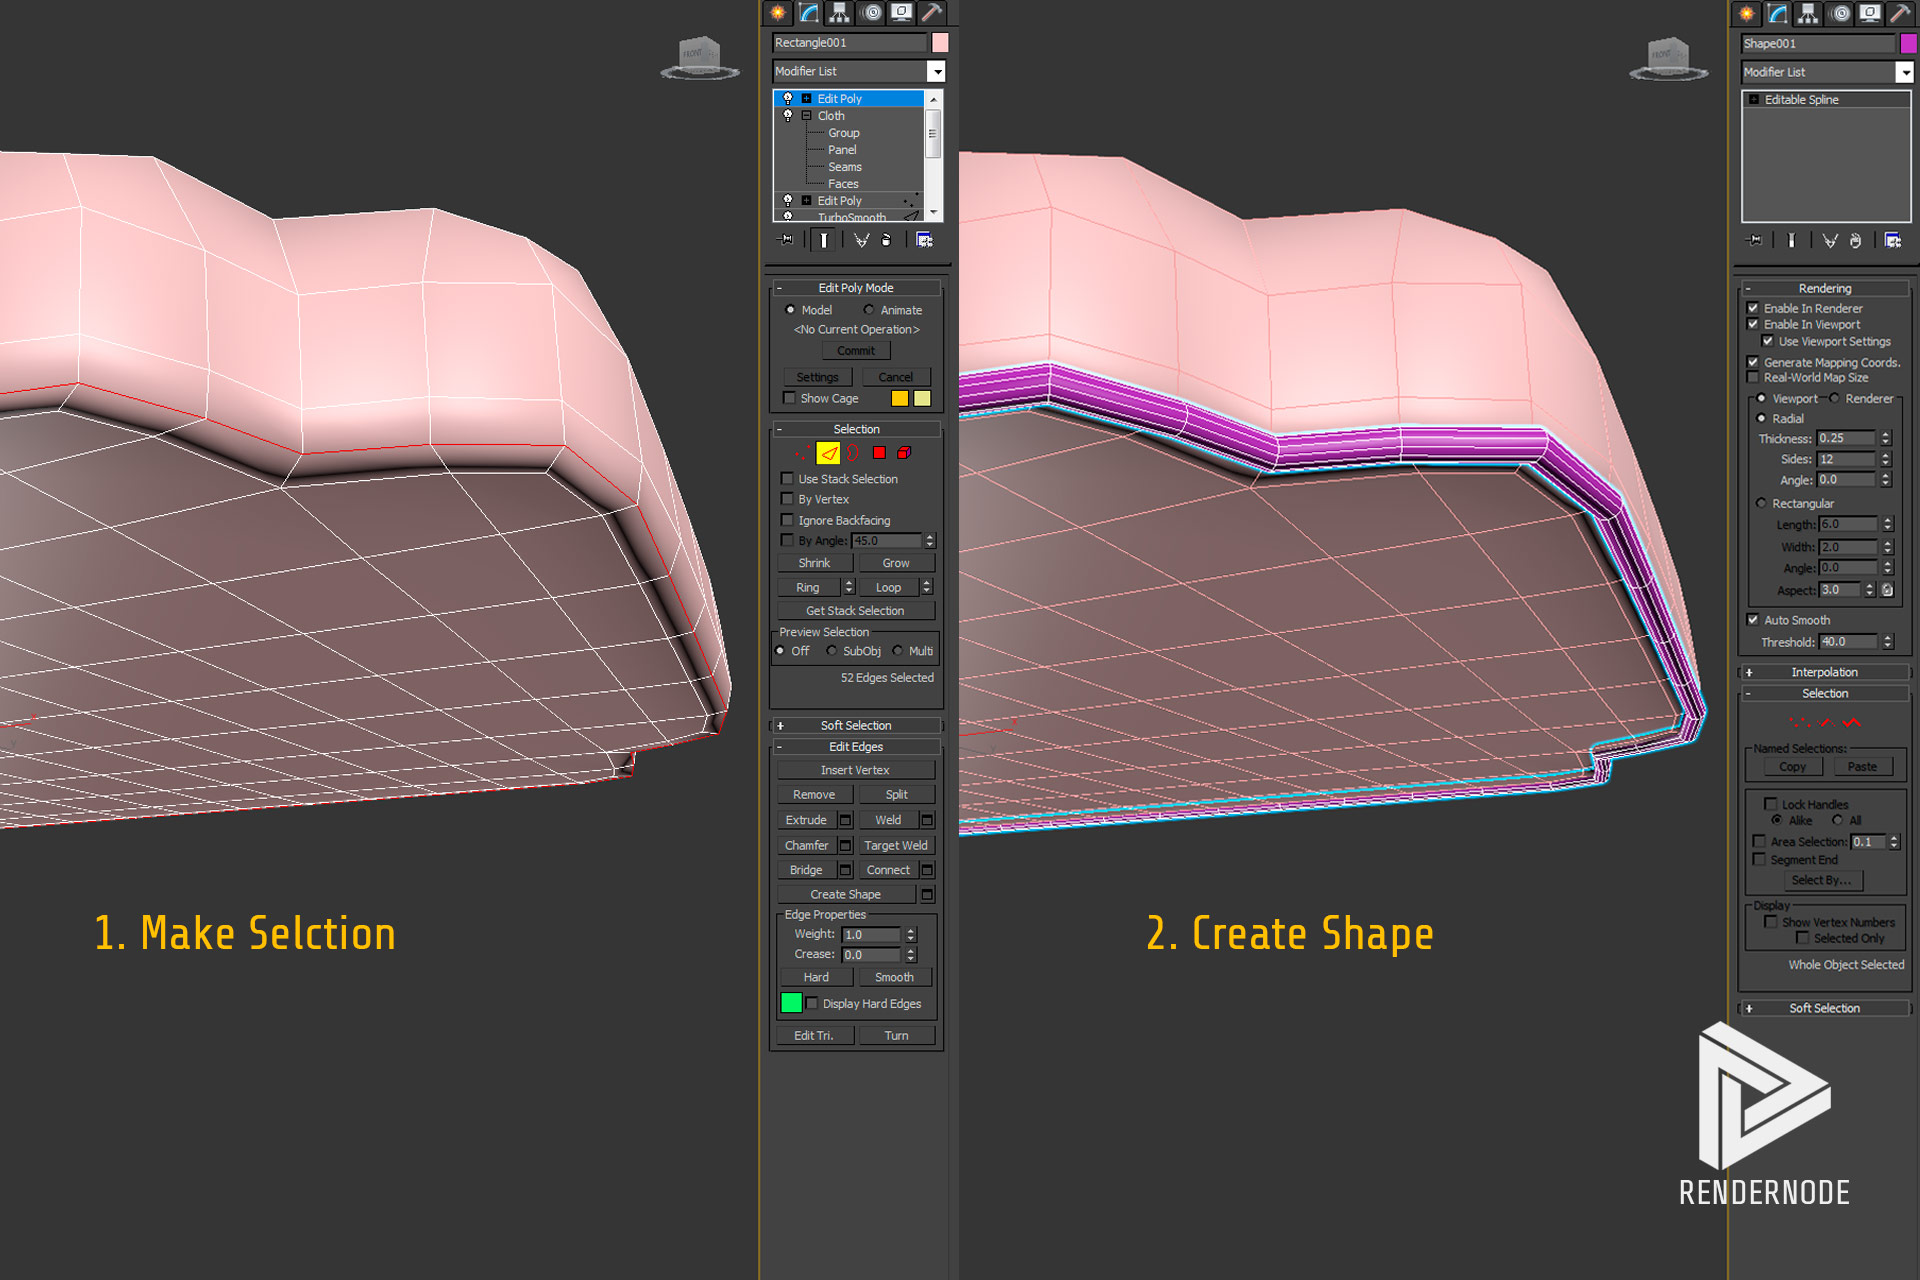
Create a piping around the bottom of the seat cushion using the Edit Poly -> Create Shape function
Once your inflated seat cushion has been created the bulk of the work is complete. One last finishing touch is to add a welt at the bottom of the seat to mimic real work manufacturing practices. To do this, add an Edit Poly modifier to the seat object, select a single edge on the bottom of the model, then click the “Loop” command.
This should create a selection of the entire edge ring at the bottom of the seat cushion. With this selection, click the “Create Shape” button in the Edit Poly options panel and proceed using the Linear option for shape type. This will create an additional Spline object in the scene. deselect the seat cushion object and select the newly-created spline. Under the “Rendering” rollout menu of the Spline object, tick the “Enable In Renderer,” “Enable In Viewport,” “Use Viewport Settings,” and, optionally, the “Generate Mapping Coords.” options. After these options have been enabled, select the “Viewport” option, select the “Radial” option, and add the desired value in the “Thickness” field. This should create a round, pipe-like object in the scene.
Step 10: Attach Piping & Add Smoothing if Needed
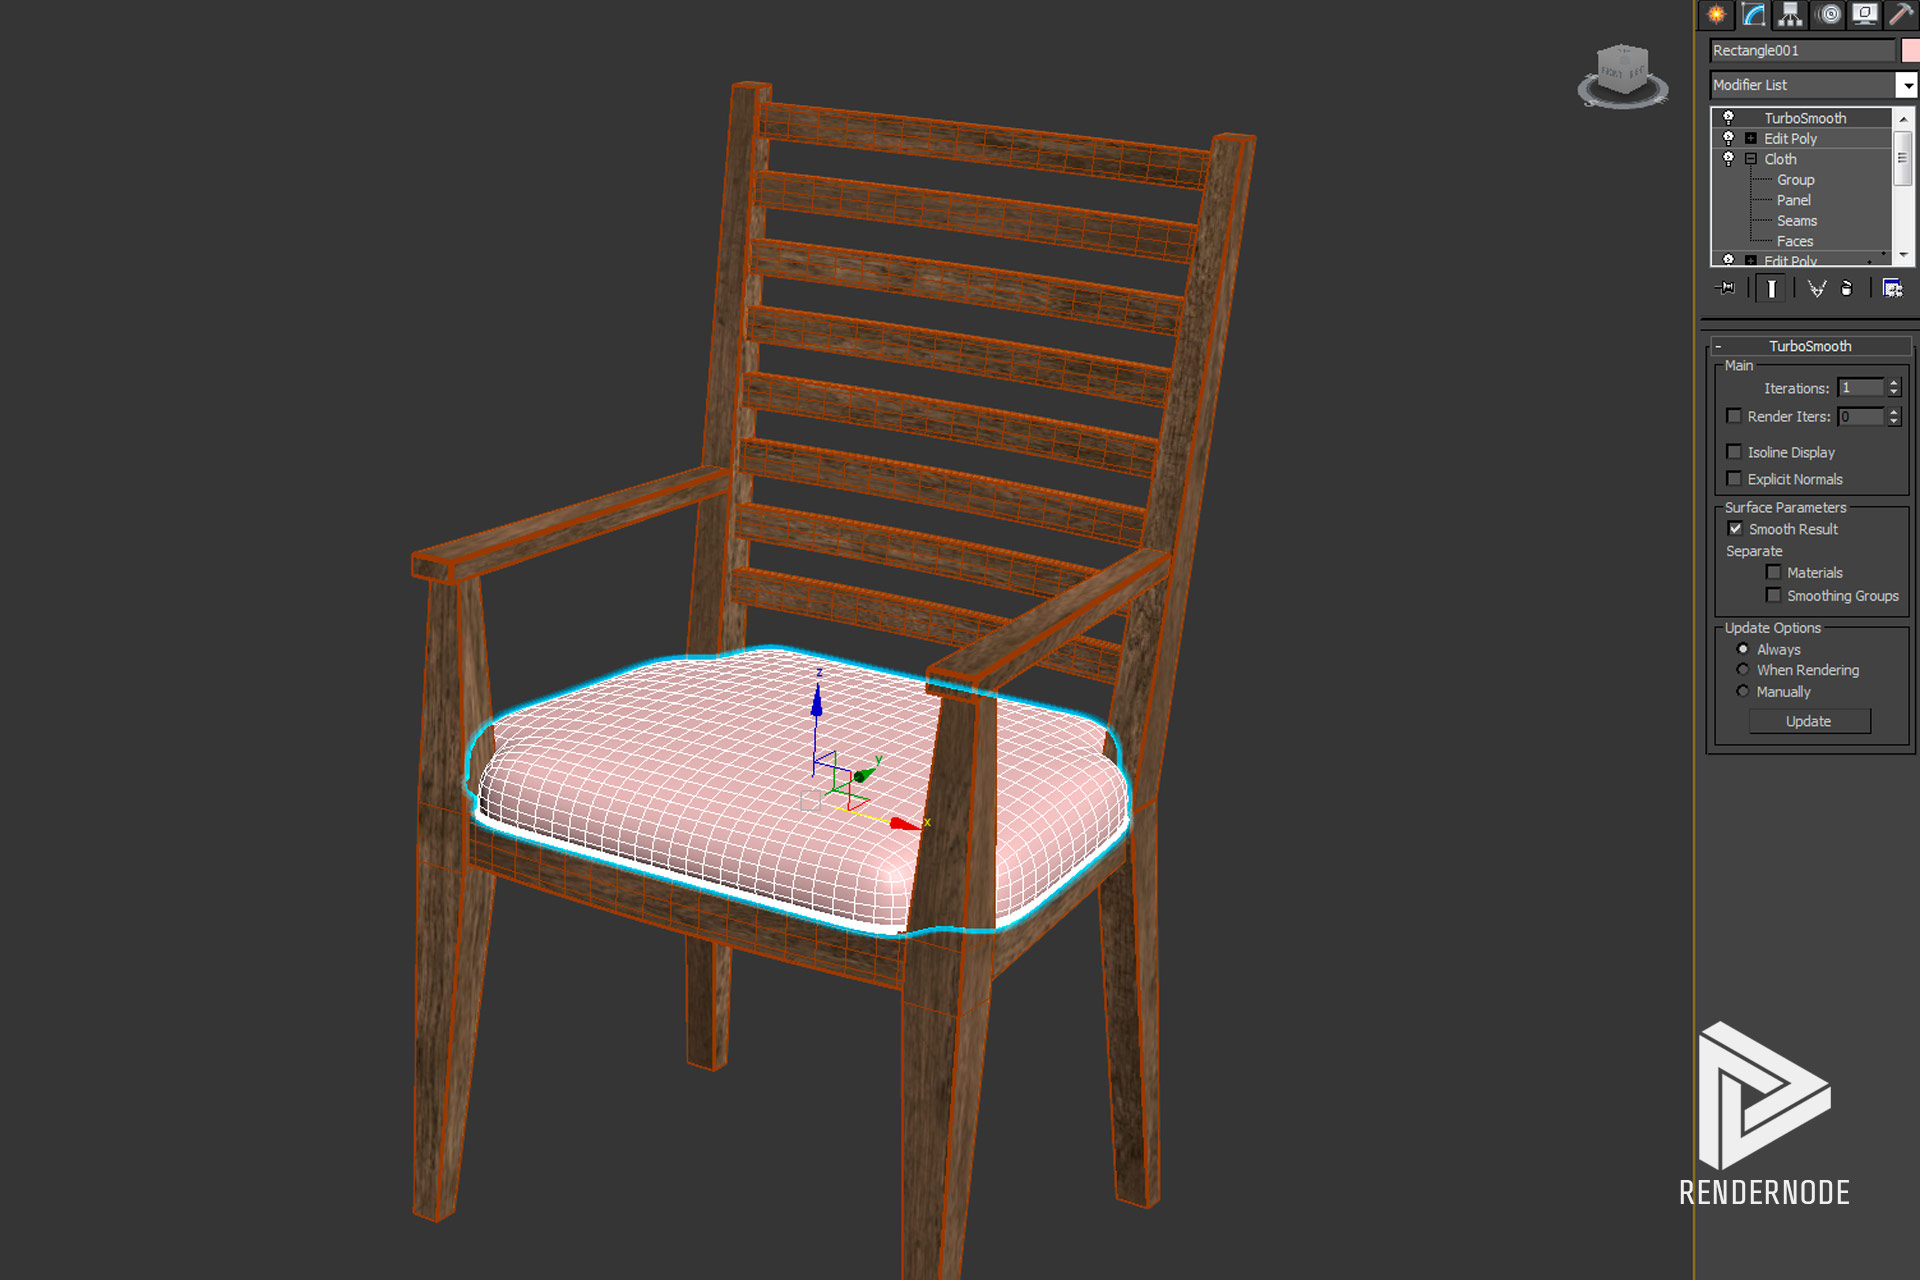
Attach the piping object to the seat cushion and add a Turbosmoothing modifier if desired.
The next step is to attach the piping created in step nine to the seat cushion model. To do this, select the seat cushion and, under the Edit Poly modifier’s options panel, click the “Attach” button. Now click the spline object in the viewport and it will be attached as an element to the seat cushion object. Right-click to finalize the selection. At this point, the seat cushion is complete and only requires smoothing modifiers. Based on your intended end-use, this can be done any way you may see fit.
Final Thoughts
Seat cushions can be quite complex depending on the materials and geometries being modeled. There are specialized programs for doing more evolved cloth and fabric simulations that those possible in 3D Studio Max. For simple simulations, such as a dining chair seat cushion for example, the Cloth modifier provides an easy solution without adding a step in the production pipeline or extra project assets. Through the simple process outlined in this tutorial one can quickly and effectively create seat cushions in 3D Studio Max using a subdivision modeling technique.


