

Unlimited Material Editor Slots in 3DS Max
3DS Max has a decent material editor system that supports a wide range of workflows. It allows for a maximum of 24 materials at any given time but can accommodate many more if needed. By using the multi/sub-object material you can easily increase the number of slots in the material editor window to as many as you like.
The Problem
3DS Max’s material editor has two distinct versions; the Compact Material Editor and the Slate Material Editor. The latter uses a drag-and-drop, node-based, visual material creation system. This has become the standard interface for many 3D programs today. You can have as many materials in this view as you like.
The Compact Material Editor has 2 x 3 material slots by default but allows 3 x 5 and 4 x 6 displays as well. To change the number of material editor slots, change the selection in Material Editor > Options > Options > Slots settings area. This effectively lets users choose between 6, 15, or 24 material editor slots.
The number of material editor slots DOES NOT limit the number of materials you can have in your scene.
The material editor window is for editing materials and isn’t designed to be a material manager. 3DS Max will prompt you with a choice to keep scene materials anytime you delete a material from the editor. This is ideal, as it lets users keep the material editor slots clear without limiting the number of materials used in the scene.
Managing An Unlimited Number of Scene Materials
In practice, the material editor absolutely gets used as a scene material manager. I do it, and most of the other 3DS Max artists I’ve worked with do it as well. 24 materials are more than enough for smaller scenes—especially product renderings—but larger scenes like architectural renderings often have hundreds of materials.
Option 1: Multi/Sub-Object Material
By leveraging 3DS Max’s default Multi/Sub-Object material you can effectively have as many materials in the material editor as you choose. The Multi/Sub-Object material wasn’t designed for this use but ends up working to transform the material editor into a halfway decent material manager! Here’s how to get this approach set up.
Step 1: Create a New Multi/Sub-Object Material
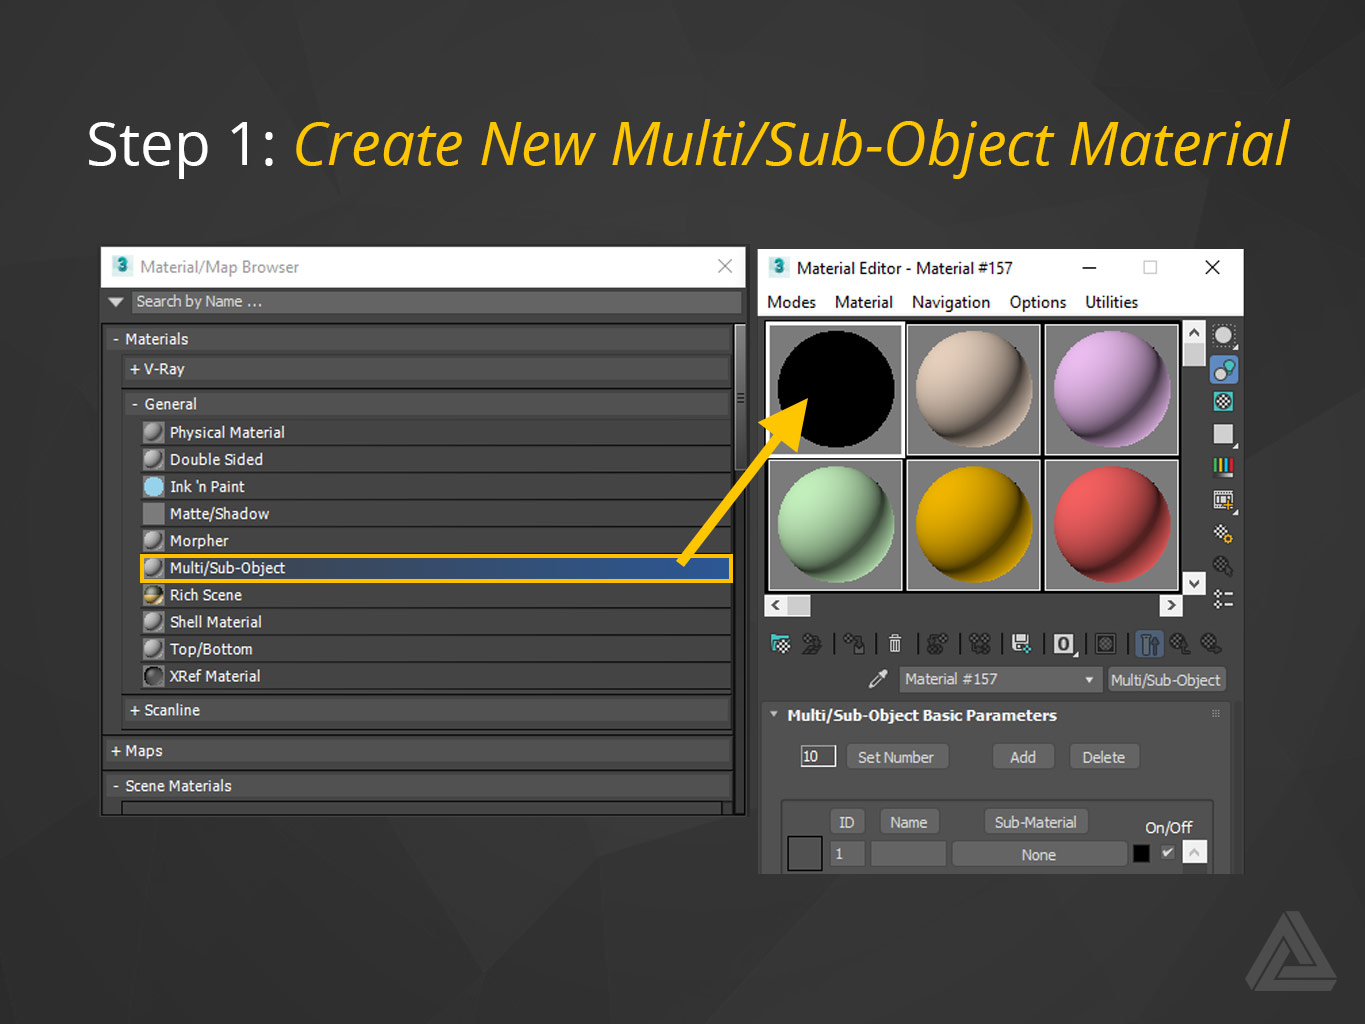
The 3DS Multi/Sub-Object material is designed for “Objects might require different materials on each face. For example, a door or window might need different materials for front and back frames, mullions, and glazing. For this, Multi/Sub-Object materials are used.” That’s a quote straight from Autodesk.
Multi/Sub-Object materials can also let you organize—and have easy access to—an unlimited number of materials in the material editor window. This is accomplished by adding up to 99 materials per multi/sub-object material and—if you need more than 99 materials—by adding multi/sub-object materials within other multi/sub-object materials.
This sounds a bit confusing but in practice offers a very flexible way to manage materials within 3DS Max without third-party plugins.
Step 2: Add Your Scene Materials as Sub-Materials
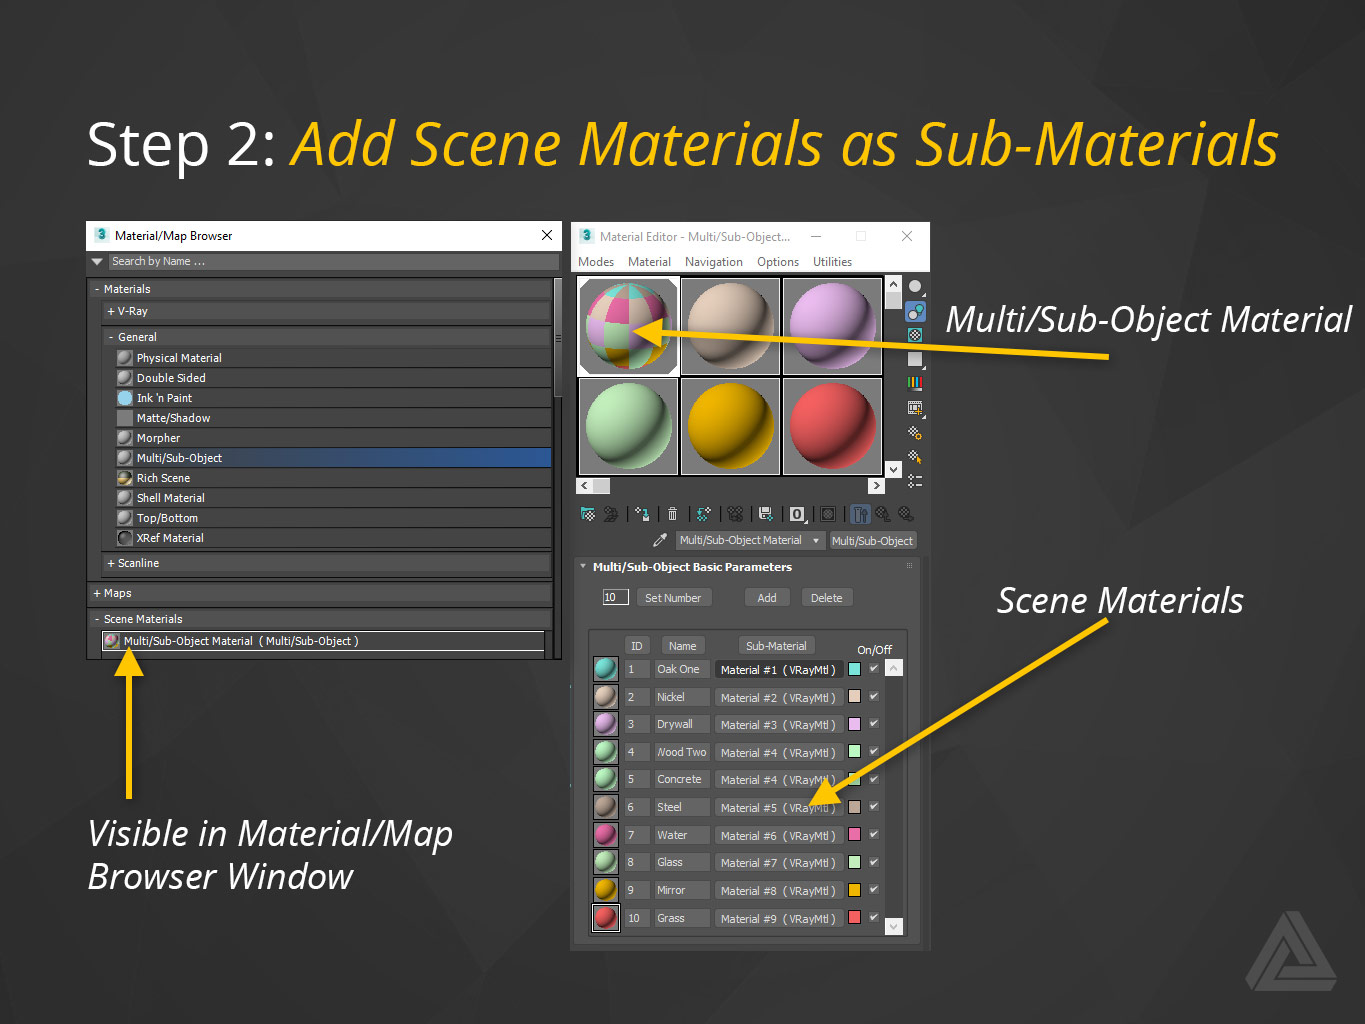
By adding any scene materials you’d like to maintain easy access to (drag and drop, point and click, etc.) simply add them as sub-object materials in the Multi/Sub-Object material. If you fill all 99 slots up, create a new Multi/Sub-Object material and drop your previous one on the first slot of that material. Now you’ve got 99 materials and 98 open slots.
Step 3: Save Multi/Sub-Object Material as Material Library
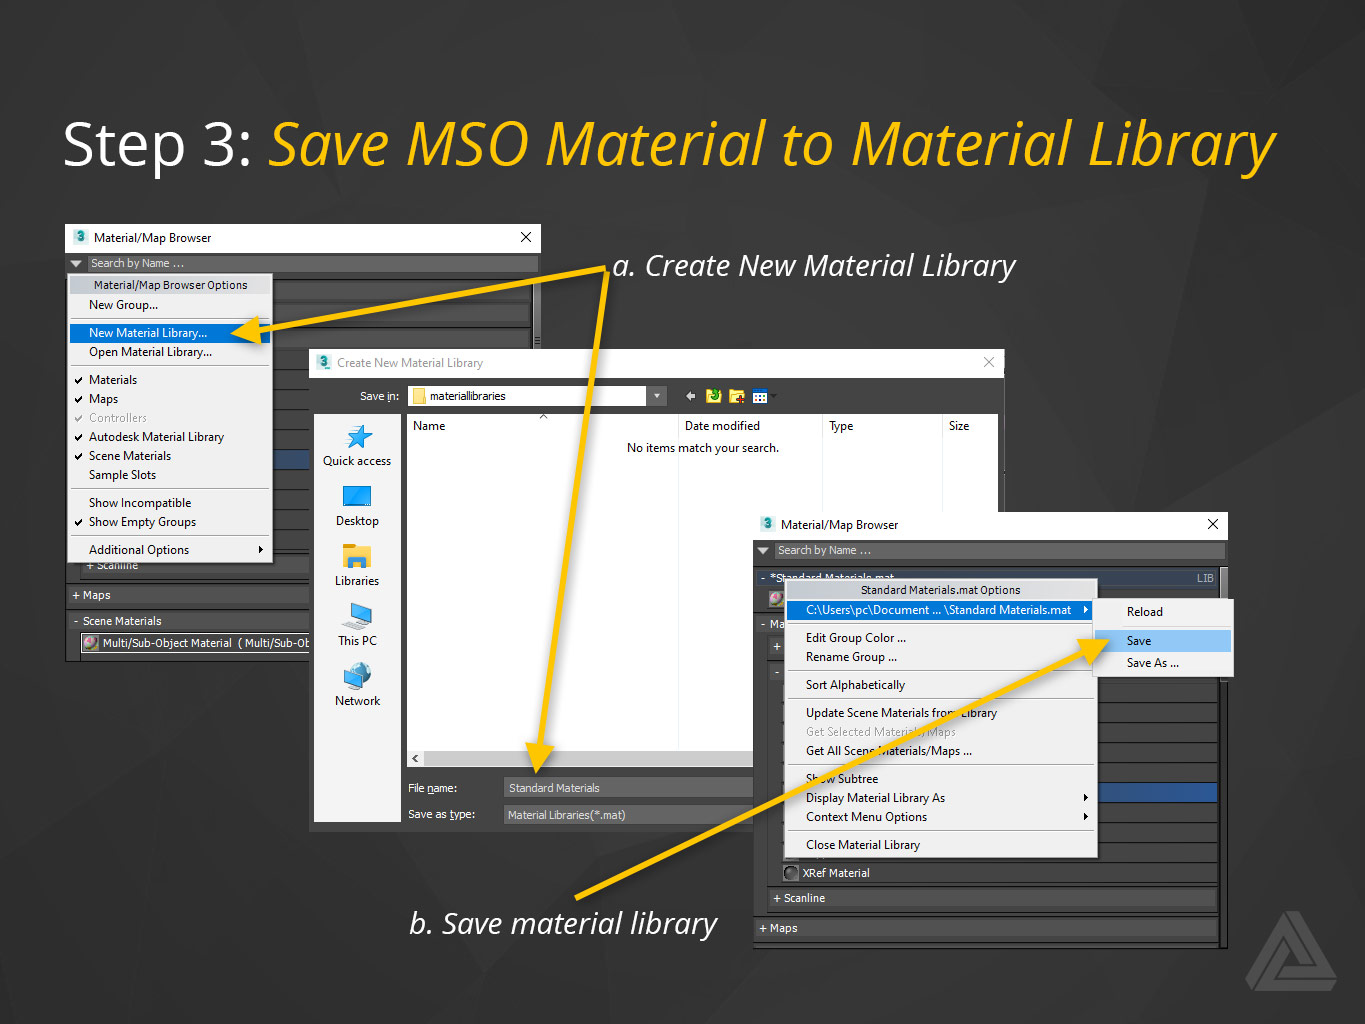
I recommend saving these types of scene materials to their own unique material libraries. For example, I might create a Multi/Sub-Object named Stone that has sub-materials named Concrete, Slate, Travertine, and Grand Emperador. In this approach, each Multi/Sub-Object material effectively serves as a separate material library. I have a material library named Standard Materials in which I have the following Multi/Sub-Object materials:
- Stone—23unique materials as a single Multi/Sub-Object material
- Glass—12 unique materials as a single Multi/Sub-Object material
- Wood—52 unique materials as a single Multi/Sub-Object material
- Metal—22 unique materials as a single Multi/Sub-Object material
- Plastic—32 unique materials as a single Multi/Sub-Object material
When I load that material library, I can add these 5 materials to my material editor and effectively have access to all 23 + 12 + 52 + 22 + 32 = 141 materials. I can drag and drop, easily tweak, and view in the Material/Map Browser window should I desire. I use this approach for most of the larger 3D rendering projects I work on.
Option 2: Objects on Hidden Layer
I find using the multi/sub-object strategy to be the most convenient and efficient way to extend the default functionality of the 3DS Max material editor. However, another possible approach is to have all scene materials applied to objects on a hidden layer. This approach involves having a unique scene object for each unique material you desire to have access to. This approach can get out of hand fast.
Step 1: Create Material Object Layer
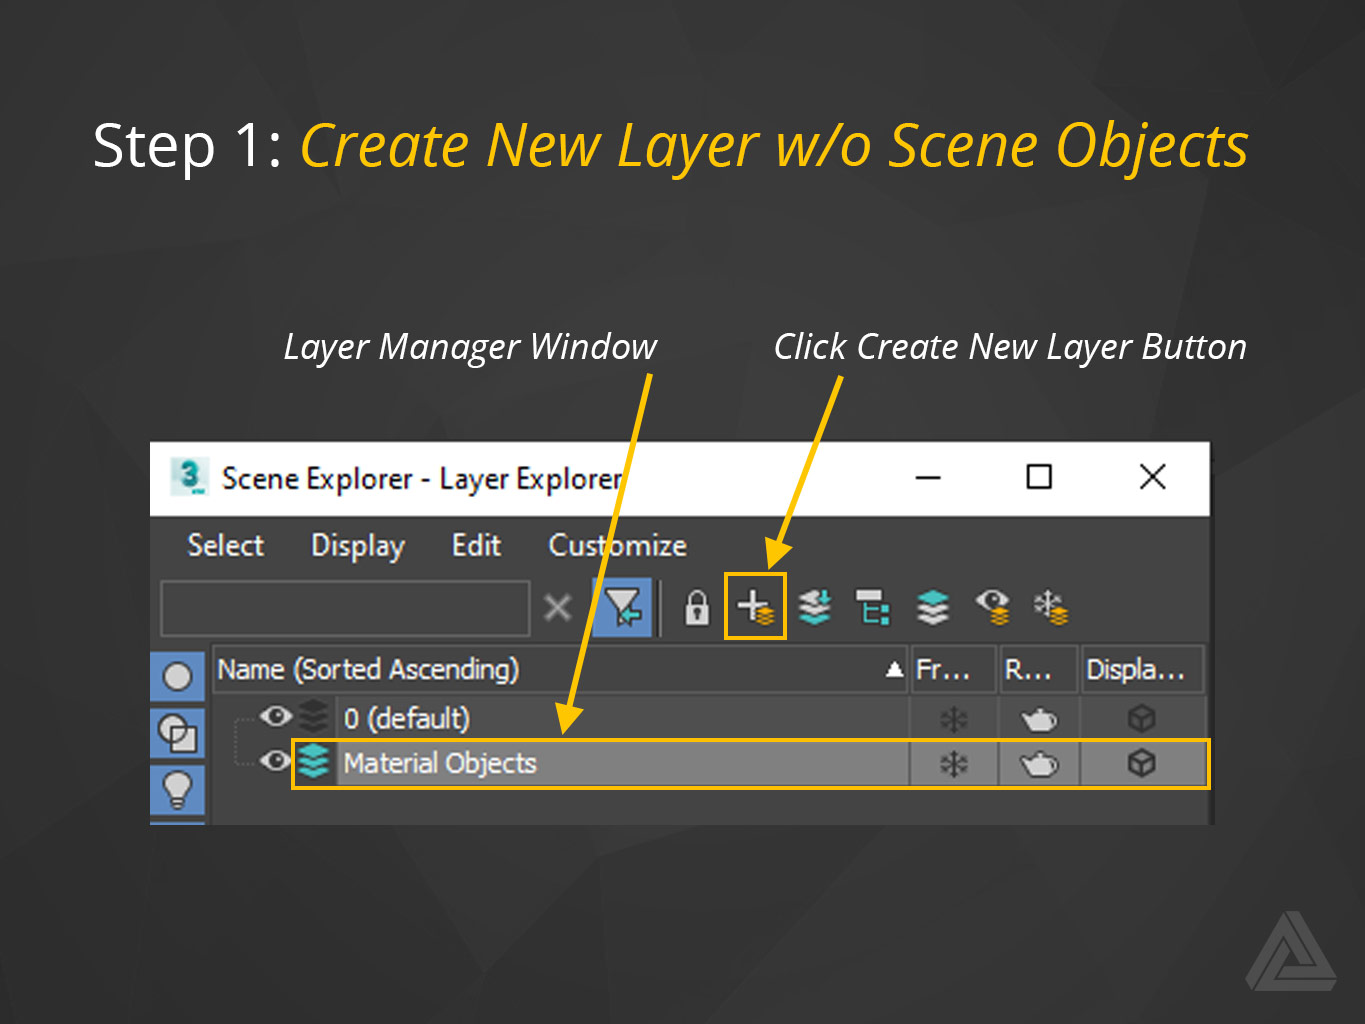
Create a separate layer from the one(s) the rest of your scene objects are on. Name this layer something like Material Objects.
Step 2: Create Objects for Each Material + Apply Materials
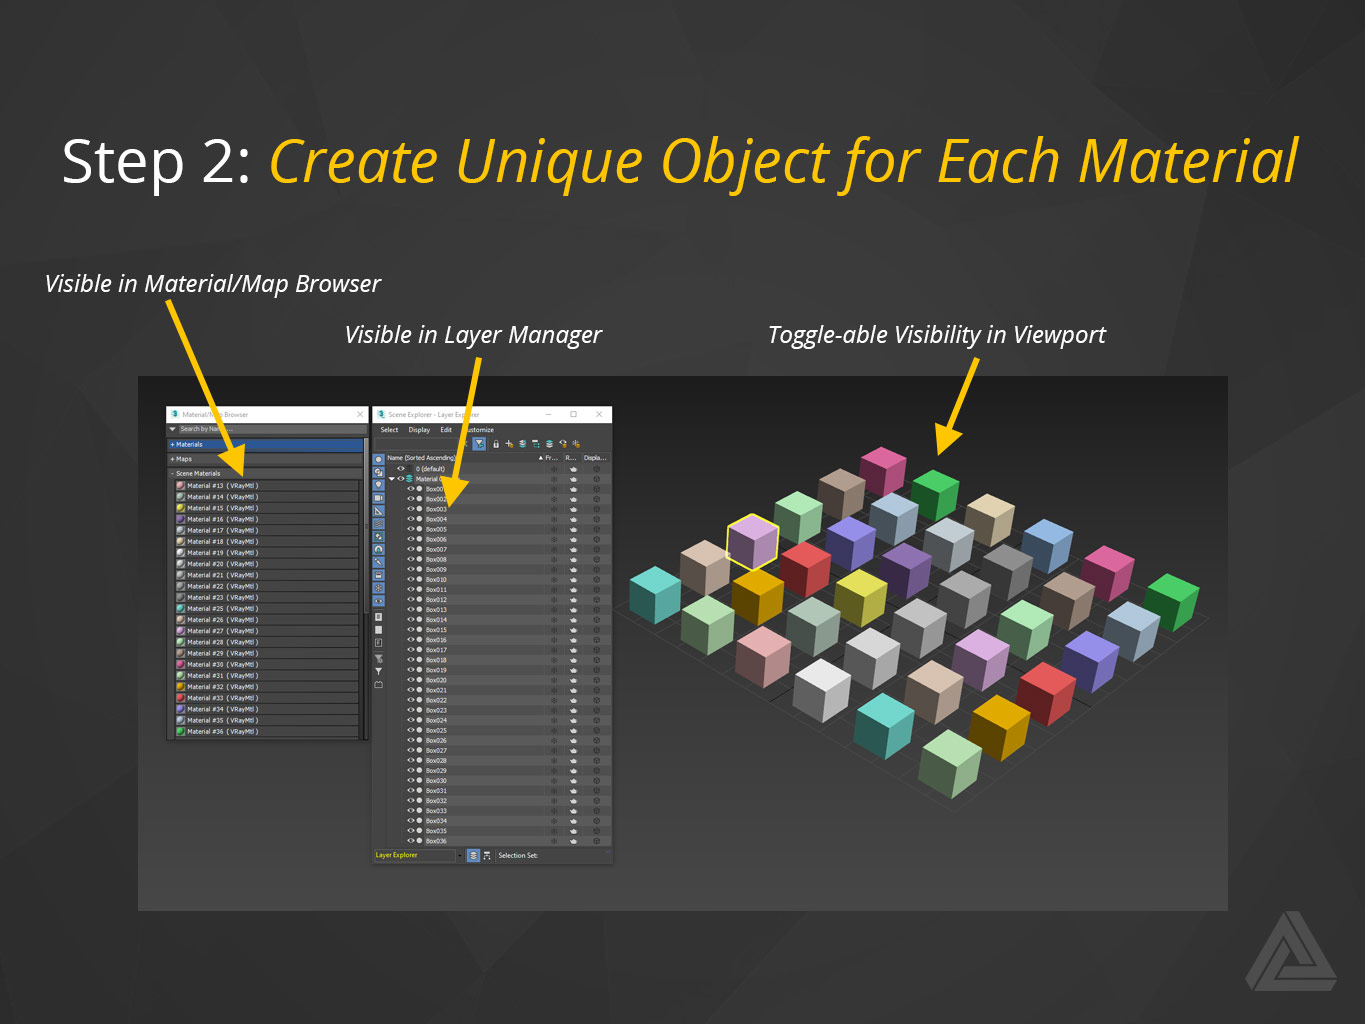
Create a unique object for each material you want to have stored in your scene. If you want twice the number of materials available in the standard Material Editor Slots (24 x 2 = 48) you need to create that many objects. I recommend creating a grid of cubes using the 3DS Max array tool. Assign a unique material to each object on the newly-created Material Objects layer for every unique scene material.
Step 3: Freeze & Hide Layer
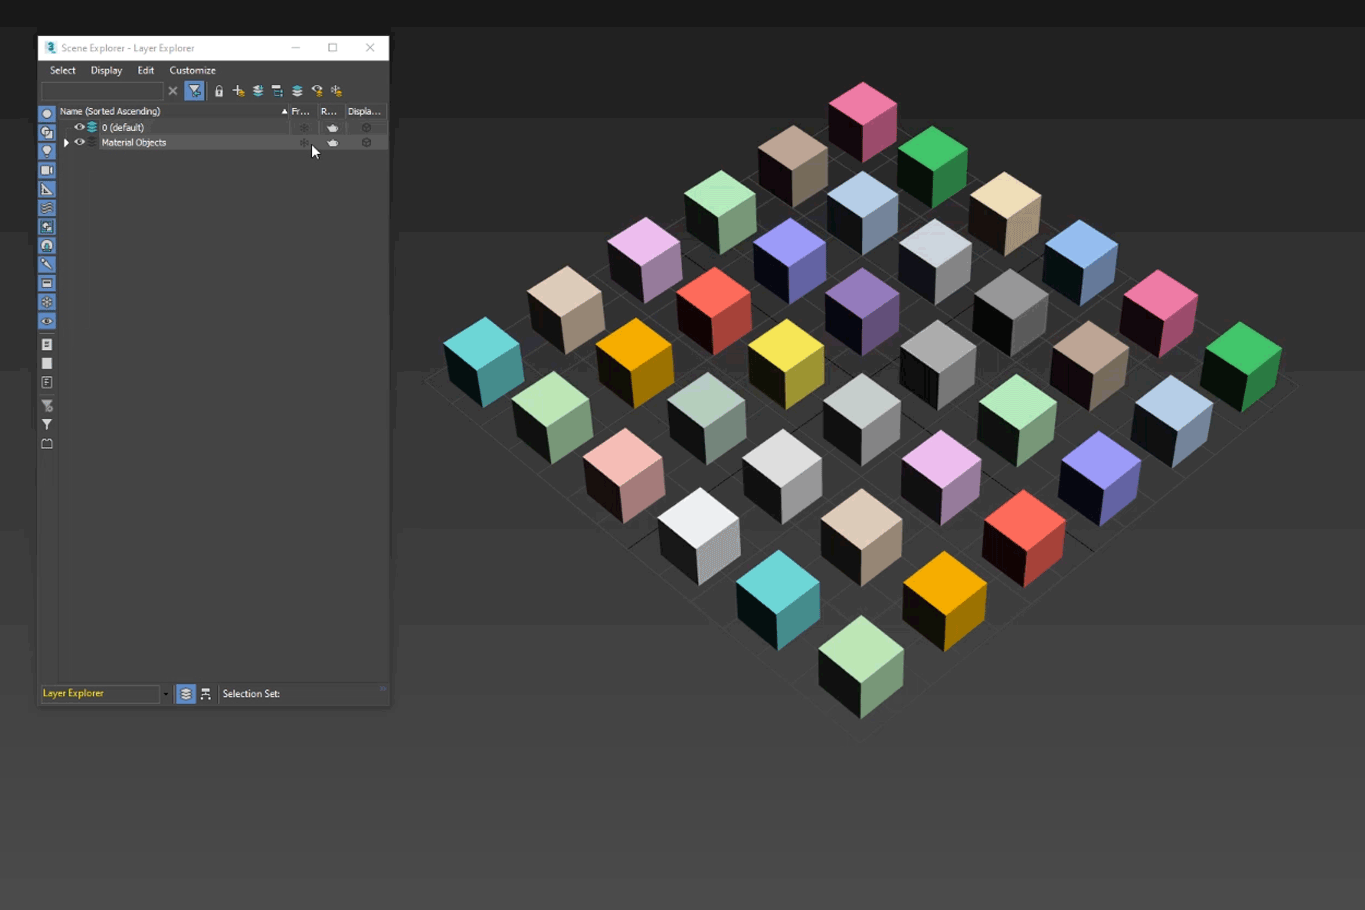
The final step is to freeze the layer (so you don’t accidentally delete the objects, thus deleting the material) and hide that layer (so it doesn’t obstruct the view of your scene.) I want to reiterate that while this approach accomplishes the same result as the first approach it is much less effective.
Final Thoughts
The 3DS Material Editor’s limit of 24 slots really isn’t a limitation. You can, effectively, have easy access to unlimited materials in the editor by using either of the two approaches outlined above. Using a combination of material libraries with the Multi/Sub-Object material can extend the 3DS Max material editor to effectively allow access to an unlimited number of materials.


