

Studio Lighting Setup in 3DS Max + Vray
Studio lighting setups come in as many variations as there are working photographers out there. There are three, four, and five-point light setups as well as many variations of each. When it comes to creating a digital studio lighting setup however, some of the rules can be bent—others can be broken. Using 3DS Max + VRay can provide you with powerful results by taking only a few basic concepts into account.
Highlights
- Creating a 3D studio lighting rig in 3DS Max is useful for test rendering and product renderings
- Key lights, backlights, and fill lights all play a role in your scenes lighting balance
- Adjusting camera parameters to control exposure and field of view is crucial
- Dial in your studio lighting setups’ settings and you can re-use it continuously to save time
- VRay Dome Lights are amazing and make life easy
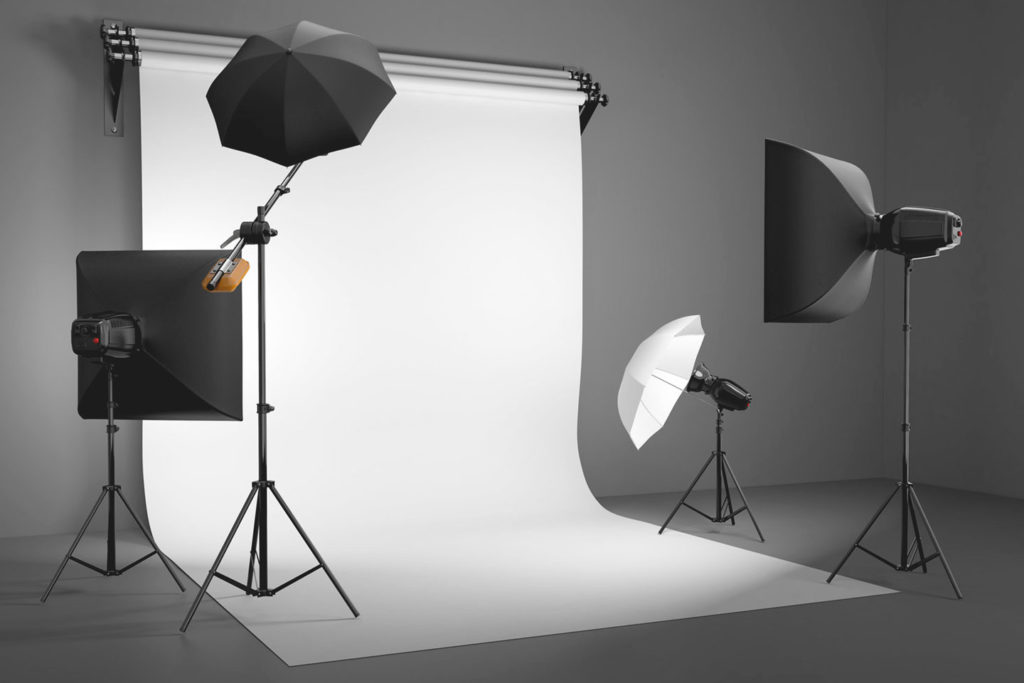
Many of the same concepts of real-world studio lighting translate to 3D software as well.
Studio Lighting 101
Of all the many combinations one could find, there are some aspects of studio lighting design that are pretty universal. That’s all we’re focusing on here—the basics. We’ll be mimicking a basic 3-point lighting setup with a little bit of corner-cutting since we’re not working in the real world. Here’s a list of parts of studio lighting we’re going to discuss a brief word on the role they’ll play in our scene.
Main Light (key light)
The main light is, as its name implies, the primary source of light in your studio setup. In cases where natural lighting is present, such as sunlight, one could arguably consider that light as a second main light as well. More on that in a bit.
Fill Light(s)
Fill lights help create a more balanced appearance by softening the shadows created by main lights. In real-world studio setups, these lights are diffused to prevent creating harsh shadows of their own. In 3D studio setups, an equivalent effect can be achieved simply by scaling up your light’s size.
Backlight
Backlights can also be referred to as “rim” or “hair” lights depending on the context in which they’re being used. Backlights are used to help separate the object of your scene from the background and highlight its edges. Backlights are especially popular in portrait photography but not always required in product photography.
Backdrop
The backdrop is the “background” you see in the image. This helps “collect” your scene light and plays an integral role in defining the overall feel of your scene. For example, a green backdrop (green screen) is often used on Hollywood sets to allow digital backdrop replacement later in production lines.
Object
This is what we’re rendering—our 3D model. This is what you’re pointing the camera at (in most cases), the relative point from where you’ll be gauging the balance of your lights, and what your clients are going to be looking at. It’s important to keep in mind the positional relationship between your object and lights. For example, do you move a light or rotate an object to soften shadows? Sometimes it’s not always an easy choice.
Creating the Studio Lighting Setup
There are many different ways to go about this so try not to focus on specific approaches and more on end-result. The basic idea is to create some degree of global lighting and then compliment it with additional fill lights. All it takes to build a solid studio setup in 3DS Max is a plane object, a camera, and a handful of lights. You’ll have to tweak your settings initially but once you get the look you’re after you can reuse it over and over again! Let’s break the process down into a series of easy-to-follow steps.
Step 1: Create the Backdrop
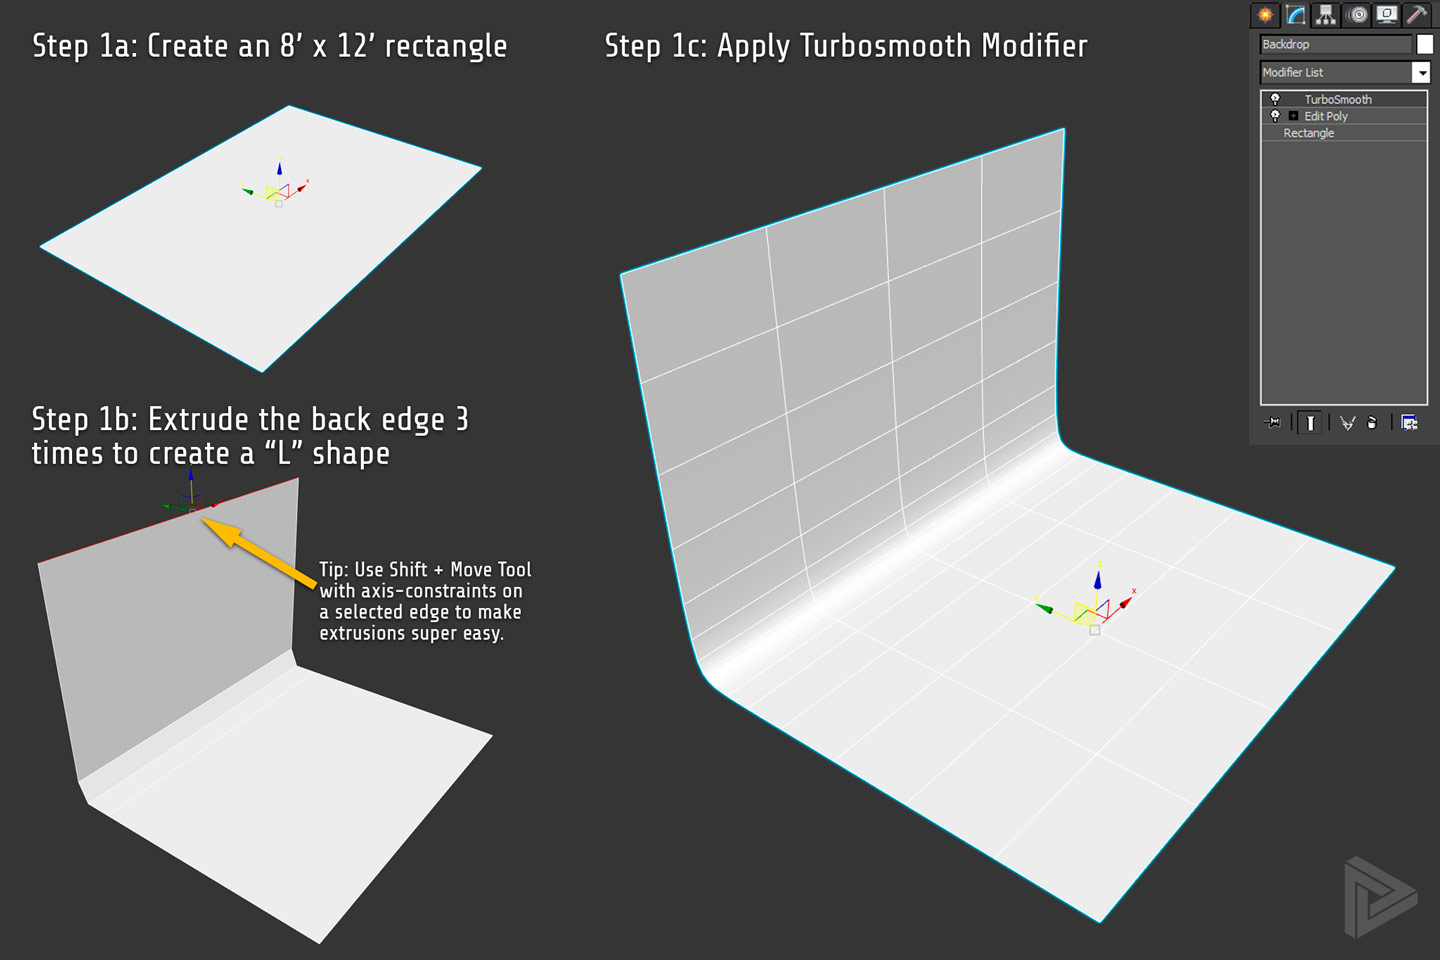
Add a backdrop by creating a plane, extruding the edges to create an L shape, then apply a Turbosmooth modifier with 2 iterations.
Create a backdrop for your scene by starting with an 8′ deep x 12′ wide rectangle and adding an Editable Poly modifier to make it a solid object. The next step is to start creating the general shape for the final backdrop. This can be done by making edge selections and applying the Extrude command from the Editable Poly or by holding Shift and dragging a selected edge. By using Shift + Axis constraints this can be accomplished quickly.
Create the first extrusion on the same XY plane as the original rectangle. Create the next one at a roughly 45-degree angle upwards. Create the next one straight upwards along the Z-axis. After you have these edge extrusions completed, apply a Turbosmooth modifier and set the number of iterations to 2. You should end up with a result that looks something like the image above.
Step 2: Add the Camera
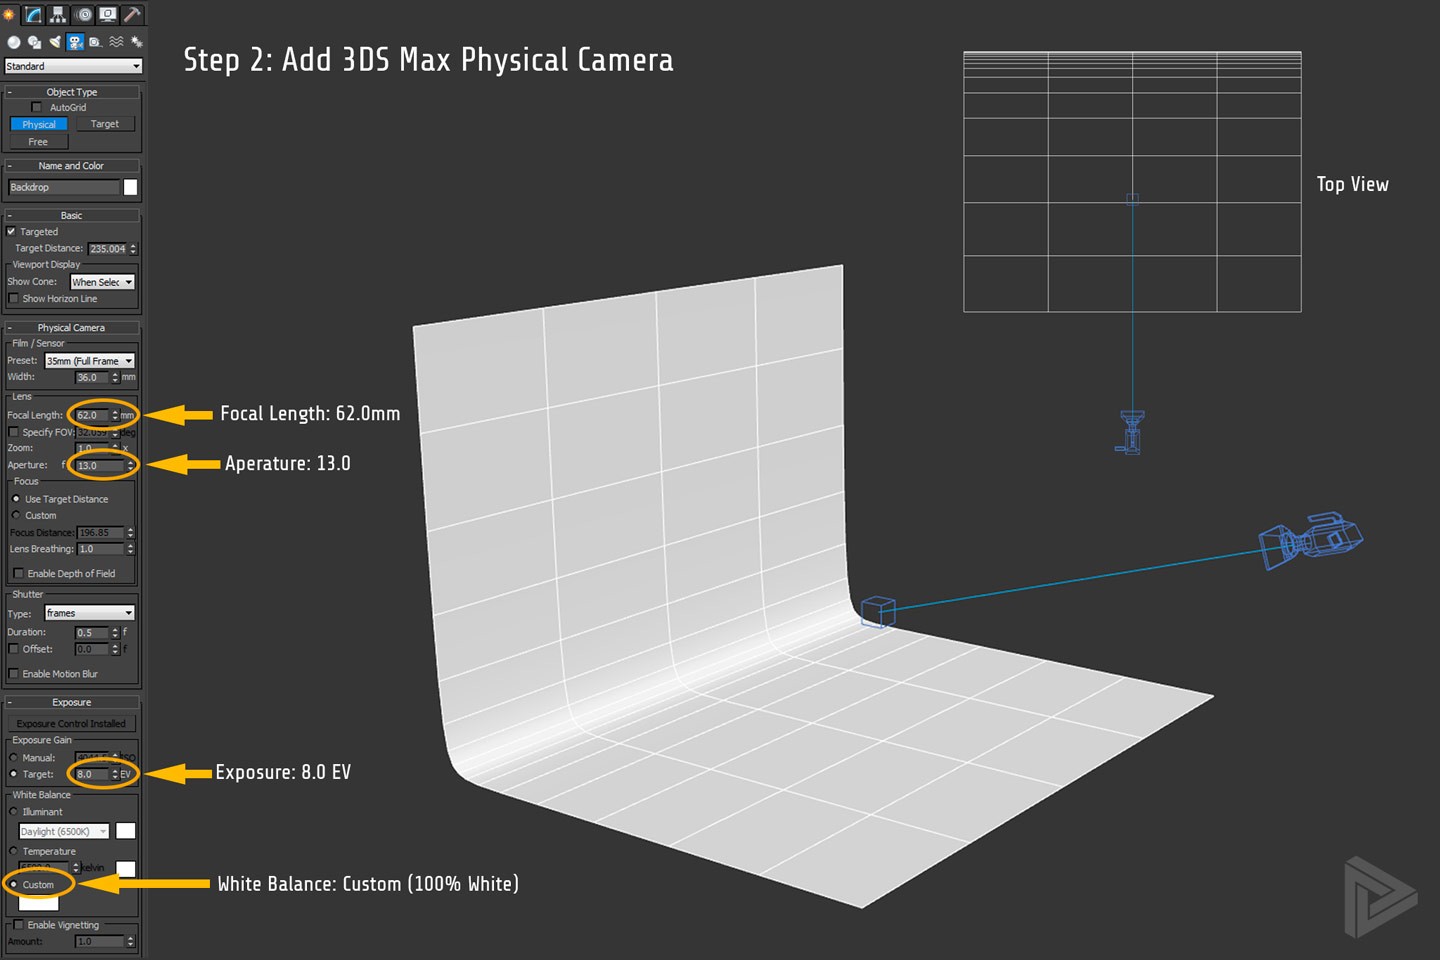
Add a camera to your scene and adjust the settings to your preference.
What’s a studio without a camera, right? Create whatever kind of camera you want and use whatever settings you want. Personally, I tend to use the 3DS Max Physical Camera with the settings shown here. Here’s a brief explanation of why I like these settings.
Focal Length @ 62mm: This helps to get away from the fish-eye lens end of the focal spectrum and produces those nice, straight, parallel vertical and horizontal edges one loves to see in Architectural Photography. Narrower focal lengths can achieve the same effect but require tilt-corrections which can be a pain. In the real world, this effect is often achieved by using a tilt-shift lens. In the digital world, we can just back the camera up as far as we need to.
Aperature @ 13.0: This will control overall scene brightness but, for our purposes here, will help create a deep field of view. This helps control how “blurry” things get when you zoom in. This is where I start from but you should be ready to adjust this based on the types of shots you’re setting up.
Exposure @ 8.0: Be prepared to tweak this with every new scene. I find 8 EV is a good guess on where to start but rarely ever create a series of final renderings without bumping it one way or another. Another option here is to use Exposure Control in 3DS Max’s Environment & Effects panel (press 8 on keyboard.)
White Balance: I like to use a “neutral” white balance and get any color-correction I need in Photoshop. I’ve seen lots of studio lighting tutorials that try to add color to lights or use odd white balance settings to achieve some blue-on-yellow balance. That approach has its place but adds another layer of complexity I try to avoid.
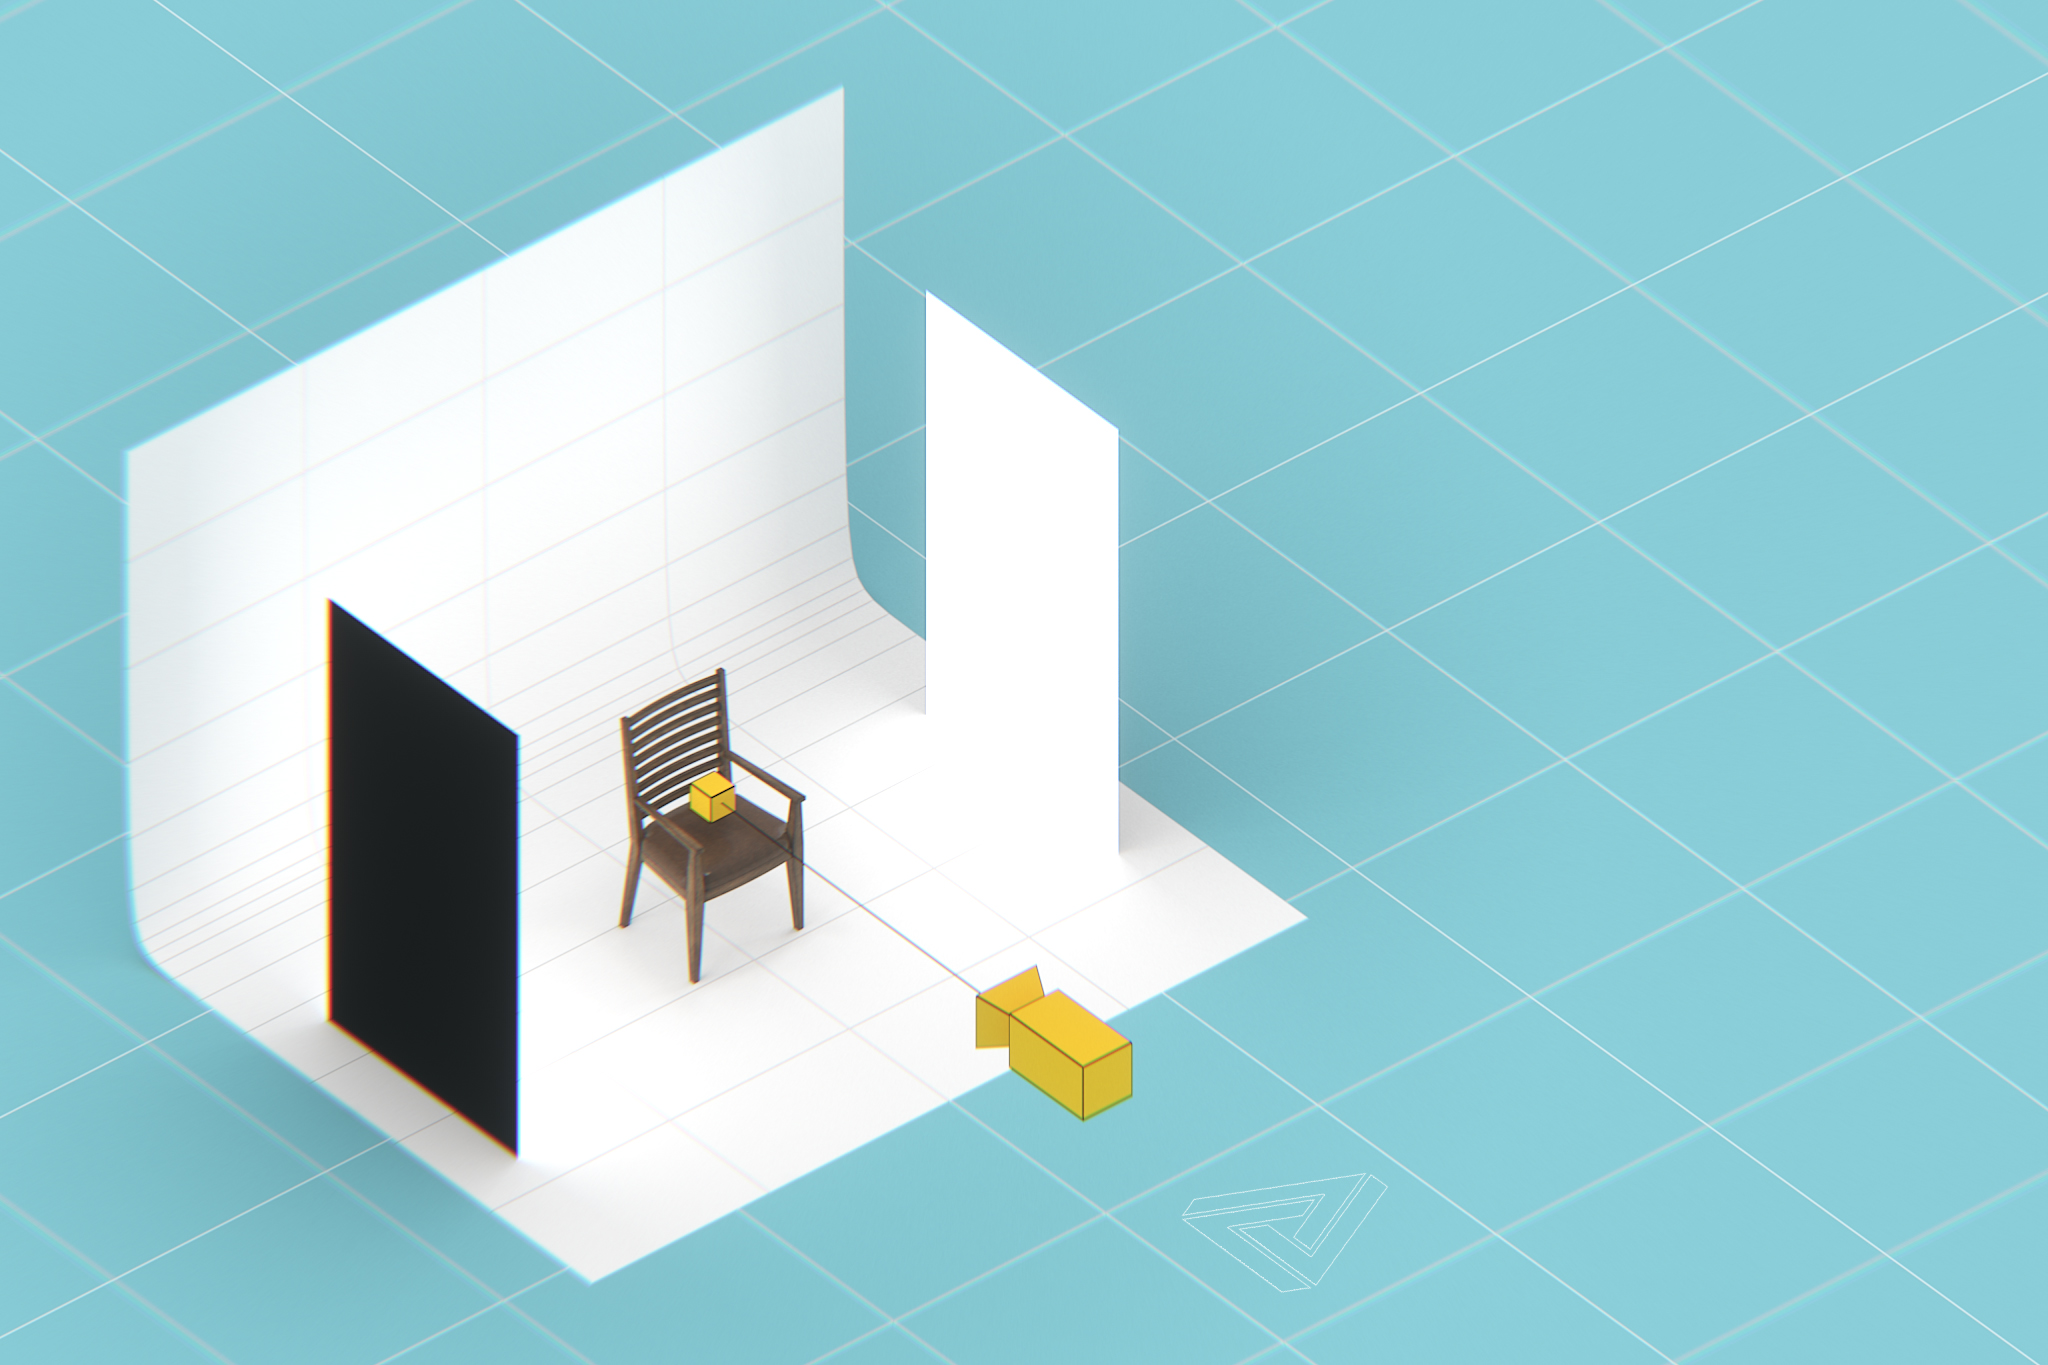
Step 3: Add the Object

Adding your scene object early can help you understand how to best position your lights
It might seem redundant to have adding your scene object listed as a step but believe me—it’s important. Having your scene object added early on can help you make focal range adjustment to your camera, better understand where to position your lights and whether they need to be re-sized, and if you need to make any other major adjustment before moving onto lighting.
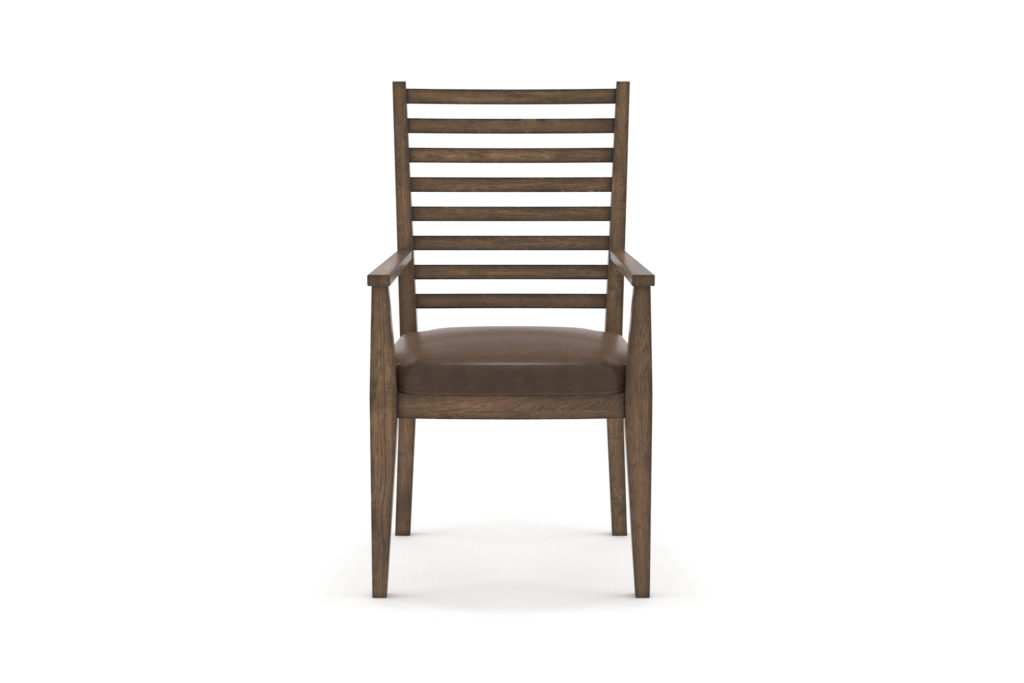
Starting out with as solid of a composition as possible saves headaches later. Here I’ve used the Firmus Armchair which has a seamless reclaimed oak texture and worn brown leather on the seat. After all, there’s not much use in creating a decent studio lighting setup if you don’t have a decent 3D model and texture use.
Step 4: Add the Main Light
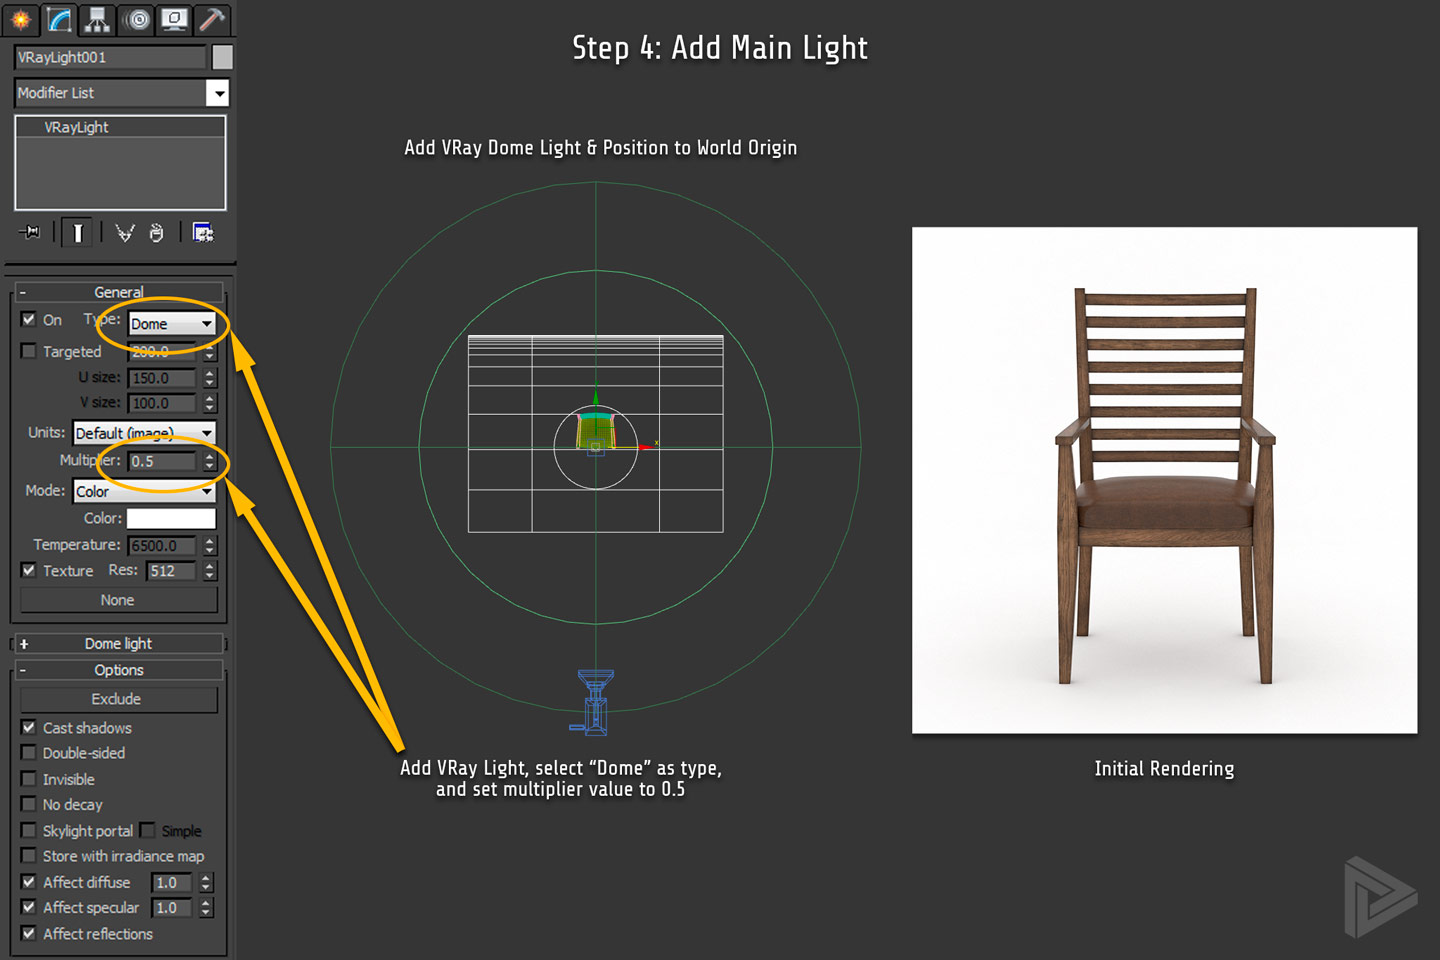
Add a VRay Dome light as the main light and watch the magic happen
The next step is to add a main light to the scene. There are several approaches that will work here but, over the years, I’ve found using a VRay Dome Light to be the simplest and most effective. Alternatives include adding large plane lights, ambient lights, adjusting environmental settings, and using HDRI maps (usually via VRay Dome Light as well.) All things considered, the VRay Dome Light is incredible.
In the image above, I’ve created the dome light, set its brightness multiplier to 0.5 (default is 1) and positioned it to the center of the scene by adjusting its the x and y coordinate values. The rendering on the right side of the above image shows just how effective the dome light really is. In some cases, you may not need to add any more lights—especially if you’re just doing test renders.
Step 5: Add the Fill Light(s)
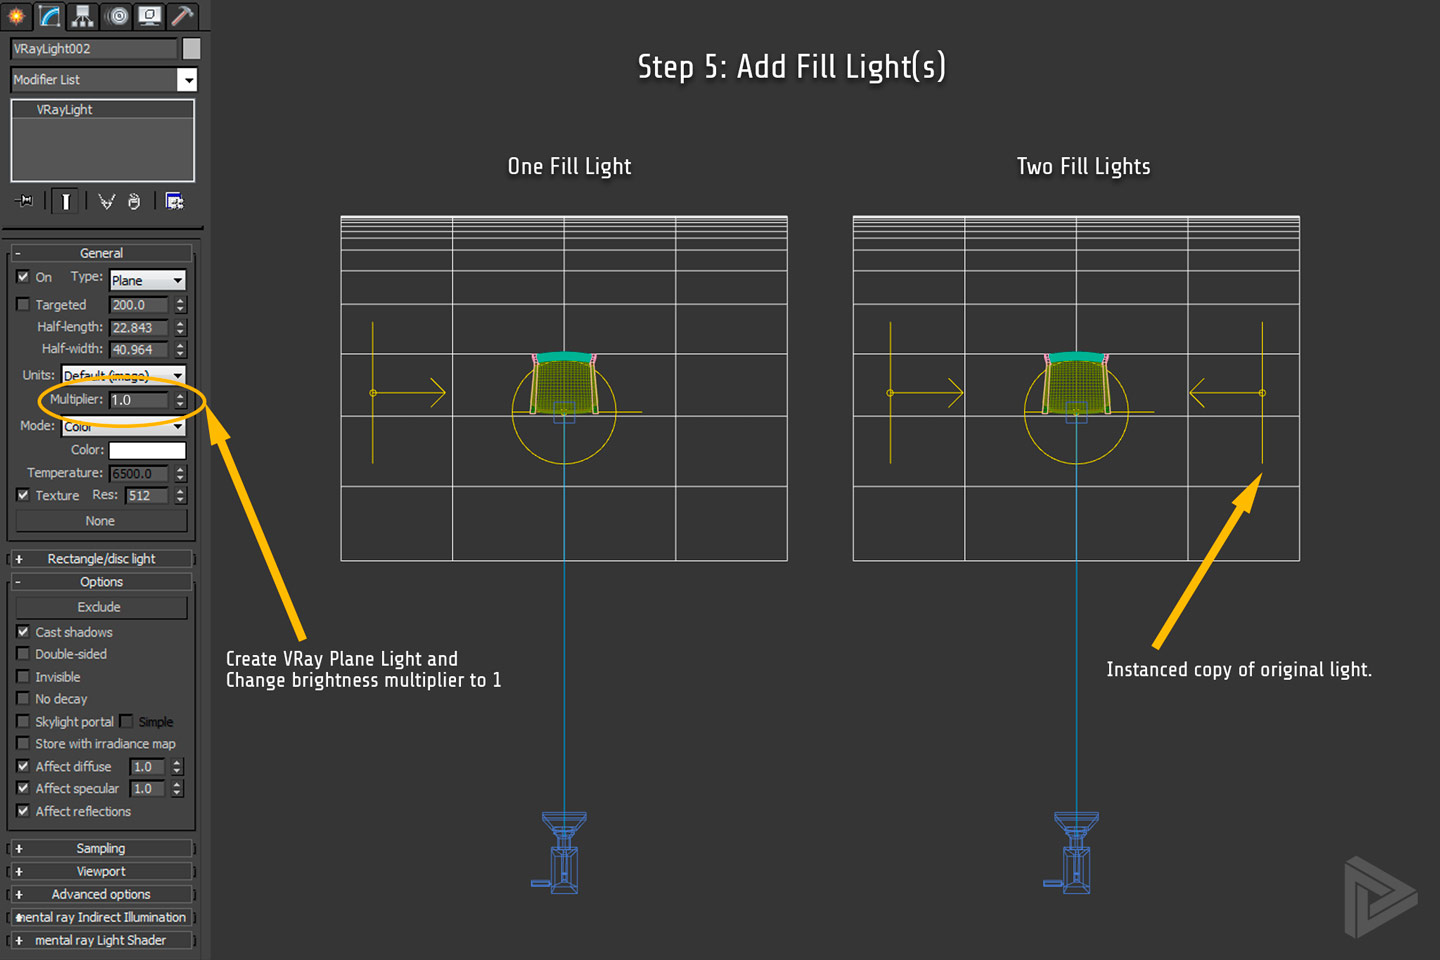
Add a VRay Plane light to the left of your scene object. Add another on the right side if you want to as well.
Next, add another VRay Light object, set as Plane type, and position it on the left side of the scene object. The light should taller and wider than your scene object. The larger the light, the softer the shadows it will produce. In the real world, photographers often use diffusers (a.k.a. soft boxes) to soften shadows. In 3DS Max, you just have to increase the size of the light.
Here I’ve added 2 VRay Plane lights as fill lights, one positioned on the left of the object and one on the right. The right light is an instance of the left so any adjustment to the brightness of one will adjust the brightness of the other. This isn’t always a good idea but for studio lighting, it helps create a favorable balance. Taking into account our camera setting and presence of the dome light, start with a brightness multiplier of 1.
If you want to get a more pronounced effect from your fill lights (stronger shadows, brighter highlights, etc.) just increase their power relative to the main light. This might mean adjusting the EV parameters (exposure value) of your camera to avoid burnouts in your image. This part of creating a studio setup is where an individual artists style starts playing a role.
Step 6: Add a Backlight
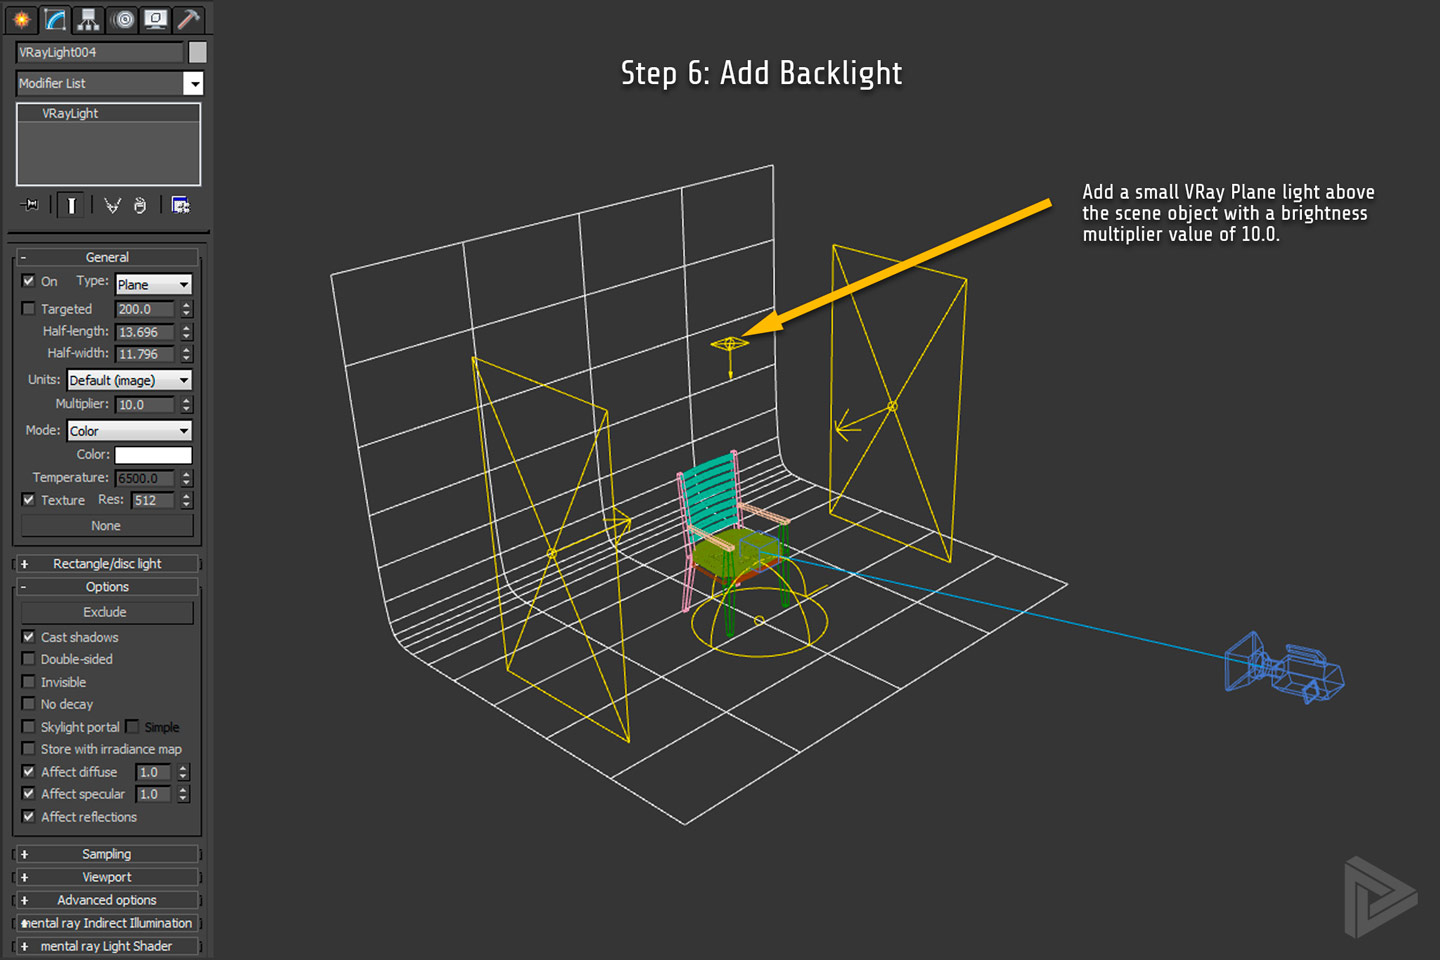
Backlights go by several names and can be used in many different ways. Here, we’re adding one above the scene object to create stronger shadows.
Next, we’re going to add a “backlight” to our scene to create some stronger shadows and stronger diffuse lighting on our scene object’s topmost surfaces. This, in effect, is meant to simulate lighting that people are used to expecting from being indoors. Professional photographers are likely to roll their eyes at calling this a “backlight” but let’s just roll with it. Scoot it back and angle it forwards if the vernacular is driving you crazy.
This light should be very small compared to the rest. Remember, the larger the light source, the softer the shadows it will produce. We want strong shadows so this light should be small. With small lights, you can also crank up the brightness values a bit more recklessly. This light will create a stronger shadow on the ground plane beneath our model, catch a few highlights on edges facing the camera, and lighten up the diffuse color on the tops of surfaces. Having evolved with the sun above our heads—that’s what our eyes have come to expect.
Step 7: Adjust as Needed
Finding the right settings is a process of adjusting brightness values of scene lights, adjusting camera exposure values, and pressing the “render” button several dozen times. Taking the time to create a well-balanced studio lighting setup will save you tons of time if you find yourself constantly rendering 3D models in such settings. Just save it as a file you merge into an existing file and click render. There’s always some tweaking involved but not having to start from scratch each time is what’s important.
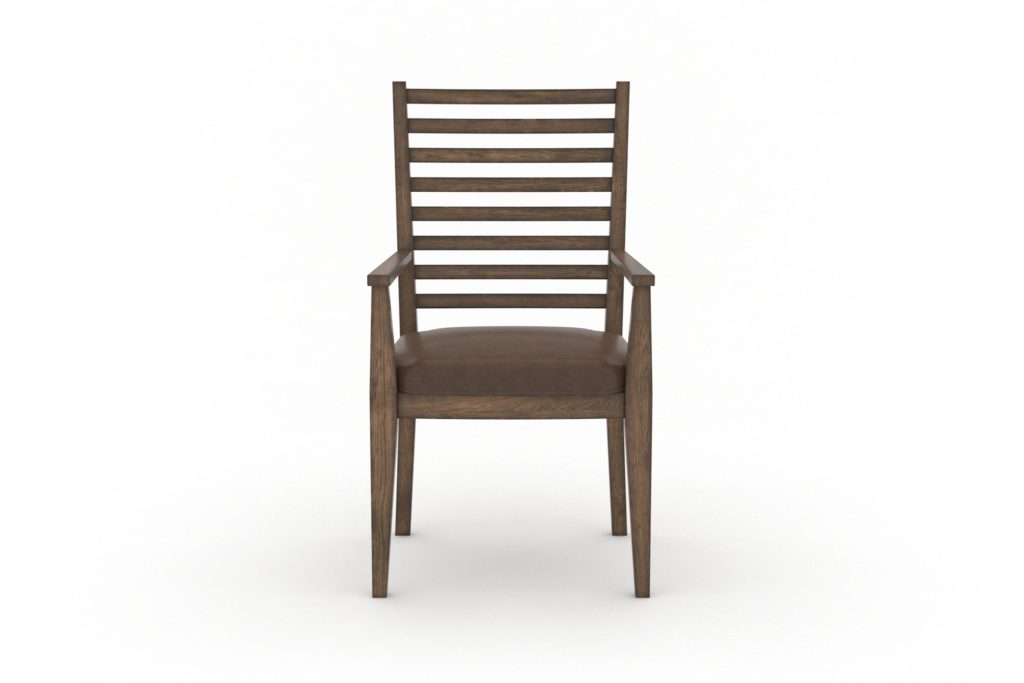
In the image above, you can see several test renderings that were done throughout the process of creating this studio setup. What should jump out first is how subtle the changes were. This is because the VRay Dome light does 90% of the work right out of the gate. The most dramatic shifts in the final image can be seen in the shadows beneath the model. As I said before, a VRay Dome light may be enough to meet your requirements.
The biggest difference between the first and last rendering is that the shadows are now more dynamic and there are some nice highlights on the front edges.
Final Thoughts
Having a dependable (and predictable) studio lighting rig is essential to most 3D workflows. Even if you’re rendering your 3D models in larger more complex scenes you’re probably doing test renderings during your texturing and UV mapping stages. Once you have your studio rig modeled and saved somewhere all you need to do is import it (including the lights) into your 3D model file and click render. That saves a lot of time.
The setup outlined here is a very basic design and won’t win you any awards for ingenuity or style. The simplest upgrade is to add some reflectance to the studio backdrop. I usually skip over this since it adds to render time and isn’t needed for most cases that I’m rendering on plain white backgrounds. The last thing—and I can’t stress this enough—is that the VRay Dome Light is a lifesaver and you should always be using it unless you have a very good reason not too!


