
Using Multiple UVW Map Modifiers in 3DS Max
UVW mapping is one of the most time-consuming aspects of 3D visualization. Depending on the complexity of your model, you may spend hours unwrapping your model. I like to avoid unwrapping UVWs as much as possible and have found that making sub-object selections and adding multiple UVW Map modifiers can help.
The Problem
When creating 3D models it’s often possible to generate UV mapping coordinates as a by-product of the modeling process. Spheres, cubes, and other basic primitives automatically generate mapping coordinates on creation. Surface objects like Editable Poly or Editable Mesh don’t do this by default but have a “generate mapping coordinates” box that can be ticked. This gets one started out on the right foot but non-Euclidian actions can quickly wreak havoc on the mapping solutions—meaning you have to start getting your hands dirty.
UVW Map vs. Unwrap UVW
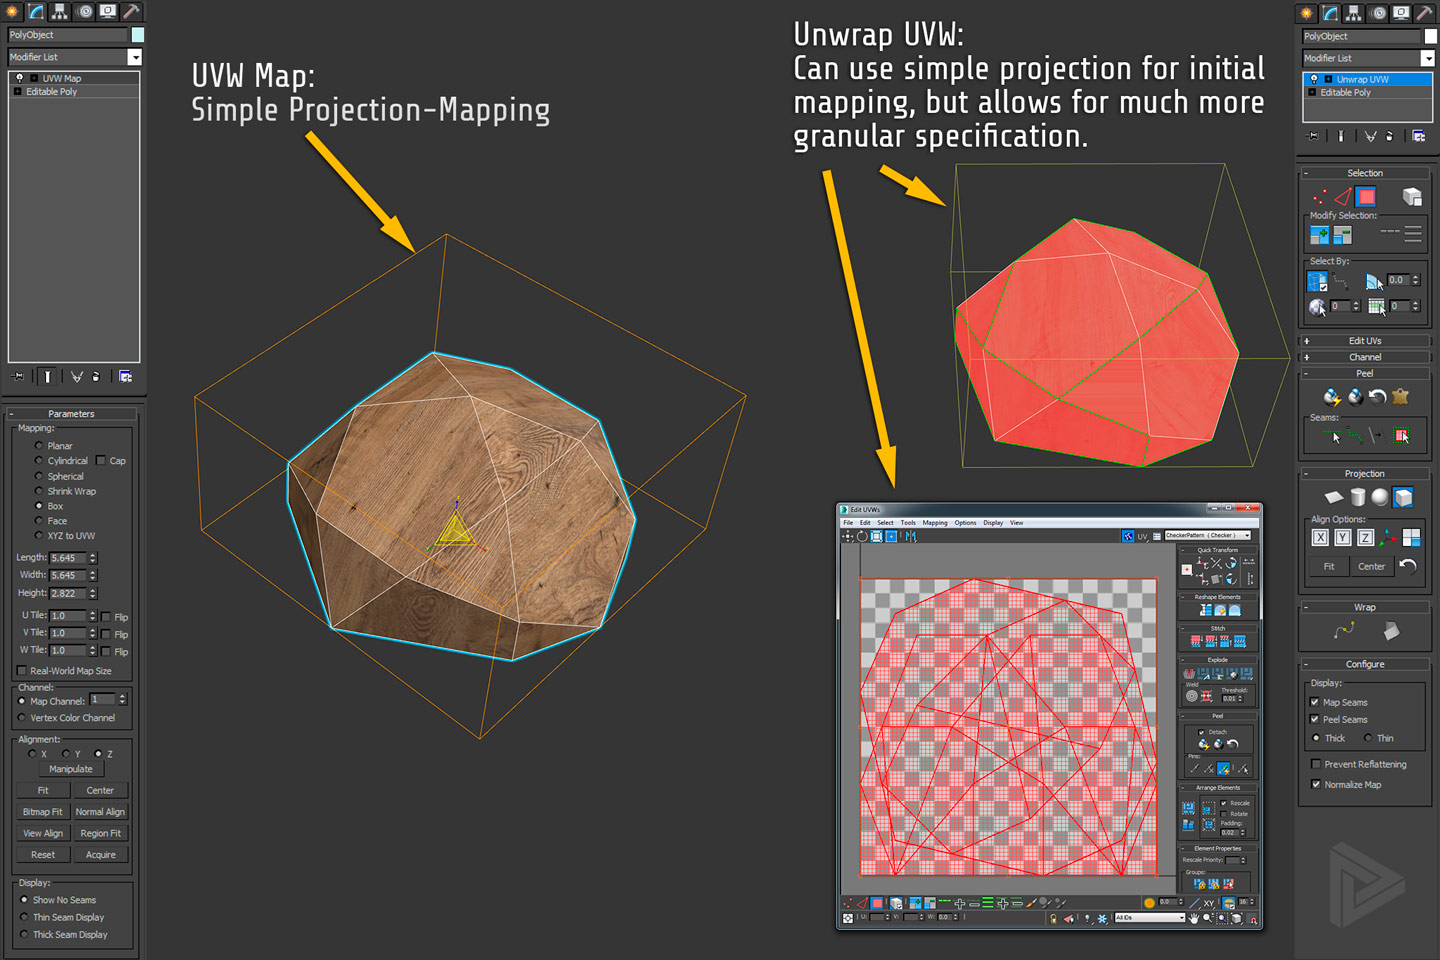
The UVW Map modifier in 3DS Max provides a quick-and-dirty way to add mapping coordinates to a scene object. It projects mapping grids onto your model rather than explicitly defining edges or boundaries. When working with simpler 3D models, the shortfalls of this method are greatly outweighed by the amount of time it saves compared to unwrapping.
The problem with the UVW Map modifier is that it only offers basic types of projection mapping, like Box, Plane, Cylindrical, and Sphere
The Unwrap UVW modifier is a whole other animal compared to the UVW Map. This modifier is, arguably, another stage in workflow compared to an added measure like the UVW Map. This tool lets one manually define where seams in texture tiling should be, features tools like the Pelt tool to evenly distribute mapping coordinates, and has a lot of third-party plugins to help along the way.
UVW Map Modifier Issues
In a perfect world, we’d all be able to justify the time required to provide seamless, beautifully-unwrapped UVW solutions. That’s never the case and knowing how to “fake the funk” when required is an essential skill of any professional artist. In this case, knowing how to extend the functionality of the UVW Map modifier to mimic the end-result of unwrapping your UVWs really pays off. The problem with the UVW Map modifier is that it only offers basic types of projection mapping, like Box, Plane, Cylindrical, and Sphere.
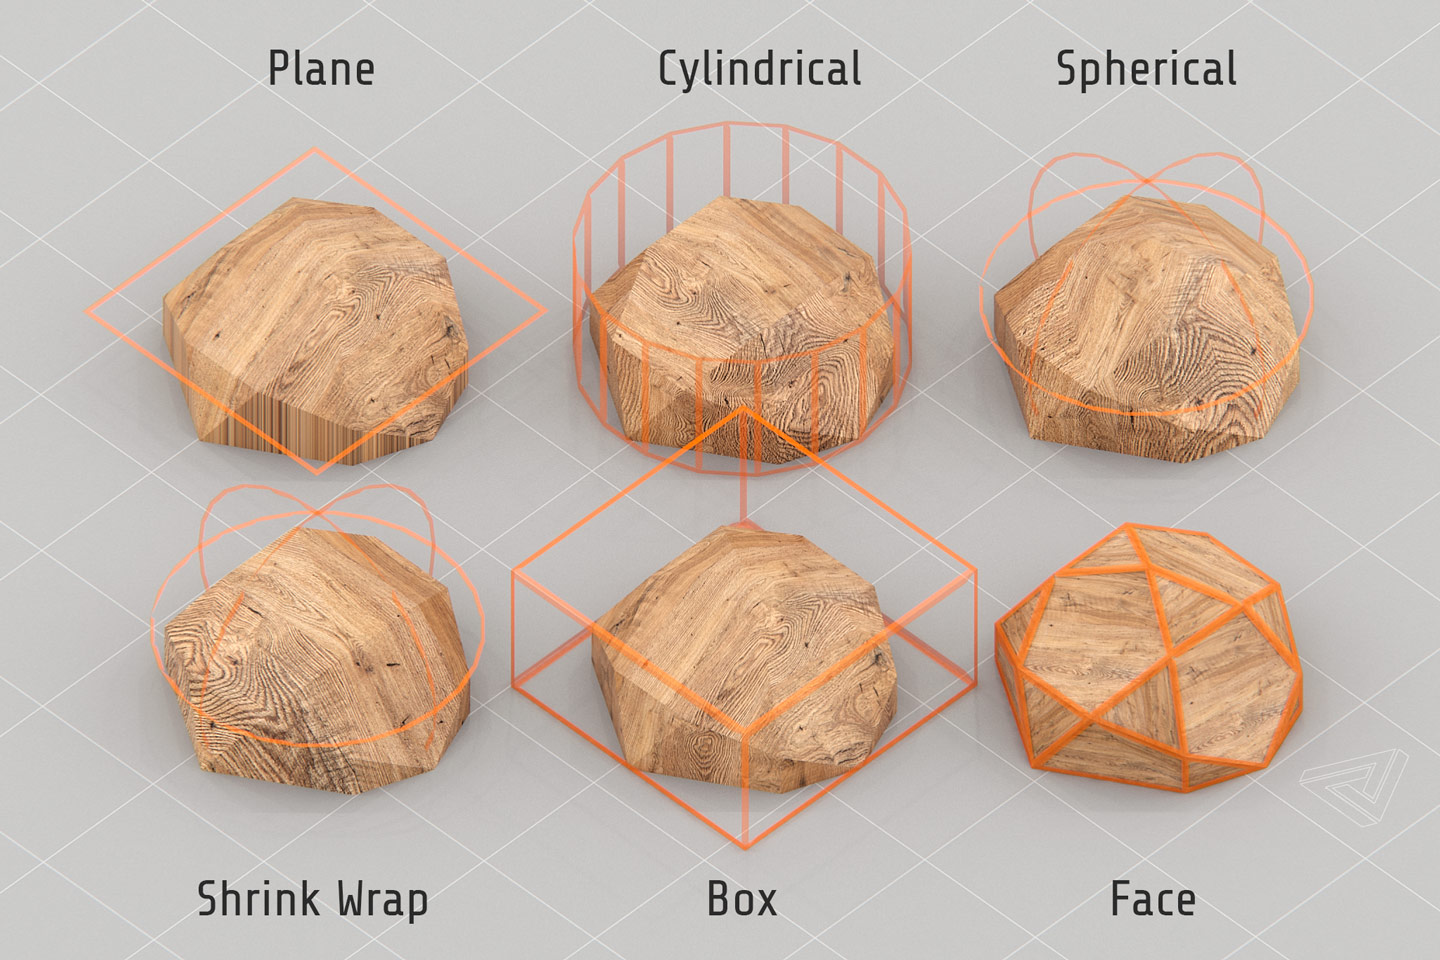
UVW Map Modifier Projection Types
Click to enlarge
If you’re applying textures to buildings, boxes, or working with procedural textures this isn’t a big issue. Most objects aren’t perfect cubes, spheres, or cylinders though—but their individual parts might be close enough. For example, the Great Pyramid of Giza doesn’t resemble a plane at all—it’s a 3-dimensional shape after all! However, each of its individual faces does resemble a plane.
You can see in the image above that each UVW Map modifier projection type functions quite differently. Usually, unless you’ve got a close similarity between your object and another projection type, plane and box types are the best place to start. There’s another mapping type XYZ to UVW that’s not pictured. It’s used more for animation-related issues of scaling and not what we’re talking about here.
That’s the trick—applying individual UVW Map modifiers to sub-object selections. Rather than approaching things from a “which projection type will fit this object best” perspective consider things more along the lines of “which projection type will fit this part of the object best.” To do this, you need to start adding UVW Map modifiers on a sub-object level, such as to individual faces (usually the case) or elements.
Sub-Object UVW Mapp Modifier Technique
The process is simple, make a sub-object selection then apply a UVW Map modifier to it, then tweak it to your needs. You may need to make many sub-object selections and apply many UVW Map modifiers depending on the complexity of your model. There are some corners you can cut to save time (making multiple sub-object selections for one) but ultimately this process is still pretty tedious. The goal is for it to be much less tedious than actually unwrapping your model.
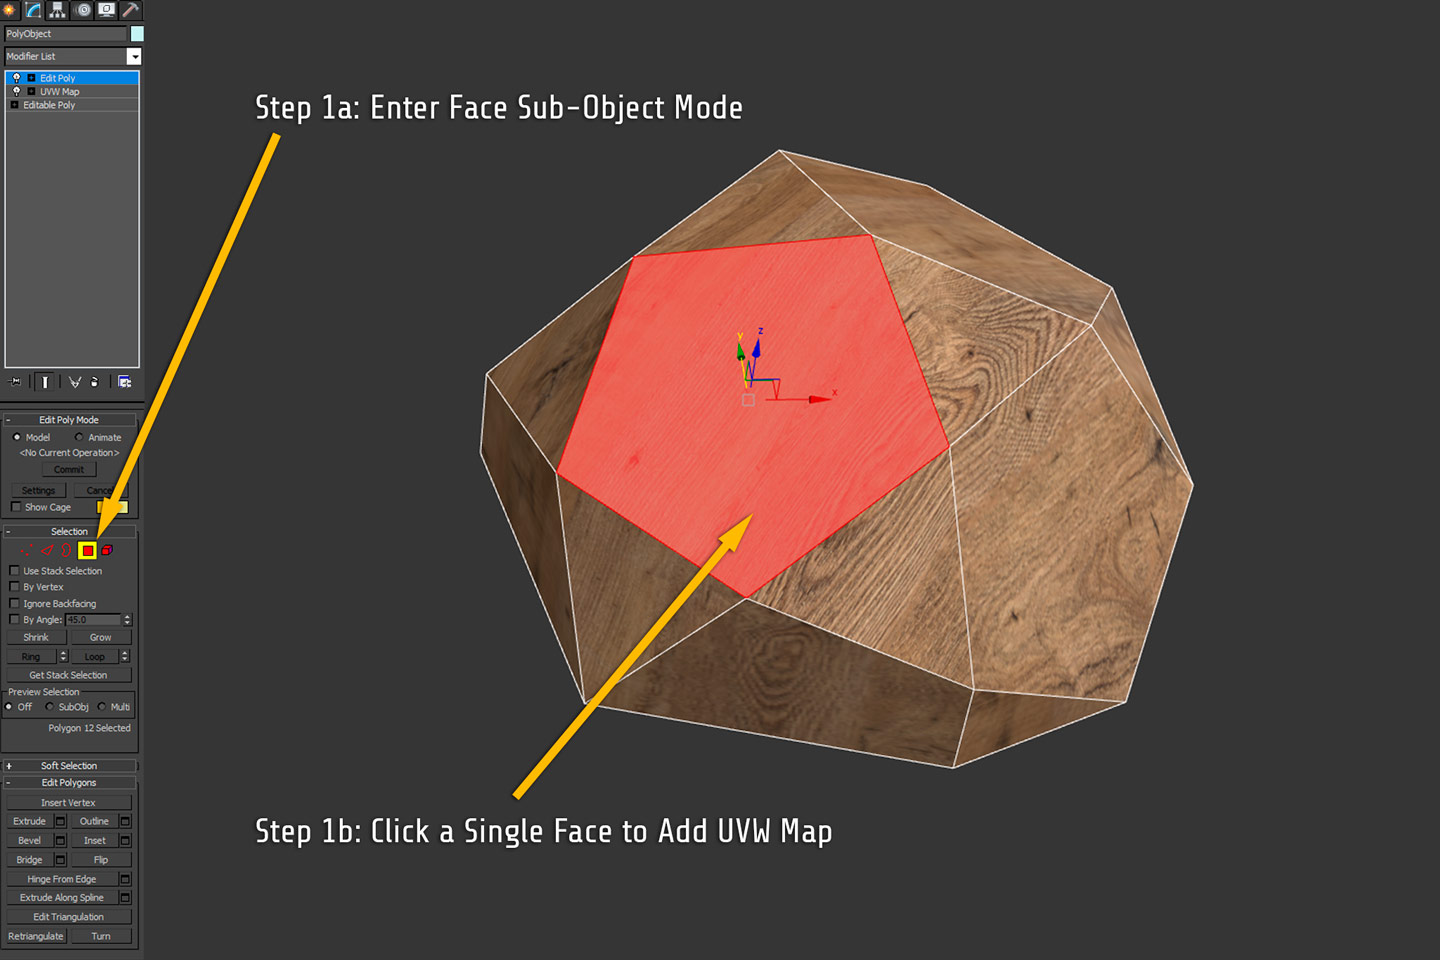
Step 1: Make Sub-Object Selection
Click to enlarge
The first step requires the active modifier layer selected to be either and Editable Poly or Editable Mesh—such that you can make a sub-object selection. It’s possible to align a UVW Map modifier to a vertex, edge, or border sub-object selection but it’s not very practical. It simply uses the calculated center of selection to align the UVW Map modifier’s XY alignment with the object (don’t worry about it.) In practice, this method almost always uses face mode for sub-object selection. Element mode is useful sometimes as well, especially in the case of some imported models.
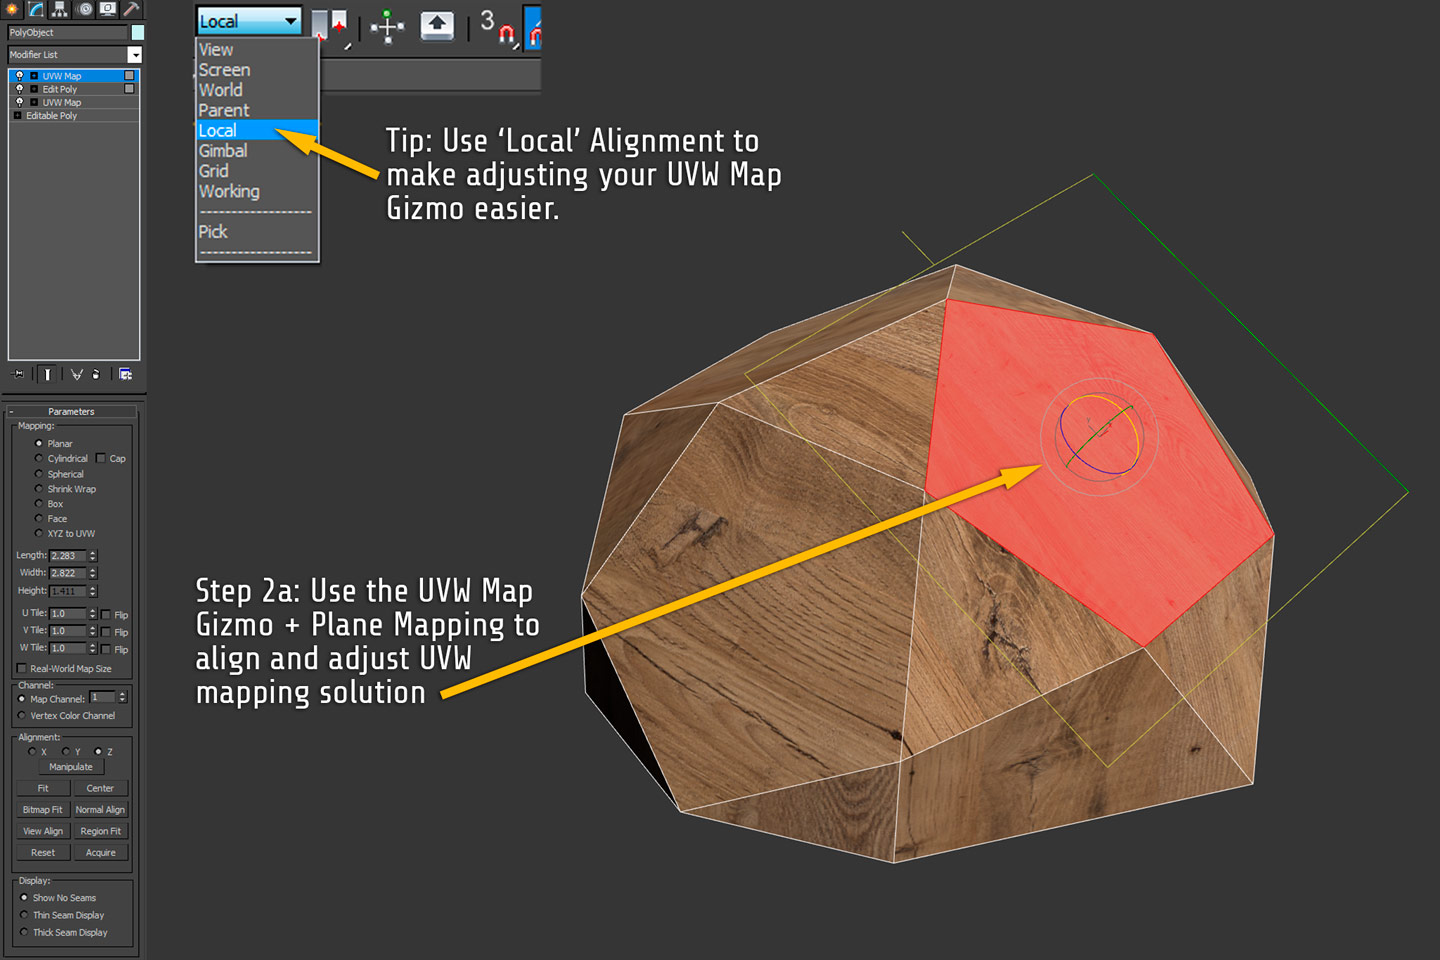
Step 2: Apply UVW Map Modifier + Adjust Gizmo
Click to enlarge
Next, add a UVW Map modifier with the sub-object selection active. This will position a UVW Map gizmo, with the shape of your specified Mapping type (Plane by default) in XY alignment with your sub-object selection. In most cases, this positioning can be improved by adjusting the gizmo using 3DS Max’s three standard transformation tools—move, rotate, and scale. Change your object’s Reference Coordinate System to local to make adjusting the UVW Map gizmo much easier.
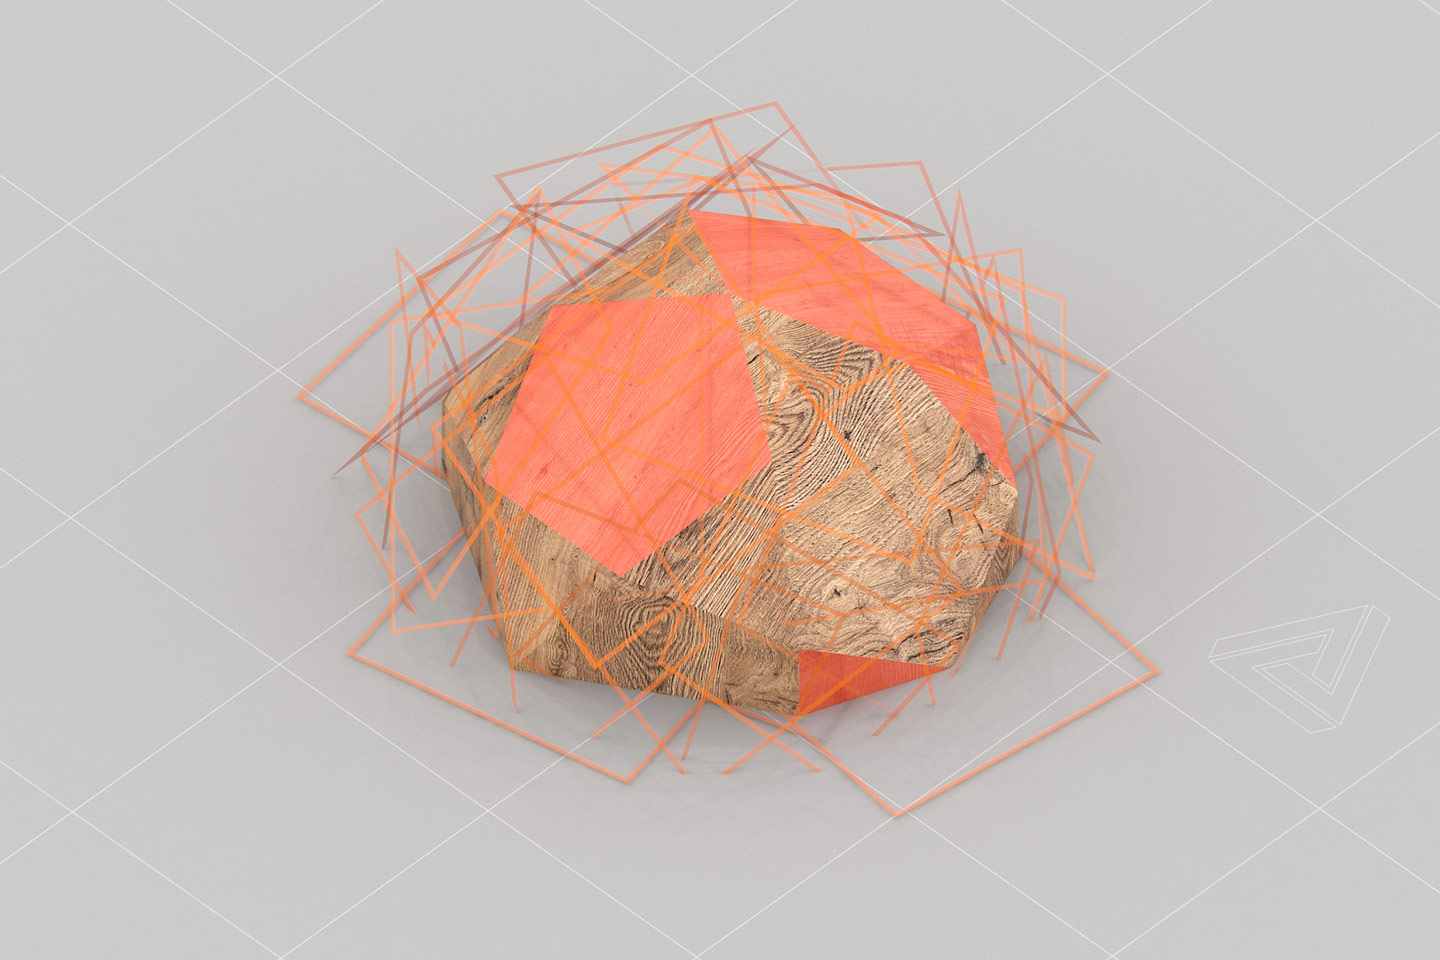
Step 3: Repeat as Needed
Click to enlarge
This technique can be used to apply a UVW Map modifier to each face on an object if you so desire. By that point, you’d be better off just using the Face projection option! This technique is extremely useful for UV mapping objects like furniture which may have multiple different grain directions on a single piece. In such cases, it’s a time-efficient alternative to creating multiple objects then attaching them or unwrapping your object’s UVWs.
Battle-Tested
This technique is a serious time-saver when dealing with fairly simple models. However, it usually won’t allow the precision one needs when rendering macro-style, super-up-close camera angles. In almost all such cases you’ll be stuck grinding it out and unwrapping your UVWs. There are some other tips that can help apply this technique with ease.
Tip 1: Keeping an Even Scale
Setting explicit values for the Length, Width, and Height (if you’re using box projection) values in the UVW Map modifier will help maintain an even texture scale on your models. The best way to ensure this is possible is to start with the biggest face of your object, find values that cover it adequately, then use those same values for all other UVW Map modifiers that are applied.
Tip 2: Use it on Large Numbers of Faces
It isn’t practical to use a per-face mapping approach with this technique on models where large polycounts are found. Imagine applying and adjusting 10,000 UVW Map modifiers. Actually, don’t—it’s torturous just to imagine. This method is most efficient when large numbers of faces are selected. Try to find a lot of faces that you can apply a UVW Map modifier with Box projection set. Box mapping is always easy.
Tip 3: Add an Extra Modifier on Top for Better Visuals
3DS Max highlights objects’ selected faces when in sub-object mode and that selection is active. When you apply a UVW Map modifier for this technique, that selection from the Editable Poly below needs to remain active. Unfortunately, this means you’re stuck looking at a red-colored version of the selection you’re trying to adjust your UVW Mapping to fit. Depending on your texture map—it can be hard to see the tweaks you’re making. Rather than disrupting the delicate balance of 3DS Max’s settings, try adding another Editable Poly modifier on to of the UVW Map, then re-select the UVW Map modifier and start using the gizmo. No more red-highlighted face!
Final Thoughts
This technique has saved me some serious time over the years but it’s important to realize it’s a corner-cutting method. Your final UVW solution isn’t likely to win any awards but it’s very likely to help you meet a deadline. The tips mentioned above can help you get the best results possible but always be prepared to unwrap UVWs if quality demands dictate so.

