

Creating Bump Maps in Photoshop
Bump maps are used in imaging software, usually 3D rendering software, to simulate texture on a surface. This might be the slight indentations of grain textures on wood or the deep scarring of a war-torn concrete wall. Bump maps are probably the easiest way to add an extra dimension of photorealism and should be part of any 3D artists standard texturing workflow.
Highlights
- Bump maps save time in simulating texture effects on 3D models
- Bump maps and displacement maps work very differently
- Bump maps can be created in Photoshop by following 3 basic steps
- Bump maps & diffuse maps are very closely related when creating materials
- Creating bump maps isn’t always easy or possible and can involve a lot of tweaking
Why Use Bump Maps
Bump maps are image files that are used to help 3D software simulate texture without actually affecting a 3D model’s underlying geometry. That is; the 3D model will look like its geometry has been changed but it hasn’t actually. This is the main different between bump maps and displacement maps. Displacement maps change the physical geometry—bump maps do not. See the difference below:
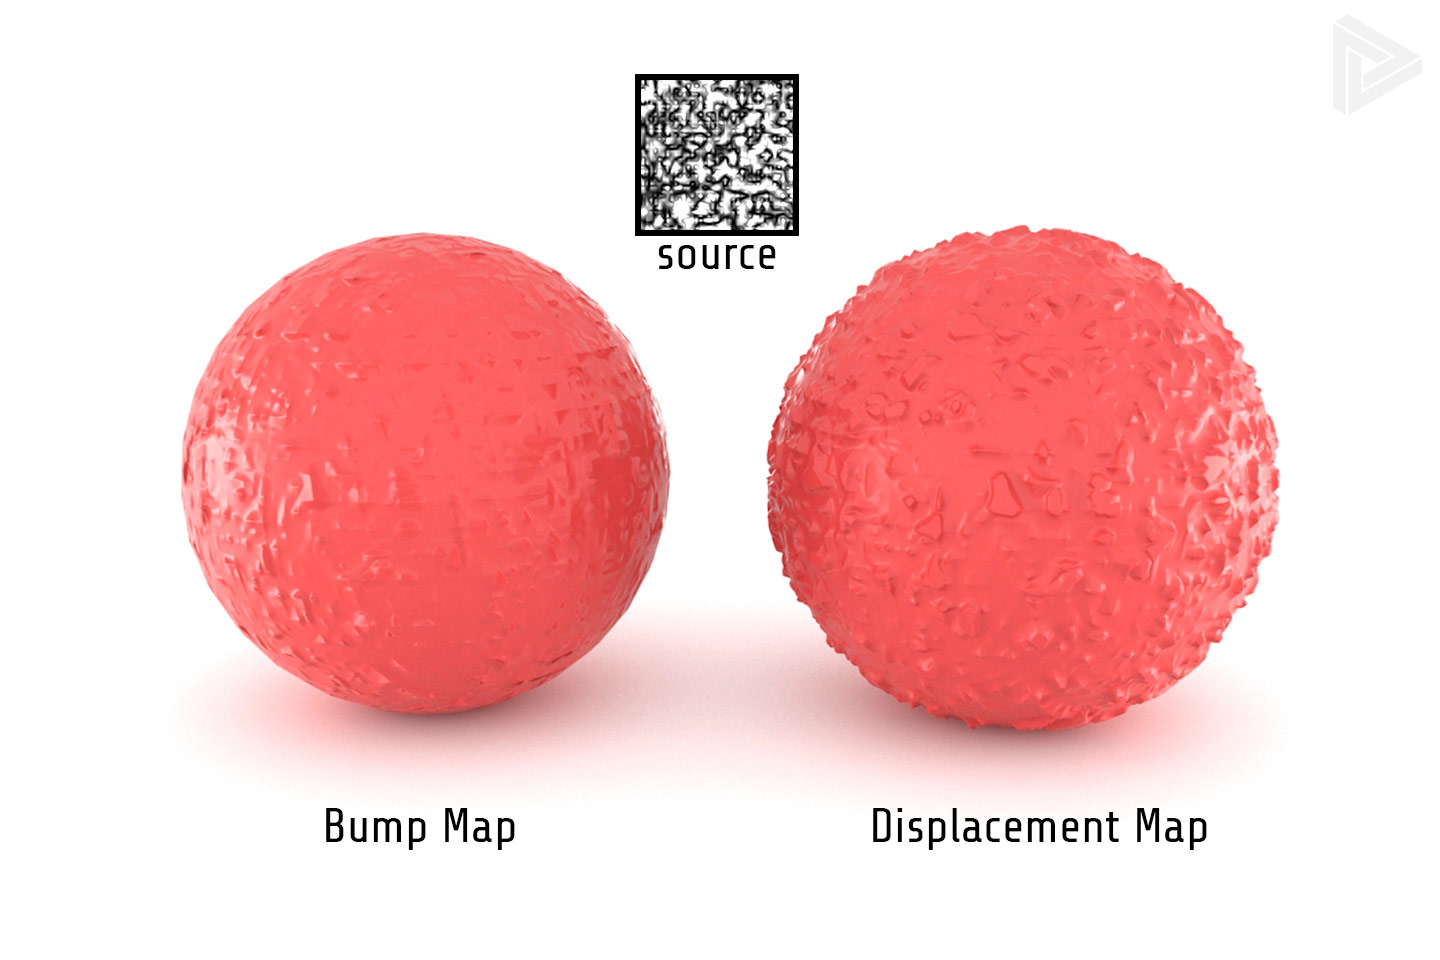
You can really see the difference when you look at the edges—notice bump maps don’t actually change the geometry of the 3D model. Bump maps only affect the surface normals whereas displacement maps affect actual geometry. My general rule of thumb is to use bump maps for representations of subtle texturing and use displacement maps for large representations. An example: use a bump map for wood grain and a displacement map for a brick wall. There’s plenty of other considerations like camera angles and render times.
How to Use Bump Maps
In the image above, I’ve applied 3DS Max’s standard Dent Map to a Vray Material that uses a simple RGB color in the diffuse slot. What that means is the only actual texture map being used is the bump map. In most cases, bump maps align with another texture map like a diffuse map. An example would be a bump map used for the cracks in a wood texture would need to align to the cracks on the diffuse map. See the image below for an example of what I’m talking about:

Here you can see that the bump map is a representation of the grain pattern shown in the diffuse map. This bump map is effectively telling the render engine to make all the grain look like it’s indented. As you might expect, it would look weird if the bump map didn’t align with the diffuse map! The image above is of the Rendernode rough-hewn pine wood texture with the bump map overlaid on the right side (in red) to show how the grain patterns of each image align. Note: don’t use red bump maps.
How to Create Bump Maps
Clearly bump maps are useful. They help add an extra dimension of photorealism to renderings in many cases where manually creating the geometry isn’t an option. Can you imagine modeling the grain of the texture above? Creating bump maps is a straight-forward process that can be done in Photoshop, given a source image. Let’s break things down into steps.
Step 1: Creating a High Contrast Black & White Version
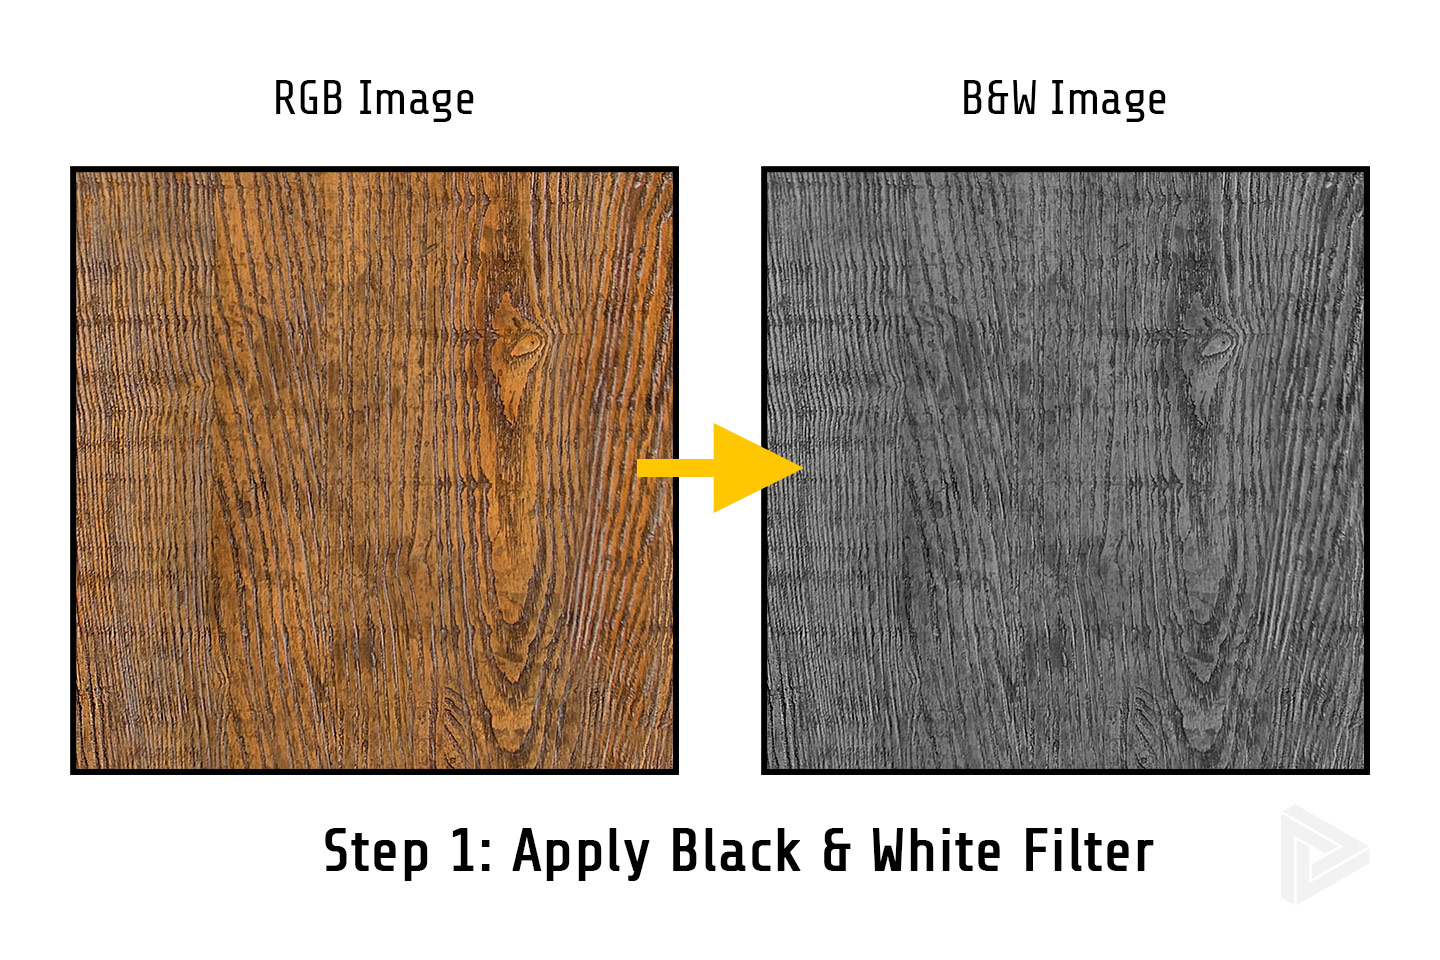
In this image, I’ve done nothing more than copy the diffuse map layer and apply a add a Black & White adjustment layer in Photoshop. Other alternatives include using Red, Blue, or Green color channels from the image. In most cases, using the Red or Blue channel will give you a much better contrast initially—but it doesn’t accommodate on-the-fly adjustments. Tip: add the black and white adjustment layer directly above the copy of your diffuse channel then ALT + Click to constrain it to just the copy of the layer.
Step 2: Increase Contrast
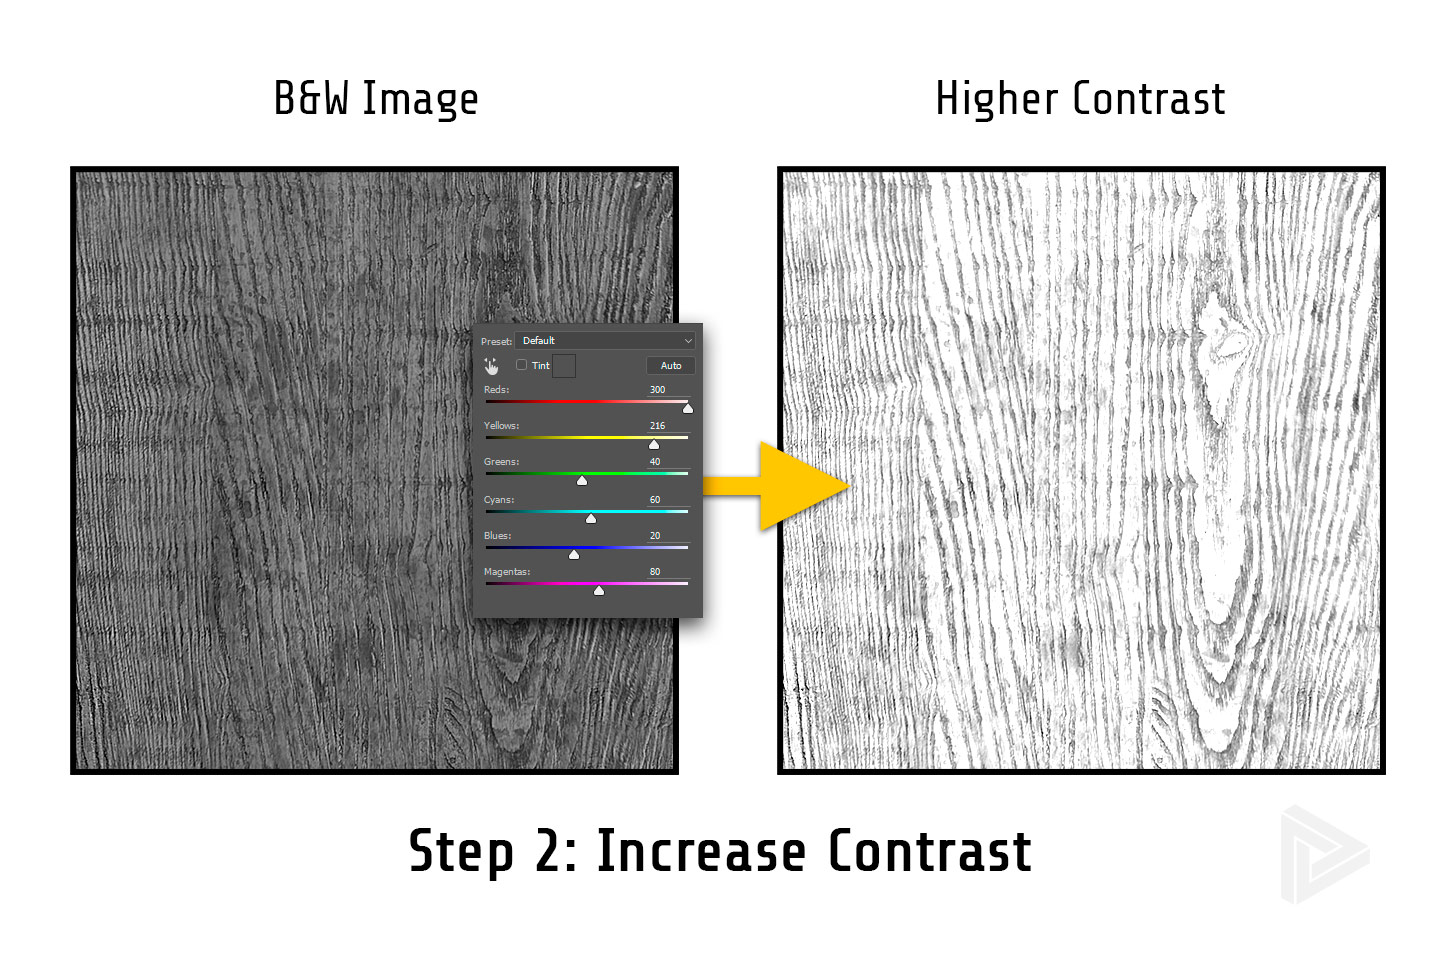
In this image, I’ve increased the “influence” of the reds and yellows by using the parameter sliders of the black and white adjustment layer. In most cases, adjusting the other channels won’t have much impact. The goal here is to make everything other than the grain pattern as close to rgb(255, 255, 255) as possible which effectively creates an image of just the wood grain. As you can see in the image above, this does a pretty good job but still needs a little refinement to ensure a realistic bump map.
Step 3: Refinement
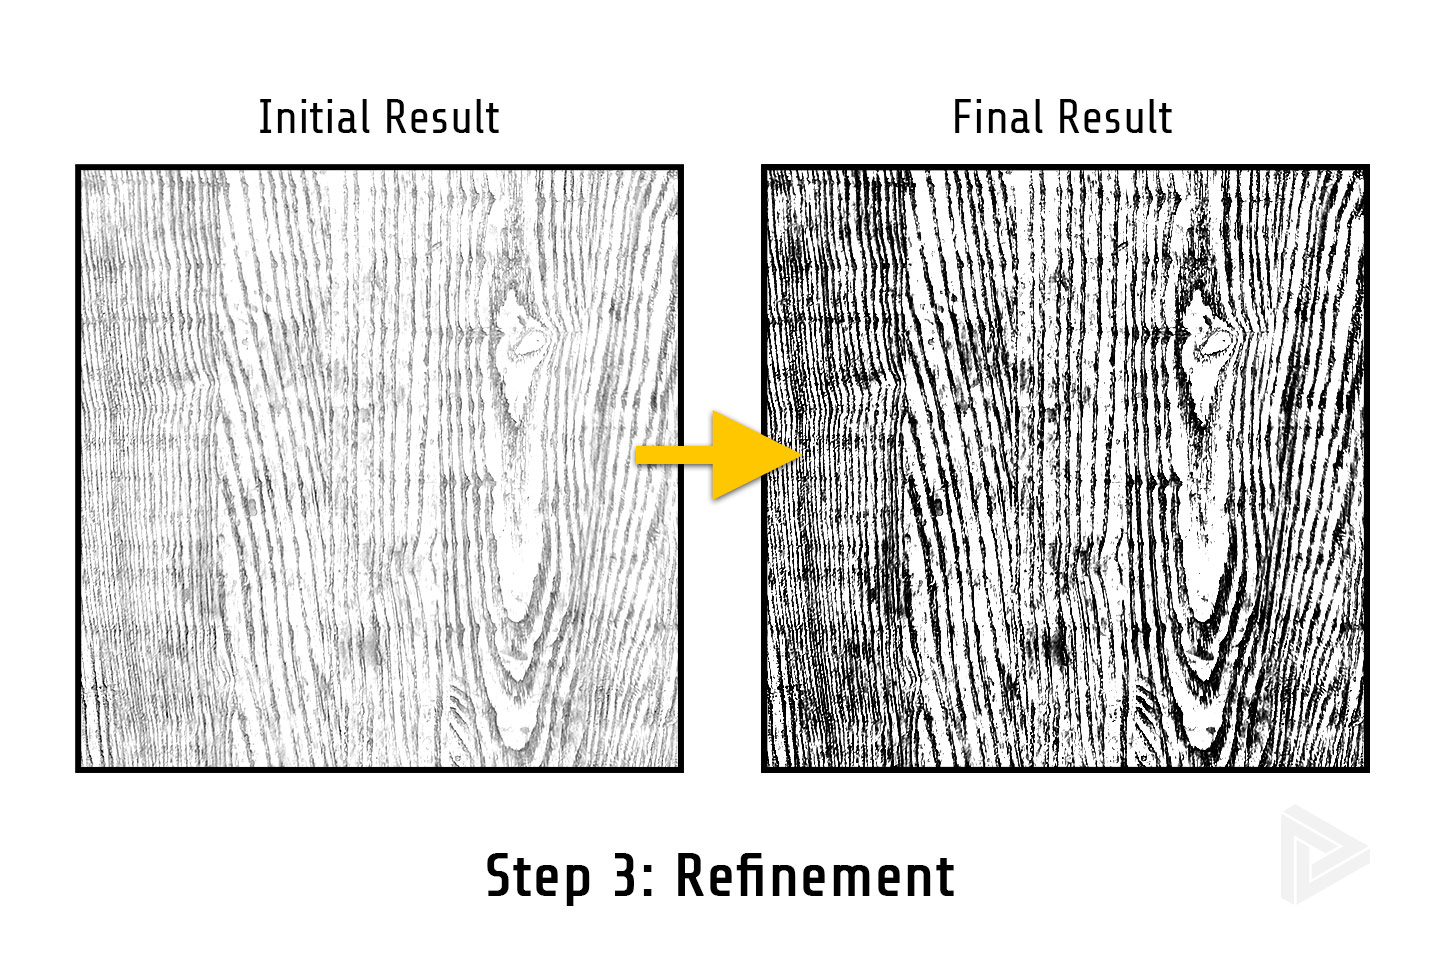
In this image, I’ve added a curves adjustment layer atop the initial result of the black and white adjustment layer. I’ve used this layer to tell Photoshop to make the darker pixels values closer to rgb(0, 0, 0) and the lighter pixel values closer to rgb(255, 255, 255). I find it’s a great way to increase the overall contrast while affording a bit more control than just a brightness and contrast adjustment layer.
I also grouped everything together, duplicated the group, and set the layer adjustment to multiply which helped fill in some of the missing spots. This step of creating bump maps in Photoshop can be as involved or as simple as you want to make it. This image was relatively simple but I’ve spent hours trying to refine some bump maps. In some cases, it’s simply impossible to create something that’s usable because the source image didn’t have enough contrast or was too low in resolution.
Final Thoughts & Tips
The steps I’ve outlined here are basic steps to create a bump map in Photoshop and shouldn’t be considered the best approach in all cases. Sometimes you need to drop in exposure layers to help “balance” the level of contrast, other times you realize you need to make adjustments to the source image in order to be able to product a workable bump map. As with all textures used for rendering, having high-resolution files that are seamless will greatly improve the speed and effectiveness of your workflow. I’ve seen diffuse maps that tile seamlessly but the overall result is still kind of wonky because the bump map’s contrast wasn’t even throughout! Don’t feel bad if you find yourself tweaking bump maps between test renders!

